Sync Connector
Vtiger has enabled sync with different applications like Google, Office365, Xero, Tally etc., But there are a lot more applications with which sync is not enabled yet.
Sync Connector opens the door to enable sync with applications that support REST based apis. With a XML schema, we can enable sync between Vtiger and any third party service.
Let’s see how we can do this.
Build your own
- Adding Sync Connector
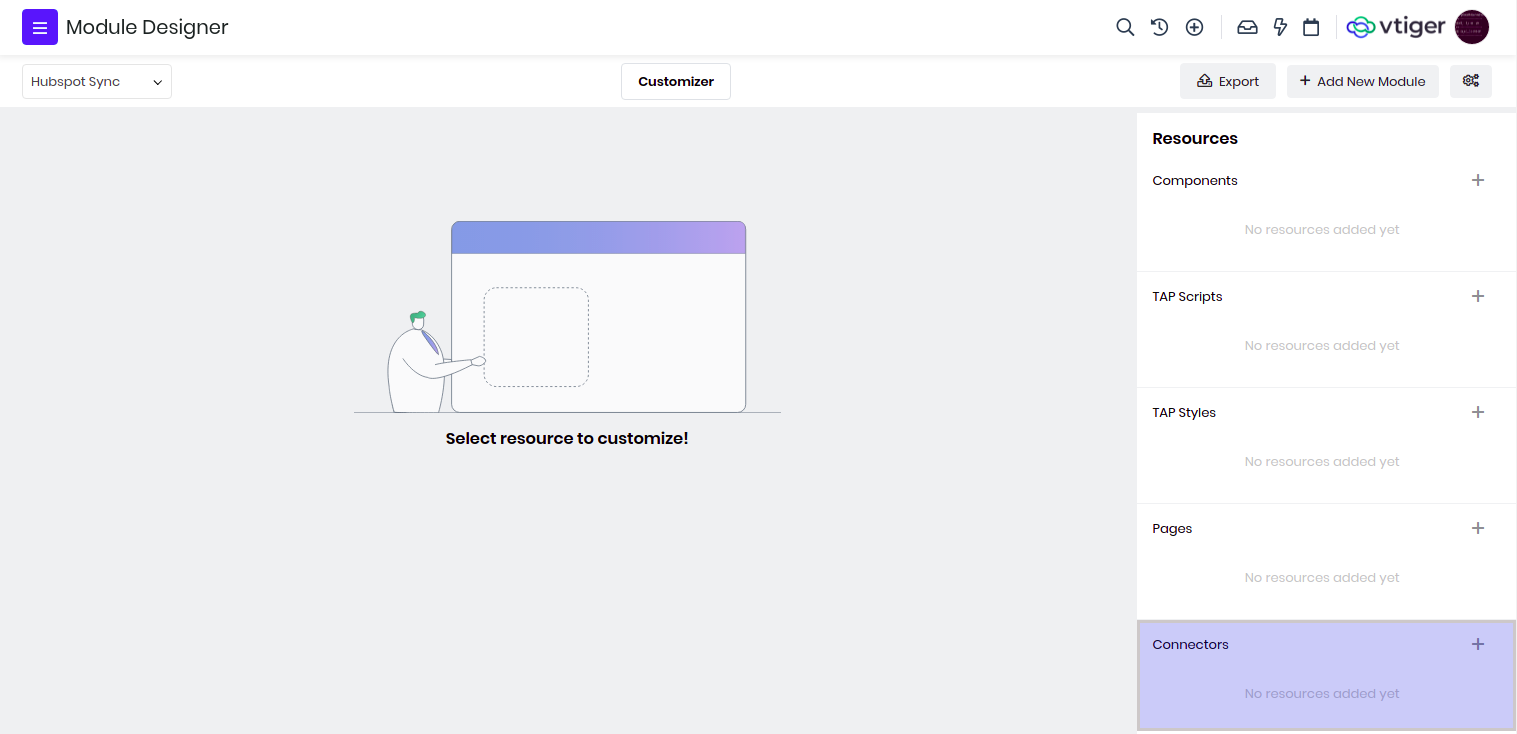
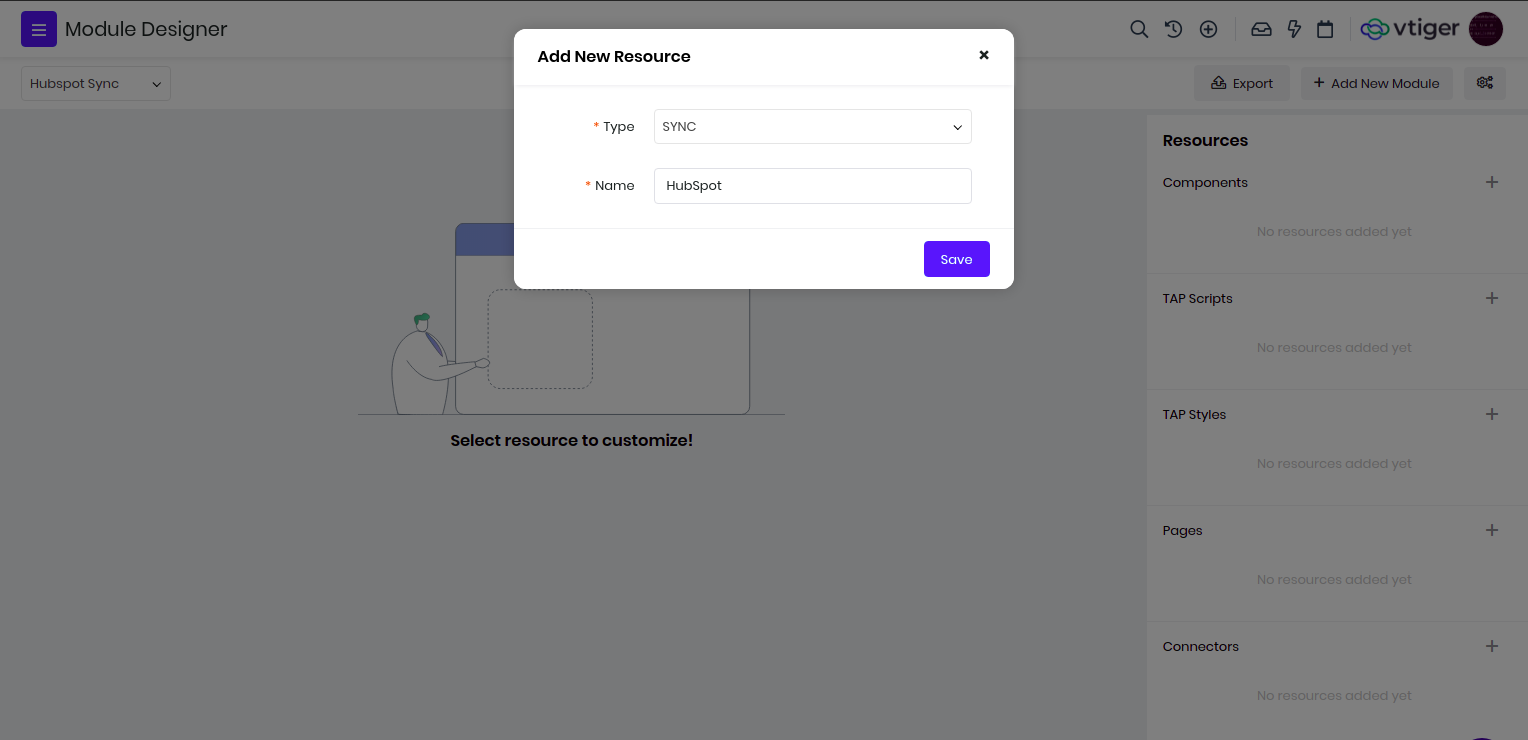
VTAP introduced a new Resource type in Module Designer called Connectors - see Adding Connector will prompt for Connector Type and Name where we need to fill details - see
- XML configuration
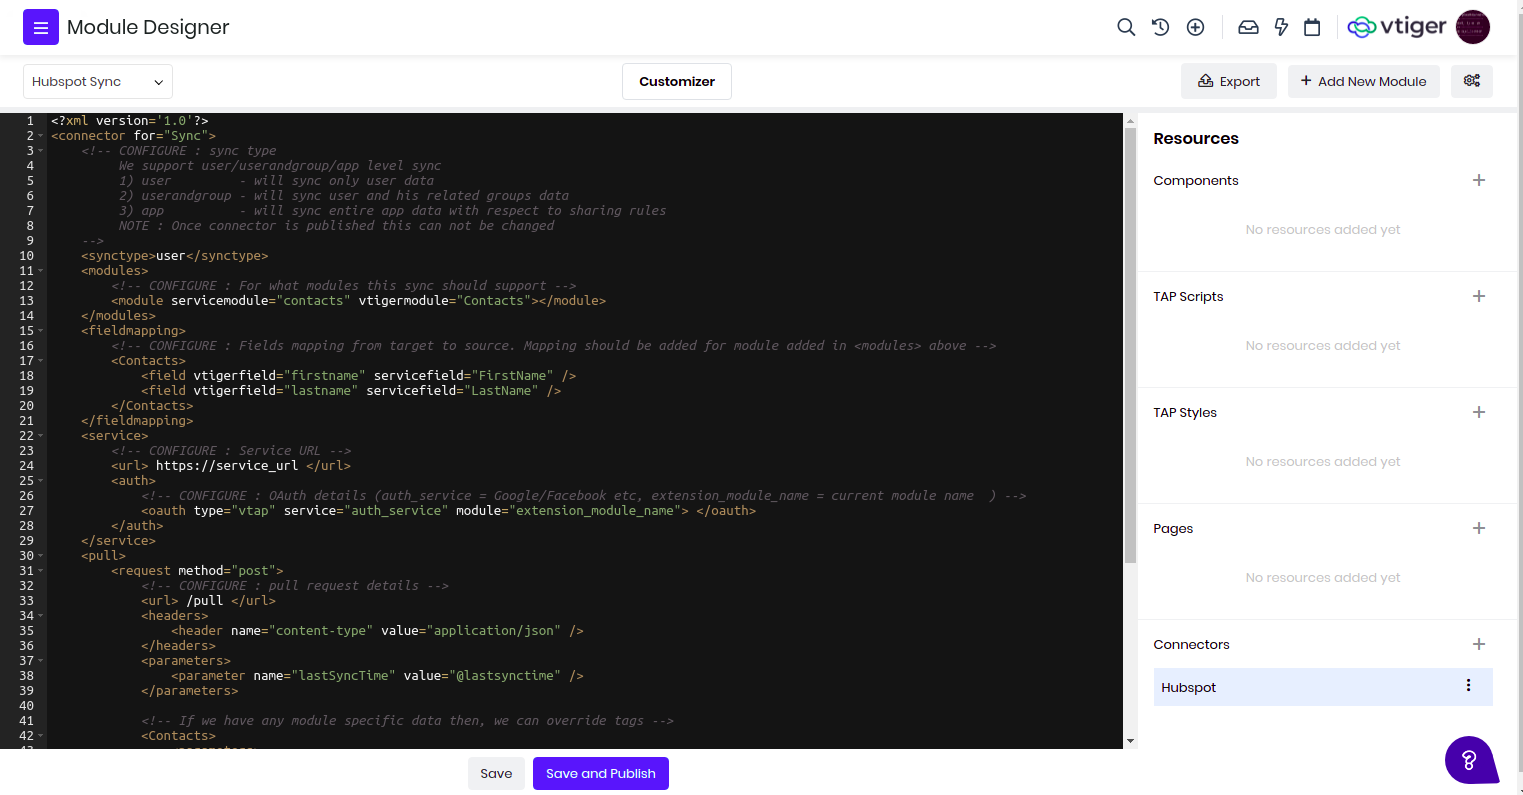
On adding the connector, a default XML template will be loaded which needs to be updated with the service details which we want to enable sync with - see. Let’s go through each XML component that needs our attention.
Sync type
We should set up the sync type of this connector. In Vtiger we support 3 types of sync types.
- user - will sync data that is directly assigned to user.
- userandgroup - will sync data that is directly assigned to user and his related groups.
- app - will sync entire app data with respect to sharing rules.
<synctype>user</synctype>
Note: Once a connector is published we can not set or change synctype.
Config
We can configure some fields in config to reuse in the parameters. Fields added in config will be shown in sync settings where the admin can set up the values. For example, we have username, password for service authentication. We can configure fields like this for admin to configure.
<config>
    <fields>
        <field name="username" type="text" />
        <field name="password" type="password" />
    </fields>
</config>
This is categorized into three types
Pre Sync Settings
Any field that is added with presync=true attribute will be considered as pre sync field and becomes a readonly field. You can make the field editable by removing presync=true.
<field name="apikey" required="true" type="text" presync="true" />
Sync will not work until all these fields are filled. Only pre sync settings will be shown in Sync settings page until the user saves the values.
By default Sync Records From field will be shown here. This field decides, from when records should be synced (1 month, 3 months, 6 months, Fetch all).
System Settings We have some system settings
- Debug Mode - checkbox to enable debug logs. Once this is enabled sync process will be logged into file
- Background Sync Frequency - Frequency of background cron for sync (3 hours, 6 hours etc)
Sync Settings All other fields in config->fields in the xml will be shown here. We support text, password, date, datetime, reference, integer, url, email, phone, picklist, boolean fields. We can set type attribute with one of these types to show specific field UI in the config section. Few types(reference, picklist) need some extra information. Below are example for those
<config>
    <fields>
        <field name="default_contact" type="reference" module="Contacts" />
        <field name="default_status" type="picklist">
            <options>
                <option>Open</option>
                <option>Close</option>
            </options>
        </field>
    </fields>
</config>
We can use these fields in the url attributes, auth or parameters in push or pull request like $config.$fields.username, $config.$fields.password Note : If any one of required field value is not set then sync will not start
Modules
We need to configure modules which we want to sync from Vtiger to Service and vice versa. This is how it will look like if we want to enable syncing Contacts, Accounts modules.
<modules>
    <module servicemodule="companies" vtigermodule="Accounts"></module>
    <module servicemodule="contacts" vtigermodule="Contacts" dependenton="Accounts"></module>
</modules>
Here:
| servicemodule | is the module name of third party service |
| vtigermodule | is the module name from Vtiger side |
| dependenton | is other modules on which this module is depending on. These can be comma separated values of any other modules that are configured to sync. If this is set then, until all dependent modules are completely synced this module will not start syncing |
Field Mapping
Mapping between Vtiger fields and Service fields will go here. While syncing data from Vtiger to Service or vice versa, we need to know what field of Vtiger should go to Service and the other way around. We need to provide field mapping for each module that we need to sync.
Module names that we use in this block will be Vtiger module names. This is how it will look for field mapping for Contacts, Accounts modules.
<fieldmapping>
    <Contacts>
      <field vtigerfield="firstname" servicefield="firstname" />
      <field vtigerfield="lastname" servicefield="lastname" />
      <field vtigerfield="email" servicefield="email" />
    </Contacts>
    <Accounts>
        <field vtigerfield="accountname" servicefield="name" />
        <field vtigerfield="website" servicefield="website" />
        <field vtigerfield="phone" servicefield="phone" />
    </Accounts>
</fieldmapping>
Line items mapping
<lineitems vtigerfield="_lineitems_" servicefield="line_items">
    <field vtigerfield="productid" servicefield="product_id" />
    <field vtigerfield="listprice" servicefield="item_price" />
    <field vtigerfield="quantity" servicefield="quantity" />
    <field vtigerfield="comment" servicefield="comments" />
</lineitems>
lineitems node is used when the module has items/line items which needs to be added in the record.
Below is the example of the default fieldmapping JSON.
[{"line_items":[{"product_id":null,"item_price":"1000.000000","quantity":"11.000","comments":"StartProduct 1"},{"product_id":null,"item_price":"1500.000000","quantity":"21.000","comments":"StartProduct 2"}],"clientversion":0,"id":""}]
To alter the values while sending the data from vtiger to service provider. Use a key serviceformat for each field which has to be modified before sending it to the service or provider.
Below is the example of the fielmapping for altering lastname and phone.
<fieldmapping>
    <Contacts>
      <field vtigerfield="firstname" servicefield="firstname" serviceformat="prefix:firstname-" />
      <field vtigerfield="lastname" servicefield="lastname" />
      <field vtigerfield="email" servicefield="email" />
    </Contacts>
    <Accounts>
        <field vtigerfield="accountname" servicefield="name" />
        <field vtigerfield="website" servicefield="website" />
        <field vtigerfield="phone" servicefield="phone" serviceformat="int" />
    </Accounts>
</fieldmapping>
For lineitems altering the values use the below
<lineitems vtigerfield="_lineitems_" servicefield="line_items">
            <field vtigerfield="productid" servicefield="product_id" />
            <field vtigerfield="listprice" servicefield="item_price" />
            <field vtigerfield="quantity" servicefield="quantity" serviceformat="int" />
            <field vtigerfield="comment" servicefield="comments" />
</lineitems>
Example JSON
Here you can see that the quantity is converted to int format.
[{"line_items":[{"product_id":null,"item_price":"1000.000000","quantity":11(int),"comments":"StartProduct 1"},{"product_id":null,"item_price":"1500.000000","quantity":21,"comments":"StartProduct 2"}],"clientversion":0,"id":""}]
NOTE: In the pull response below we will be configuring identifier for records object. In this object we will have records that are pulled from the service. Fields from these records should be configured in servicefield in field mapping.
We can use nested values too, for instance if firstname field is inside properties array of the each record then in the mapping we can keep properties.firstname
<field vtigerfield="firstname" servicefield="properties.firstname" />
We can go to any number of nested levels.
Service
We need to provide service details with which we are trying to sync the data. Here, we will need to set up the service url and the auth details.
<service>
    <url> service_url </url>
    <auth>
        <oauth type="vtap" service="service" module="ext_module_name"></oauth>
    </auth>
</service>
NOTE : If there are any dynamic parameters to be used in the URL we should use url attributes. Examples:-
<url SYNCMODULE="@syncmodule"> service_url/$SYNCMODULE </url>
<url TOKEN="$config.$fields.token"> service_url/$TOKEN </url>
Auth can be any of these types
- basic - if service authentication is username, password based then
<basic username="" password="" />
- apitoken - some services expect to send some api token for those
<apikey token="" />
- oauth - VTAP also opened the door to do oauth of any service. If we configure the auth this way then while doing the sync it will automatically show auth popup
<oauth type="vtap" service="service" module="ext_module_name"></oauth/>
- service = service name with which oauth should perform
- ext_module_name = module name of current connector
Pull This is the one that helps us to get data from the Service to CRM. Like any other request, we will have
Overview of pull request
<pull>
   <request>
      <url>endpoint</url>
      <headers>
         <header name="" value="" />
      </headers>
      <parameters>

      </parameters>
   </request>

   <response>
      <error use="message" />
      <records use="results" />
      <recordid use="id" />
      <recordmodifiedtime use="updatedAt" />
      <recorddeleted use="archived" />
   </response>
</pull>
Request This will have pull endpoint, headers, and parameters. If the service what we are trying to sync with, has module specific endpoint, headers or parameters then we can overwrite the request for that module using that module tag inside the main request
<request method="post" >
    <url SYNCMODULE="@syncmodule">/$SYNCMODULE/search</url>
    <headers>
        <header name="content-type" value="application/json" />
    </headers>

    <Contacts>
        <parameters raw-post-data="true">
            <parameter name="filterGroups">
            <values>
                <parameter name="filters">
                    <values>
                        <parameter name="value" value="@lastsynctime:M" />
                        <parameter name="propertyName" value="lastmodifieddate" />
                        <parameter name="operator" value="GTE" />
                    </values>
                </parameter>
            </values>
            </parameter>
        </parameters>
    </Contacts>

    <Accounts>
        <parameters raw-post-data="true">
            <parameter name="filterGroups">
                <values>
                    <parameter name="filters">
                        <values>
                            <parameter name="value" value="@lastsynctime:M" />
                            <parameter name="propertyName" value="hs_lastmodifieddate" />
                            <parameter name="operator" value="GTE" />
                        </values>
                    </parameter>
                </values>
            </parameter>
        </parameters>
    </Accounts>
</request>
If parameters are common for all modules then we can avoid module specific tags in the request and keep parameters in the request tag directly.
Parameters
Different services will expect parameters in different formats with respect to nested levels. Let see some examples of parameters set to understand this better
- If you have plain key value pair then
<parameters>
    <parameter name="key1" value="value1" />
    <parameter name="key2" value="value2" />
</parameters>
Output would be {"key1" : "value1", "key2" : "value2"}
- Sometimes we may want to send an array of objects, that’s where we can use values tag.
<parameters>
    <parameter name="filtergroup">
        <values>
            <parameter name="key1" value="value1" />
            <parameter name="key2" value="value2" />
        </values>
    </parameter>
</parameters>
Output would be {"filtergroup" : [{"key1" : "value1", "key2" : "value2"}]}
values can be used if we have any sub parameters (i.e., nested). If the values tag has a name attribute then it will be considered as an associative array, else a non-associative array.
For example, if values in the above xml has name attribute name="filter" then output would be {"filtergroup" : {"filter" : {"key1" : "value1", "key2" : "value2"}}}
We can go any number of nested levels with values. Like parameter -> values -> parameter. Then values can again have parameter -> values -> parameter and so on.
- If we just want to send array of values then inside values tag we can use value.
<parameters>
    <parameter name="fields">
        <values>
            <value>firstname</value>
            <value>lastname</value>
        </values>
    </parameter>
<parameters>
Output would be {"fields" : ["firstname", "lastname"]}
Pre-defined rules in parameters
- values with name will be an associative array, else a non-associative array
- values with value inside will be taken as array of values
- values with parameter inside will be as array of object
Dynamic values
In the parameters we use dynamic values, which will be calculated and used while hitting pull request
- @lastsynctoken - In general sync works based on the last sync time. We need to send filters to the service to give us data that is changed after last sync time. For this, we enabled this dynamic parameter. Wherever we use this parameter, while hitting pull request to service it will take the last sync time.
- @lastsynctoken:M - lastsynctoken is a unix timestamp. If we want to send milli seconds in the the lastsynctoken then we can use this parameter.
- @lastsynctoken:T - some services expect value in T format. T is just separator of Date and Time part in date time value.
- $config.$fields.fieldname - If config is enabled in xml when we can use the config fields. We can use these in request headers also.
Response
This will have identifiers for some required data in the response from the service.
<response format="json">
    <code use="200" />
    <error use="message" />

    <records use="results" />
    <recordid use="id" />
    <recordmodifiedtime use="updatedAt" />
    <recorddeleted use="archived" />
</response>
- code = Expected response code. We can use comma separated values without space.
- error = What value will have error message if request is failed
- records = What object in the response holds the records. If entire response is records object then we can set use = @response
In the records object each record will have few required details for which we need to configure the identifiers.
- recordid = what is the identifier for record id
- recordmodifiedtime = What is the identifier for record last updated time. This is must in the response, because we are using this to store the last sync token.
If response will not have this value then we can use @currenttime which will use current time
- recorddeleted = If there is any identifier to know the record is deleted or archived
Append fields Here appendfields node is using to re-rwite the record with new values or updated values.
<appendfields>
    <request>
        <url URL="$config.$fields.baseUrl" ID="@id"> $URL/v1/deals/$ID/products </url>
        <response>
            <line_items use="data"></line_items>
        </response>
    </request>
</appendfields>
Note : If any one of these things is missing then sync may misbehave!
Push This helps with configuring details for pushing data from Vtiger to Service. Like pull we will have
Request This will also have endpoint, headers, and parameters. Like pull, If the service what we are trying to sync with, has module specific endpoint, headers or parameters then we can overwrite the request for that module using that module tag inside the main request
This is how push request is going to look like
<request method="post" >
    <url SYNCMODULE="@syncmodule">/$SYNCMODULE/batch</url>

    <headers>
        <header name="content-type" value="application/json" />
    </headers>

    <parameters raw-post-data="true">
        <parameter name="inputs" value="@records"> </parameter>
    </parameters>
</request>
Modes While pushing we will have to create, update or delete on the service side. Some services might have different endpoints, parameters for these actions. In that case we can add those modes with urls which will be appended to the push endpoint. We can overwrite parameters also in these modes
In these modes we can have following tags.
- url - endpoint of that mode
- batchlimit - if the service is only accepting 10 records at a time we can put 10. If this is set to 1, we assume the service only does single record operations i.e., we send one record at a time and expect only one record in the response.
- record - record that needs to push to the service will be generated with respect to the field mapping configuration. If any new property needs to be added or overwritten then we use the property tag (please refer create/update in below code). Sometimes we want to overwrite entire record object, then we can add a overwrite attribute to record tag (please refer delete in below code)
- parameters - If mode has any parameters then we will consider those else we will take from request node.
Here is the push request object with modes.
<push>
    <request method="post" >
    <url SYNCMODULE="@syncmodule">/$SYNCMODULE/batch</url>

    <headers>
    <header name="content-type" value="application/json" />
    </headers>

    <parameters raw-post-data="true">
    <parameter name="inputs" value="@records"> </parameter>
    </parameters>

    <create>
    <url>/create</url>
    <batchlimit>10</batchlimit>
    <record>
        <property name="properties" value="@record:properties" />
    </record>
    </create>

    <update>
    <url>/update</url>
    <batchlimit>10</batchlimit>
    <record>
        <property name="id" value="@record:id" />
        <property name="properties" value="@record" />
    </record>
    </update>

    <delete>
    <url>/archive</url>
    <batchlimit>10</batchlimit>
    <record overwrite="true">
        <property name="id" value="@record:id" />
    </record>
    </delete>

    </request>
</push>
Dynamic values
- @records - In parameters we might want to send all records where we can use this.
- While generating record objects for any action (create, update, delete) we might need to set record properties
- @record - entire record array
- @record:id - set records id where we can use this
- @record:fieldname - If we want to set to any property from a record
- $config.$fields.fieldname - if config is enabled in xml when we can use the config fields NOTE: Whatever nested parameters we configured in field mapping. Record will be generated that way first, then in create, update, delete tags we can access that object using @record: as identifier.
Response
We need to configure identifiers for few mandatory things
<response format="json">
    <createdcode use="200" />
    <updatedcode use="200" />
    <deleteddcode use="200" />

    <error use="message" />
    <createdrecords use="results" />

    <recordid use="id" />
    <recordmodifiedtime use="updatedAt" />
</response>
- createdcode = Expected response code for push create. We can use comma separated values with out spaces.
- updatedcode = Expected response code for push update. We can use comma separated values with out spaces.
- deletedcode = Expected response code for push delete. We can use comma separated values with out spaces.
- error = What is the key for error message in the response
- createdrecords = After records are created in service, it will send response which will have records with ids, we need these ids for mapping in CRM. If entire response is records object then we can set use = @response
- recordid = How to identify record id from the response
- recordmodifiedtime = How to identify record modified time
Value format
While using parameters in the pull/push request, sometimes we might want to format the values. For instance, if we have parameter like this which is a timestamp
<parameter name="time" value="@lastsynctoken" />
and, we want to convert this to specific date format then we can do
<parameter name="time" value="@lastsynctoken" format="dateformat:Y-m-d H:i:s" />
(or) short form
<parameter name="time" value="@lastsynctoken|dateformat:Y-m-d H:i:s" />
Likewise we support the following formats
- int - value|int - To convert the value to an integer
- float - value|float - To convert the value to decimal
- string - value|string - To convert the value to string
- array - value|aray - To wrap the string into an array
- json - value|json - To convert any array to json
- trim - value|trim - To trim any spaces at first and end
- timestamp - value|timestamp - To convert date to timestamp
- wrap - value|wrap:’ - To wrap value with any character
- prefix - value|prefix:+ - To prefix value with any character
- suffix - value|suffix:+ - To suffix value with any character
- join - value|join:, - To join array with given character
- separate - value|separate:, - To separate string with given character
- array_values - value|array_values - To take values of array
We support multiple formats as well for same value For example, if you want to separate value by comma (,) and convert that to json then
<parameter name="field" value="value|separate:,|json" />
Each format should be separated by | symbol
This formatting is supported in URL Attributes, Headers, Parameters, Push record properties
Notes
- Debug logs will show time in UTC format.
- While writing xml for pull, always order the records by last modified time in ascending order. Services may give the data in random order, but we depend on fetched records last modified time to fetch the next set of records
- By default sync records limits are fixed
- User action - 100 per sync (Pull - 100, Push - 100)
- CLI (cron) - 500 per sync (Pull - 100, Push - 100)
- But, if we want to change this limit for any sync connector then we can add these global variables
- User action - $MODULENAME_$CONNECTORNAME_SYNC_RECORDS_LIMIT
- CLI (cron) - $MODULENAME_$CONNECTORNAME_SYNC_RECORDS_LIMIT_CLI
- Module sync will be skipped if any dependent module is not completely synced yet
Security
Vtiger supports 2 algorithms used for encryption and decrytpion.
- AES - Advanced Encryption Standard(AES) is a symmetric encryption algorithm. Uses key - 32 bits and iv is not mandatory in this algorithm.
- 3EDS - Triple Data Encryption Standard. Uses Key- 24bits and iv - 8bits. iv is mandatory for using this algorithm.
key and iv are the variables which are enabled in sync connector which helps in encyrption and decryption. Add the key and iv input in config node.
Add the algorithm by deafult while building the sync connector as:
<config>
    <fields>
        <field name="key" label="KEY" type="text" required="true"/>
        <field name="Algo" label="Algo" type="text" value="AES"  />

    </fields>
</config>
To decrypt the response data from the service.
Add the following in the response of pull request.
<algo use="AES"></algo>
<decrypt use ="true" />
<iv use="$config.$fields.iv"/>
<key use="$config.$fields.key"/>
This will decypt the data from the service (which is in encrypted format using the same algorithm).
Here algo node is used to add the algorithm ie, AES or 3DES.
decrypt,key,iv are the nodes.
During the push operation.
We will encrypt the data before passing to the service or provider.
Use the below format inside push node.
<push>
    <request method="post" encrypt="true">
            <headers>  </headers>
            <parameters raw-post-data="true"  key="$config.$fields.key" iv="$config.$fields.iv"  algo="AES">
                <parameter name="_raw_data" value="@records"><parameter>
            </parameters>
    </request>
 </push>
This will encyrpt the data using the algorithm provided.