VTAP
Vtiger Application Platform (a.k.a VTAP) is a low-code and no-code platform that helps you extend CRM capabilities on Cloud with suite of simple and powerful tools.
Don't have an account yet? Signup now
These range of tools enables you to customize simple UI flow to develop complex business flow such as integration with other apps or data from third-party application easily.
To get started, you'll need a solid understanding of HTML, CSS, and JavaScript, along with working knowledge of REST APIs for integration. Familiarity with jQuery, VueJS and Bootstrap Vue will further enhance your ability to create more better and deeper customized solutions.
Follow this Quickstart guide to know the ways of using the tools for various customization purpose.
To discover each of the tool capability in more detail you can follow the links below:
- Module Designer
- Process Designer
- Api Designer
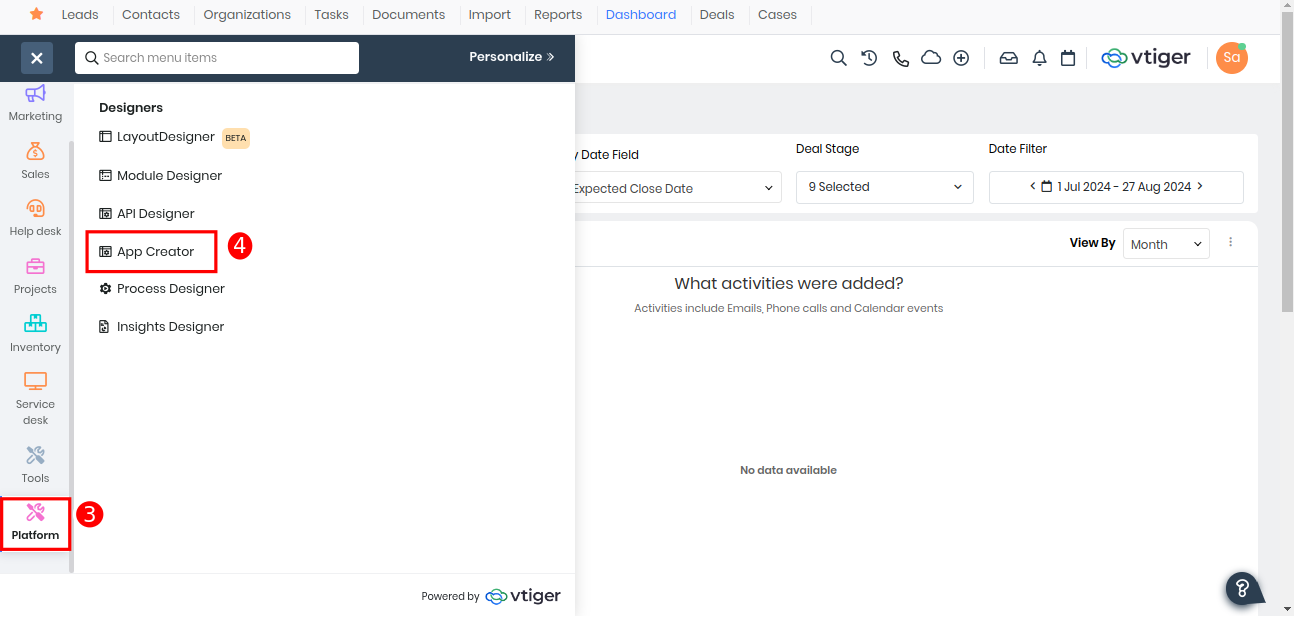
- App Creator
- Insights Designer
- Layouts Designer
- Server Scripts
- Add-ons Publisher
- REST API
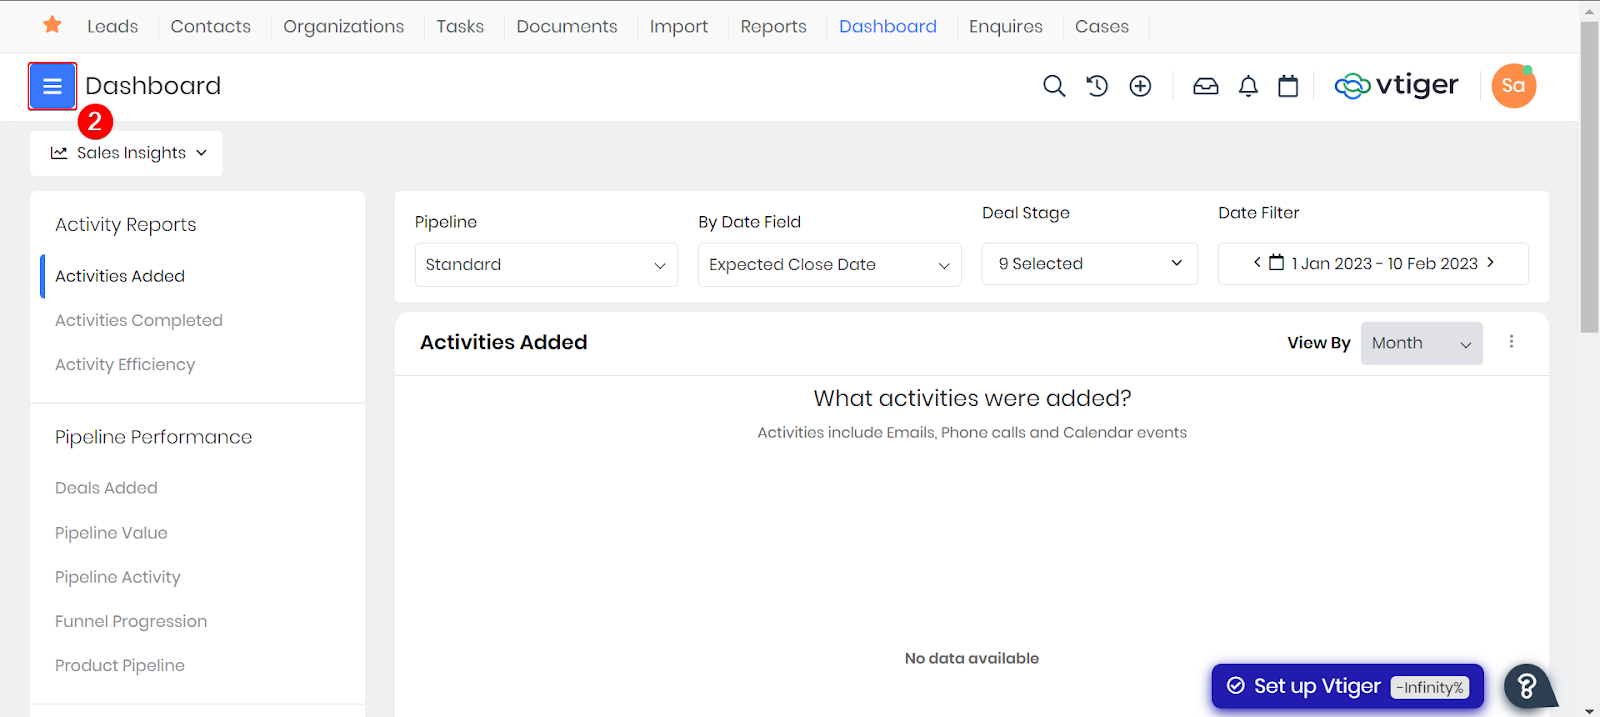
Quick Start
In this quick-start guide you will be introduced to the capabilities of VTAP to develop a solution for an imaginary industry.
Consider MOVENT Inc. to be an entertainment agency who are offering service to book Movie shows for their customers (or clients). They are in need of CRM implementation to streamline the process of tracking requests and enhancing customer engagement.
Customers reach MOVENT Inc. through Email or Phone to know about the Movie or confirm the Show timing they would like to get booking for.
Agents are required to provide the information about the Movie on Call. Agents use external services to book the show, and they need to send an email confirmation to the Customer.
CRM adoption is expected:
- To delight the experience of Agents by making the Movie information available within CRM.
- Agents should have the ability to track the show booking against the Customer and Movie.
- To automate email confirmation to Customer when show is booked.
Solution Design
- Customers can be tracked using CRM Contacts (
standard module) - CRM should have information about Movies. (
custom module) - Movie Show when booked can be tracked using CRM Events (
standard module) linked to CRM Contacts and Movie. - Email confirmation to Customer should be sent after Movie Show is booked.
Solution Implementation
Let us now see how Platform tool enables you to build custom solution using capabilities within CRM.
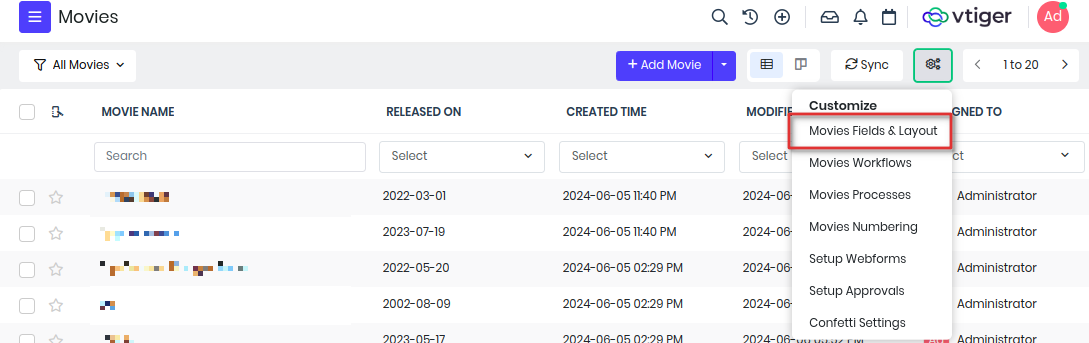
1. Module Designer
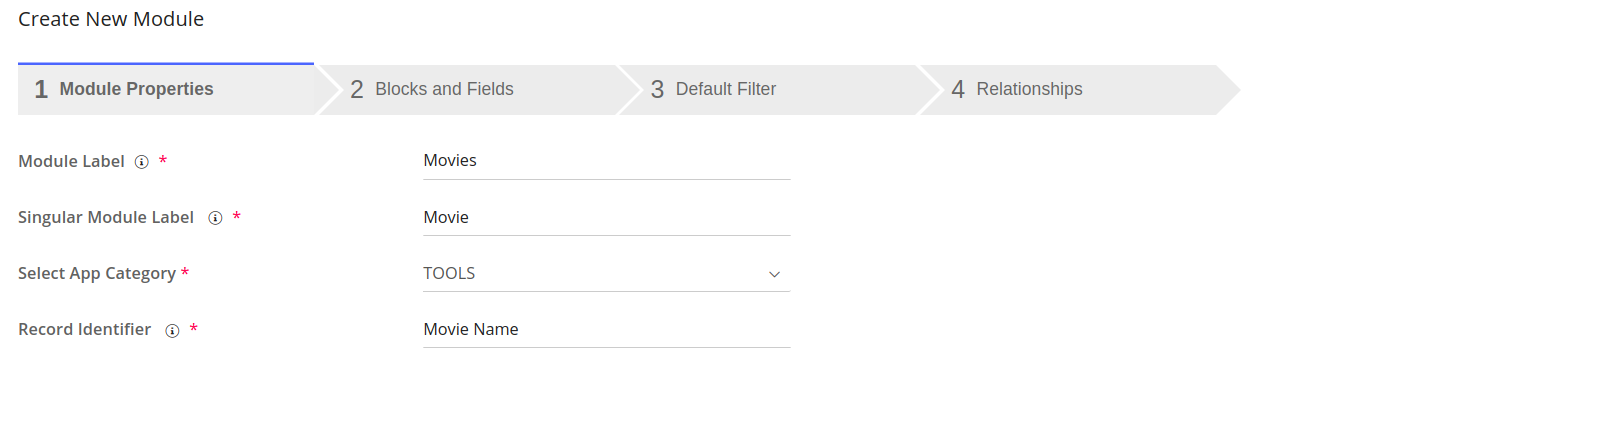
Navigate to Menu > Platform > Module Designer, then click Add New Module, and choose Entity Module.
Now you can create Movies custom entity module. You have four more steps to complete the creation of Movies entity module.
(i) Module Properties :
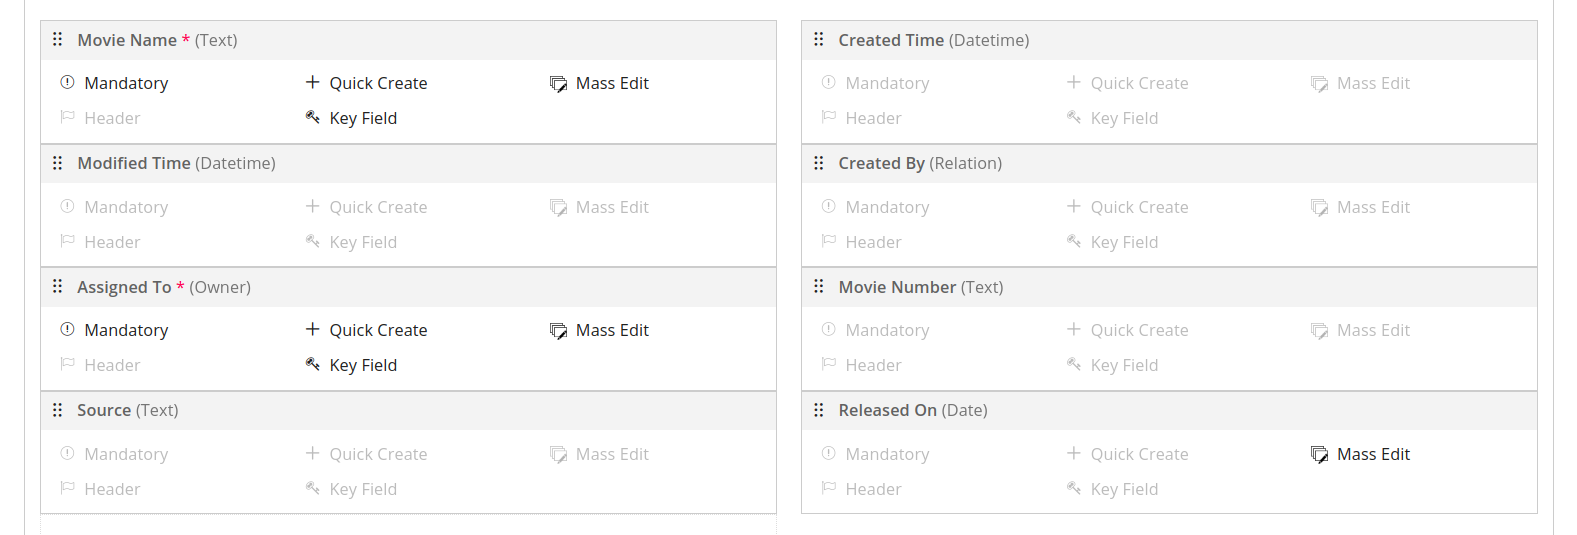
(ii) Blocks And Fields :
(iii) Default Filter : This step allows you to select the records view in the custom module. Select desired columns you would like to see in the default list view of the module. Click Next.
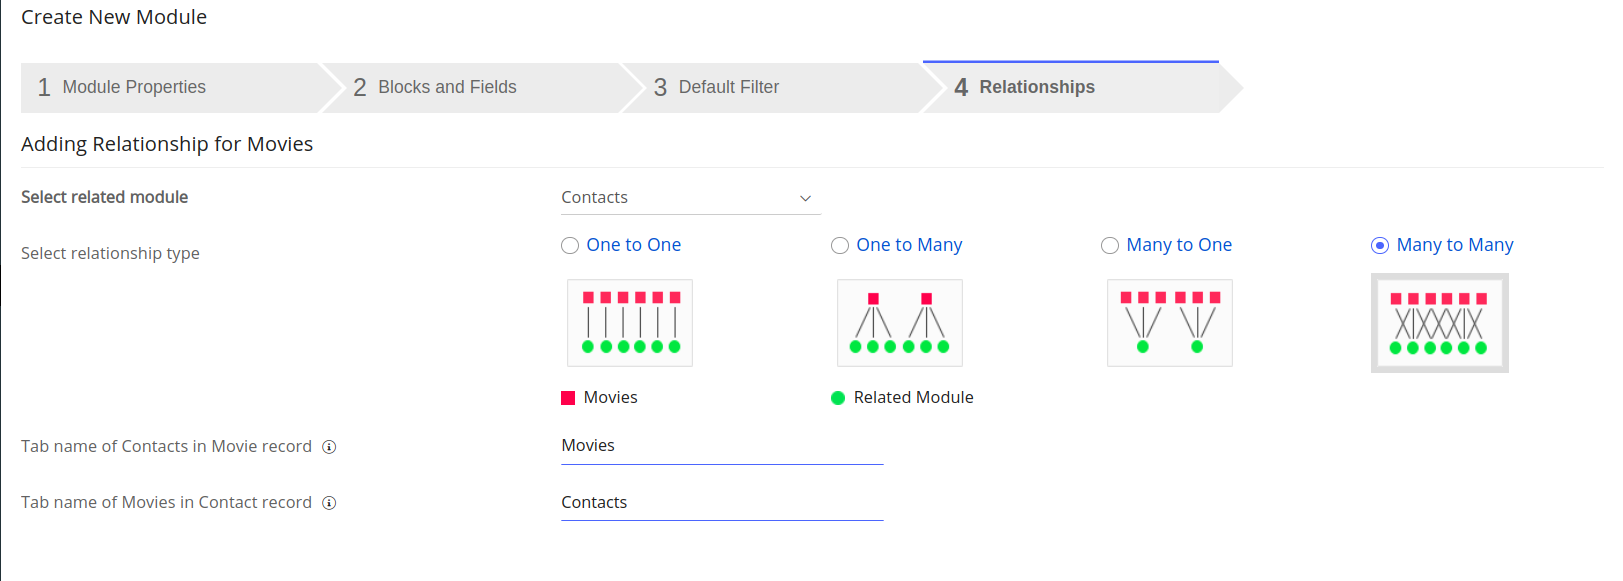
(iv) Relationships :
For more detailed information on creating a custom module, refer to this guide
Solution Implementation
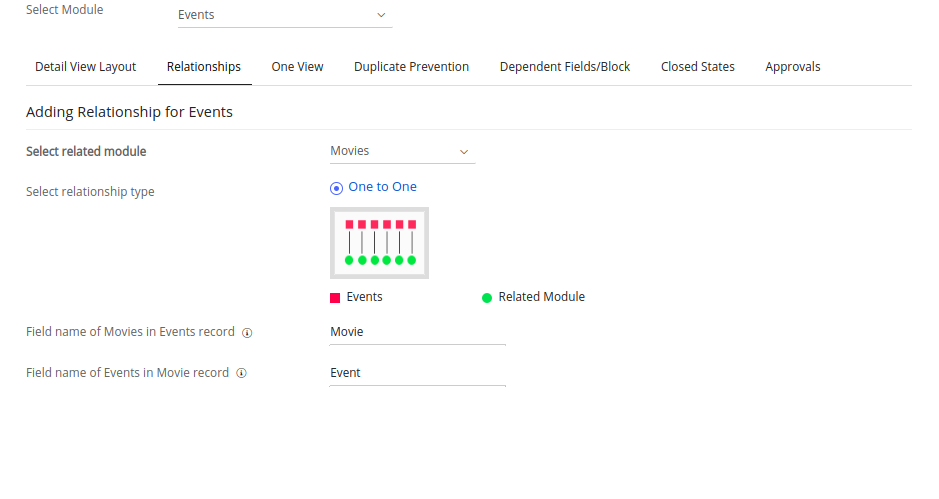
2. Module Configuration
Events standard module needs to be configured with newly created custom module.
This can be achieved through Settings > Module Layouts & Designer > Select Module Events
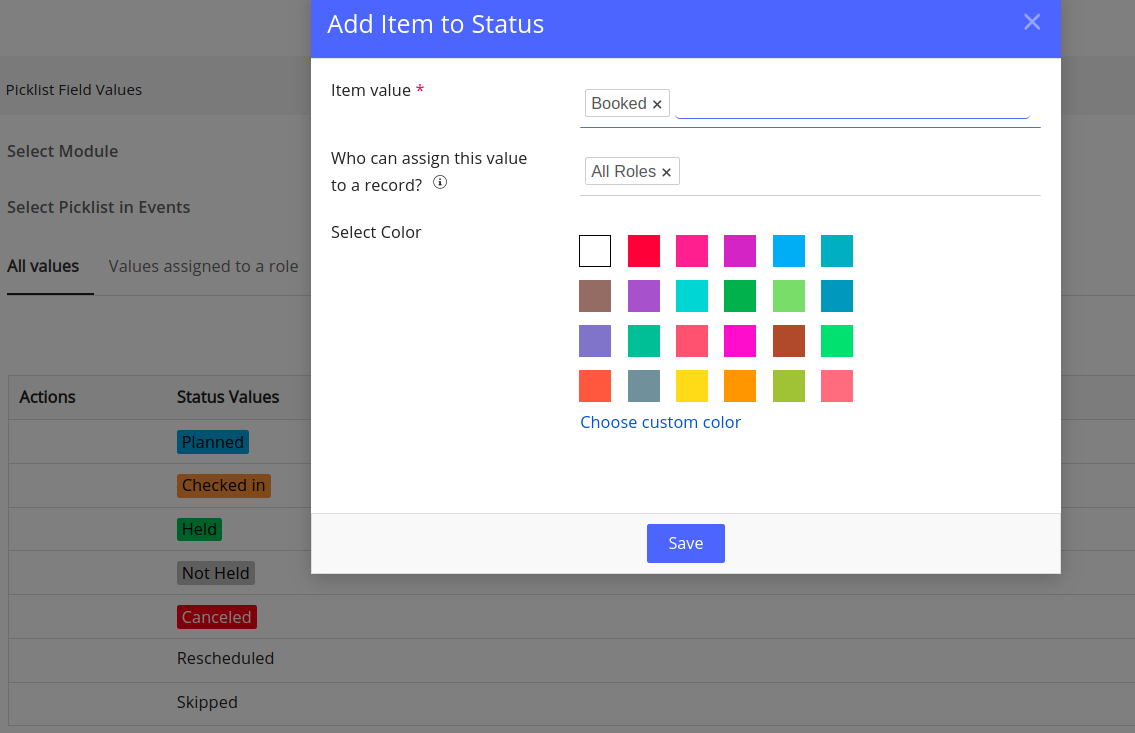
Using Settings > Picklist Field Values > Select Module Events
Add (Movie Show) to Activity Type field.
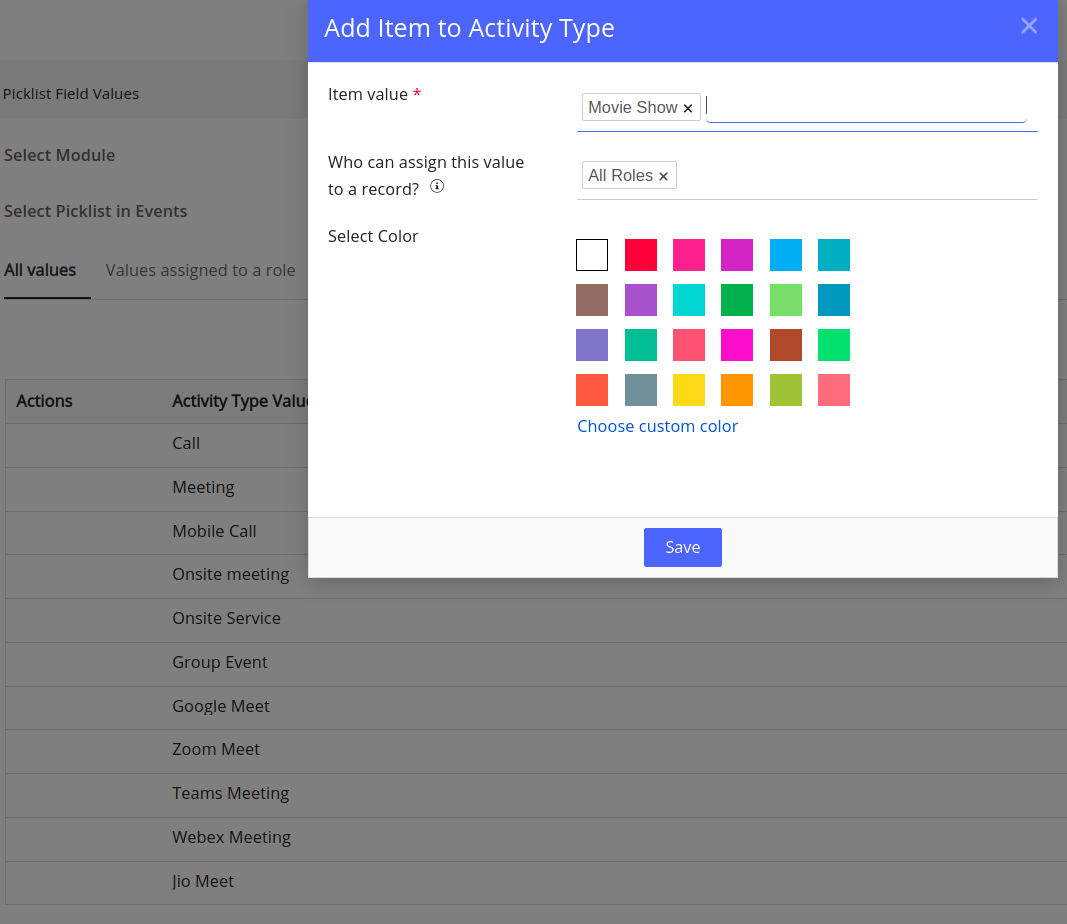
Add (Booked) to Status field.
Solution Implementation
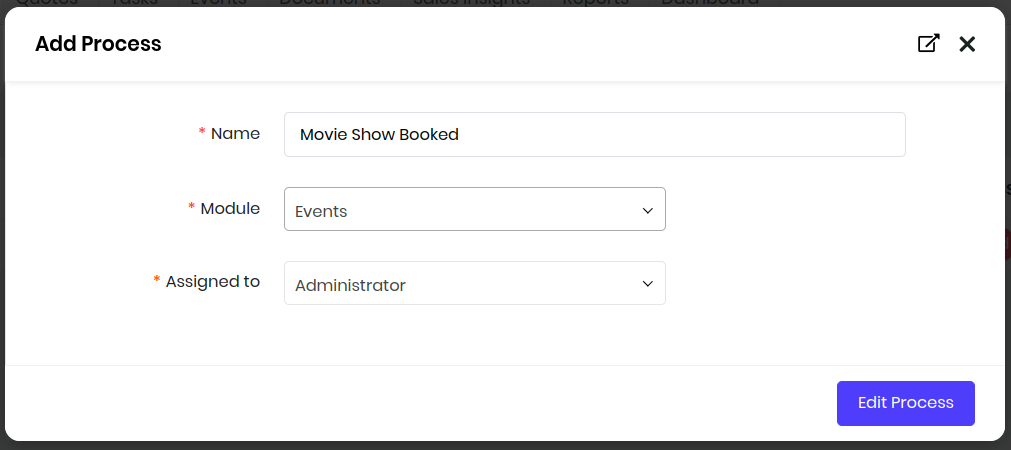
3. Process Designer
Let us now setup Email Notification on Movie Show Booked status using Platform > Process Designer
(i) Create new process flow on Events module.
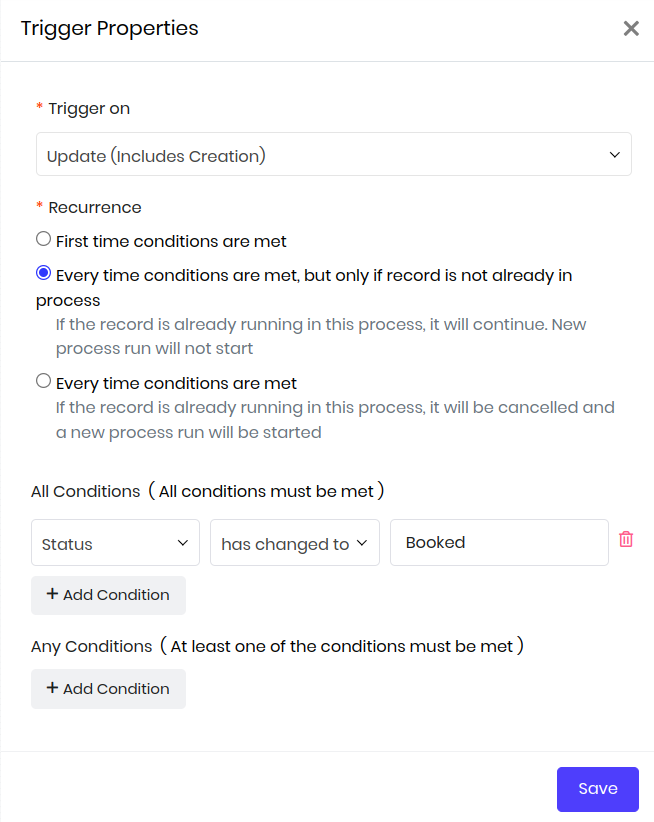
(ii) Configure Trigger Properties and Save.
(iii) Add Email Action
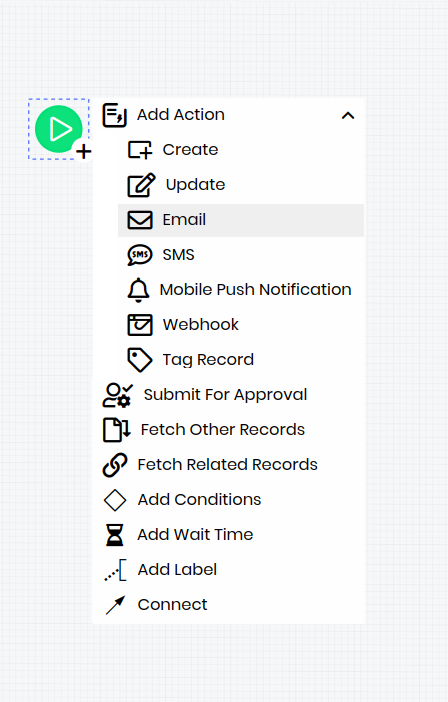
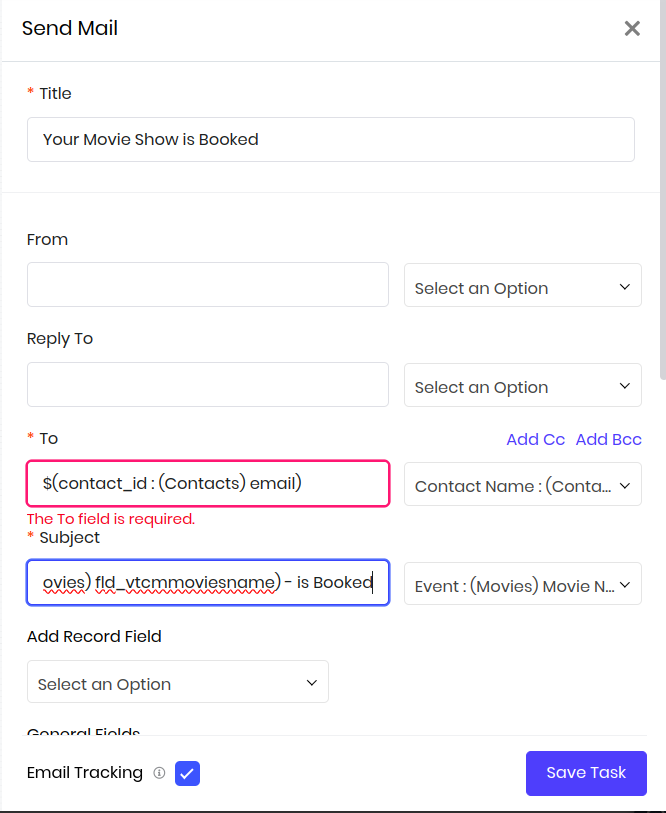
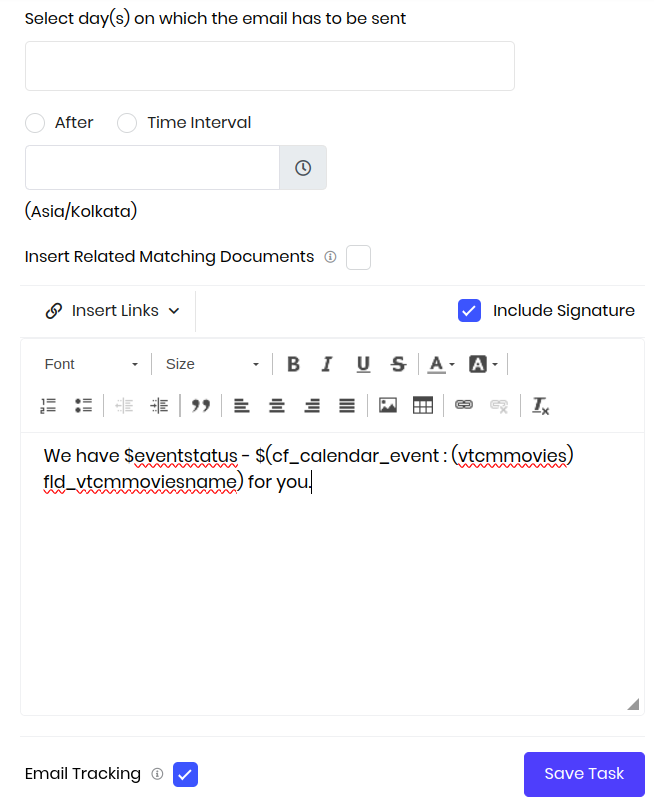
(iv) Configure Email Task and Save.
- To: $(contact_id : (Contacts) email)
- Subject: $(cf_calendar_event : (vtcmmovies) fld_vtcmmoviesname) - is Booked
- Body: We have $eventstatus - $(cf_calendar_event : (vtcmmovies) fld_vtcmmoviesname) for you.
(v) Finally Save and Publish the Process.

Solution Validation
- Create Contact with valid email address.
- Create Movie with Name.
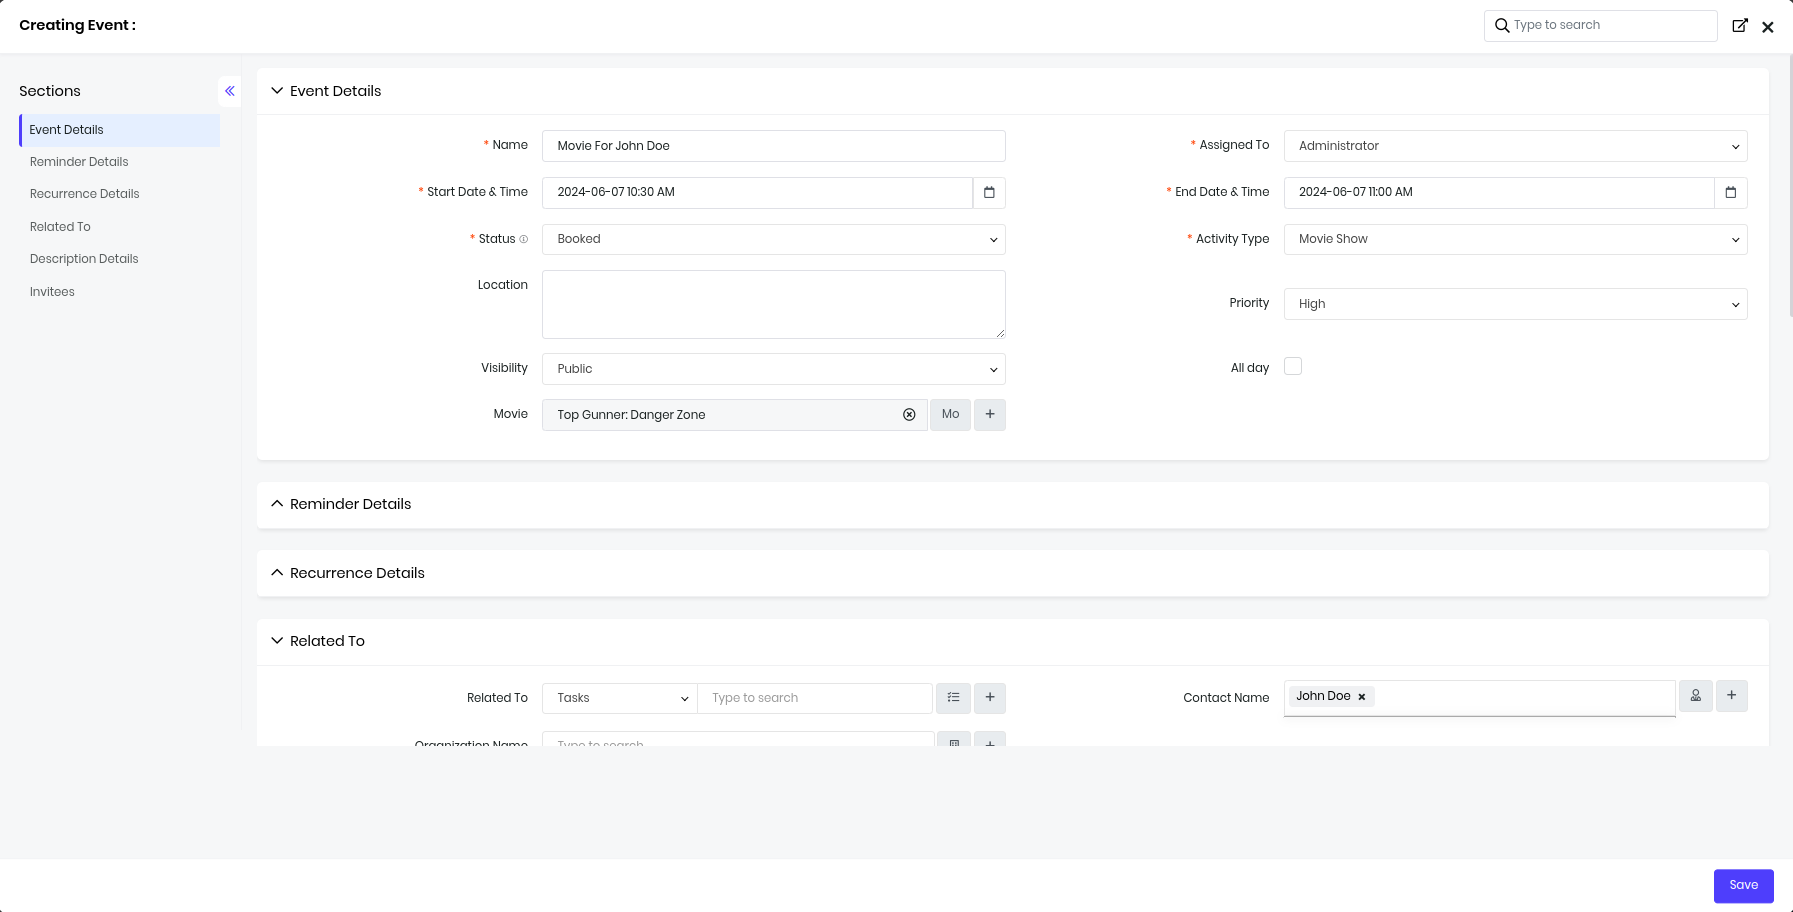
- Create Event in Full Form
- Event Name: Movie for "Customer Name"
- (Start Date & Time = Show start time)
- (End Date & Time = Show end time)
- (Activity Type = Movie Show)
- (Status = Booked)
- Select Movie
- Select Contact
- Save the Event (accept do you want to send email to all invitees)
CRM would trigger Email Notification to Contact.
Hurrah! we completed implementation of CRM for MOVENT Inc.
Enhancements
We are using themoviedb.org service to demonstrate the API integration capabilities of VTAP.
You will need to Join TMDB to obtain API Key or Token. TMDB API documentation has information about usage of APIs.
Let us now learn how to use TMDB APIs to enhance functionality within CRM.
Data Synchronization
TMDB provides GET /discover API to fetch details of movies by popularity.
We shall use it to demonstrate how to build data connector which can bring data into CRM.
GET /discover Usage
curl --request GET \
     --url 'https://api.themoviedb.org/3/discover/movie?include_adult=false&sort_by=popularity.desc' \
     --header 'Authorization: Bearer api_read_only_token' \
     --header 'accept: application/json'
{
  "page": 1,
  "results": [
    {
      "adult": boolean,
      "backdrop_path": string,
      "genre_ids": array,
      "id": number,
      "original_language": string,
      "original_title": string,
      "overview": string,
      "popularity": decimal,
      "poster_path": string,
      "release_date": date,
      "title": string,
      "video": boolean,
      "vote_average": float,
      "vote_count": number
    },
}
Build Connector
To build data sync connector for Movies module in CRM.
Navigate to Main Menu > Platform > Module Designer
- Choose Movies
- Click on + Connector
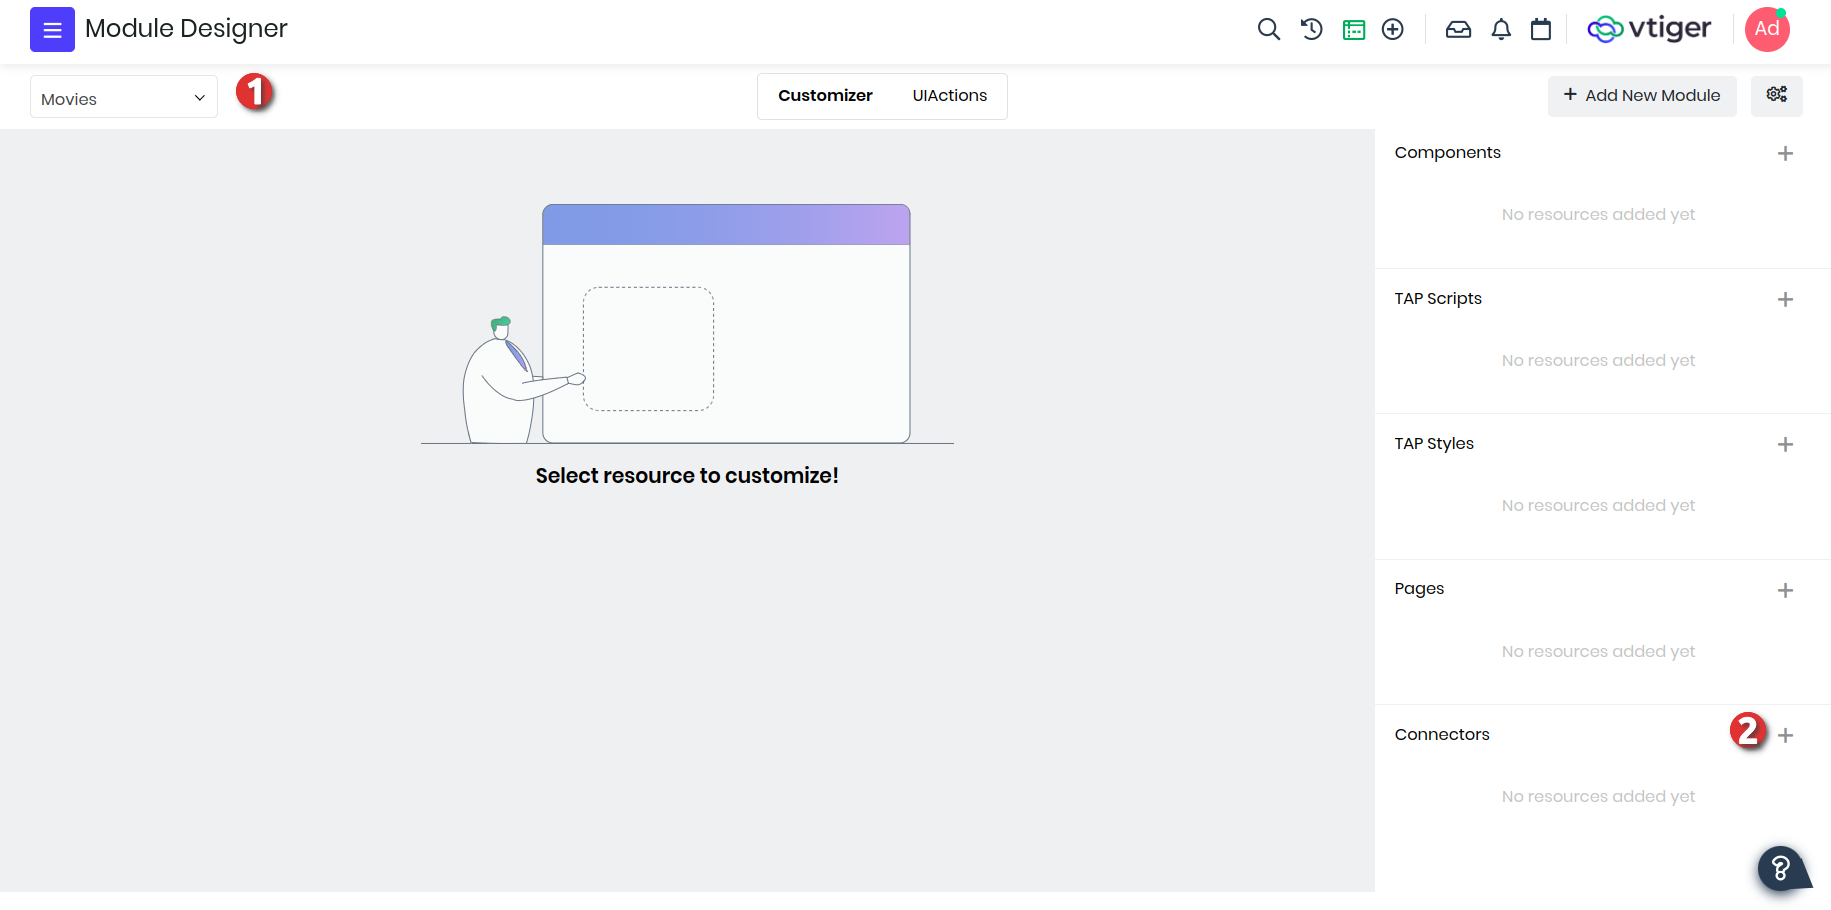
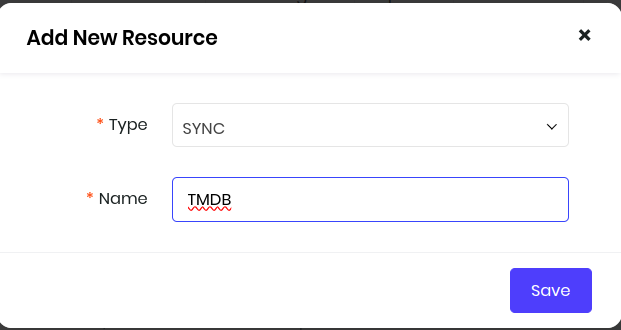
Fill details of connector. Click Save
Here is the connector VADL code which enables you to get user-configuration, make-request and map-response to CRM records easily.
<?xml version='1.0'?>
<connector for="Sync">
    <!-- configuration field to accept details during connector setup. -->
    <config>
        <fields>
            <field name="tmdb_api_token" type="text" required="true" />
        </fields>
    </config>
    <!-- synchronization strategy global to CRM -->
    <synctype>app</synctype>

    <!-- Definition to pull data from external service. -->
    <service>
        <url>https://api.themoviedb.org</url>
    </service>
    <pull>
        <request method="get">
            <url>/3/discover/movie</url>
            <headers>
                <header name="content-type" value="application/json" />
                <header name="Authorization" value="$config.$fields.tmdb_api_token" />
            </headers>
            <parameters>
                <parameter name="include_adult" value="false" />
                <parameter name="sort_by" value="popularity.desc" />
            </parameters>
        </request>
        <response format="xml|json">
            <code use="200" />  <!-- expected response code -->
            <error use="errorIdentifier" />
            <records use="results" />
            <recordid use="id" />
        </response>
    </pull>

    <!-- Map external data to CRM data -->
    <modules>
        <!--
            servicemodule: short-identifier of target service
            vtigermodule : target module of CRM
        -->
        <module servicemodule="TMDB" vtigermodule="vtcmmovies"></module>
    </modules>
    <fieldmapping>
        <vtcmmovies>
            <!-- map each row of (pull > records) to module record.  -->
            <field vtigerfield="fld_vtcmmoviesname" servicefield="original_title" />
            <field vtigerfield="fld_releasedon" servicefield="release_date" />
        </vtcmmovies>
    </fieldmapping>
</connector>
You can copy-and-paste code in IDE. Save and Publish.
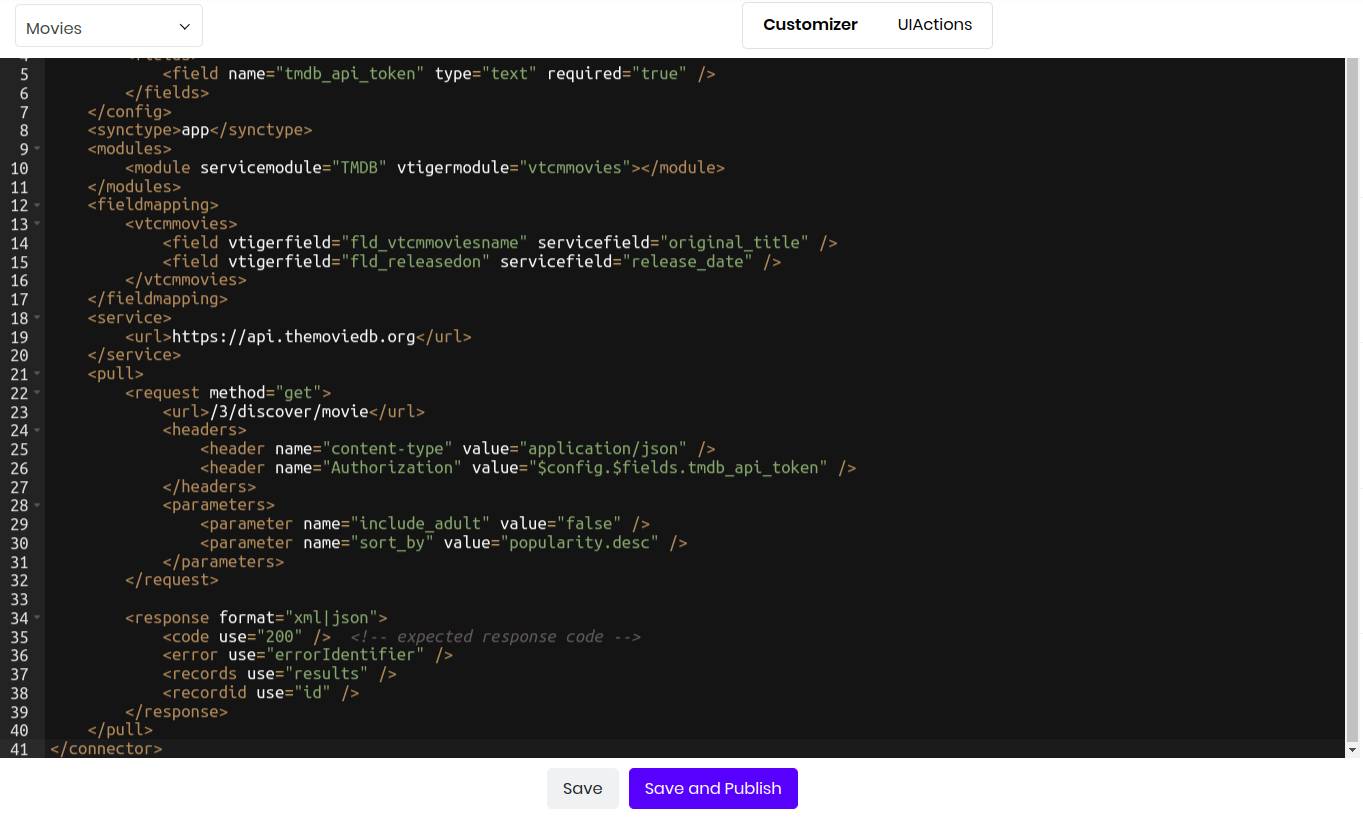
It will now be ready for use.
Use Connector
Sync button will appear on Movies module as we have published TMDB Connector.

We have to activate as first step.
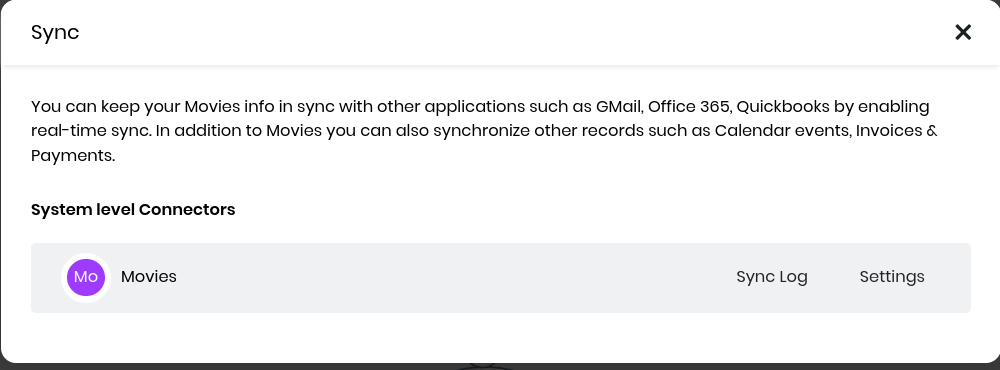
Click Settings and Save with default option.
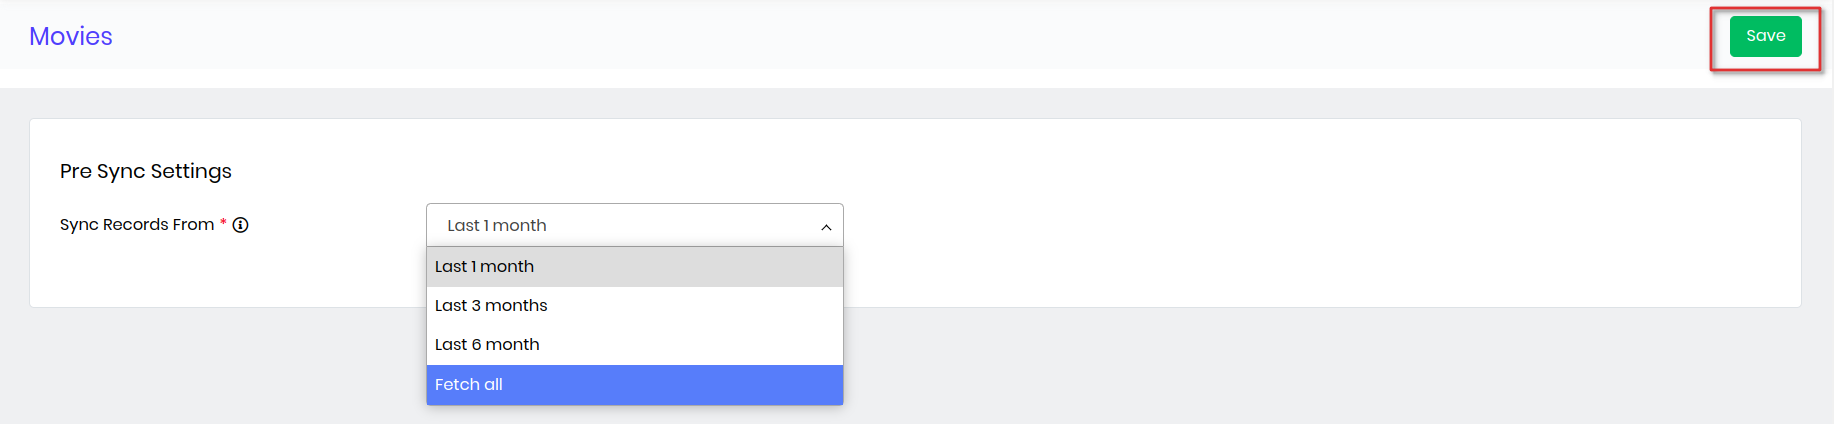
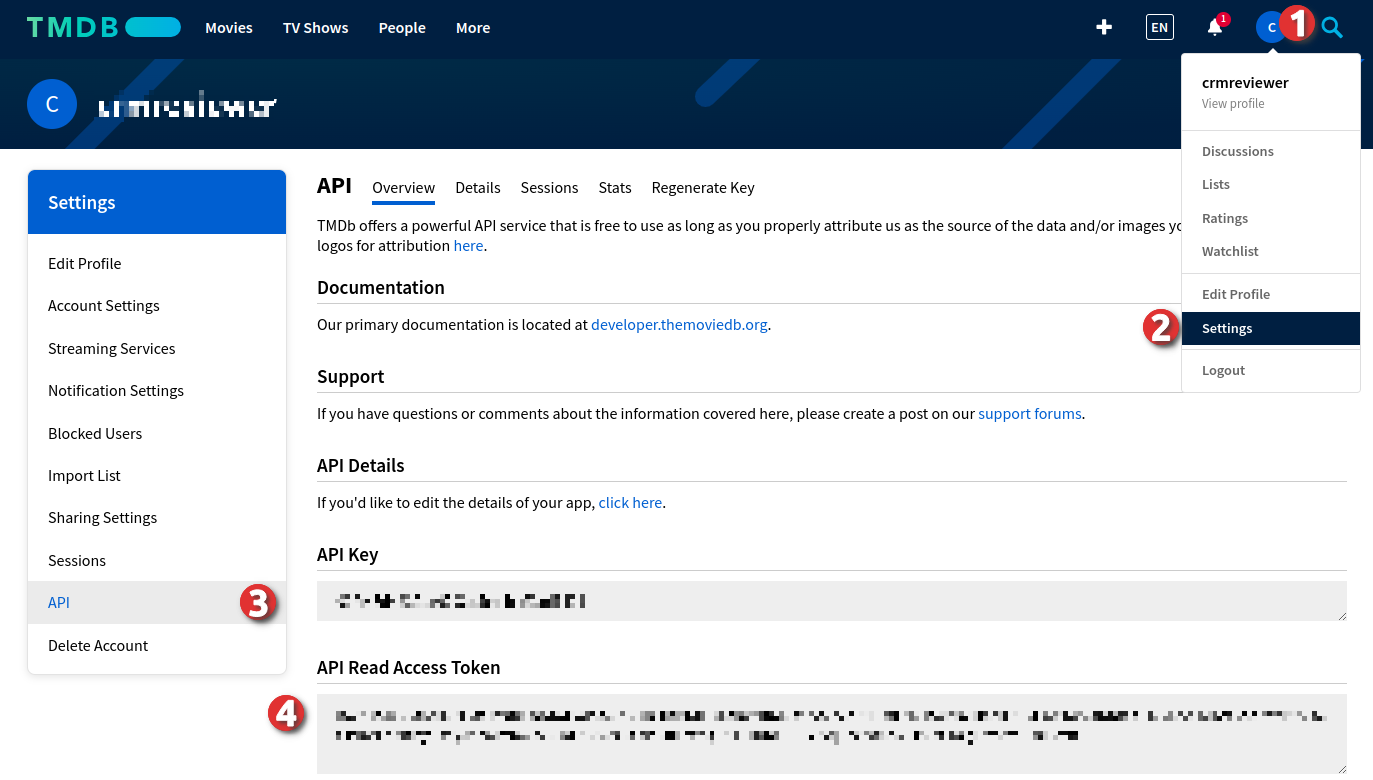
Login to TMDB. Navigate to Settings > API > Copy API Read Access Token
Update Sync Settings > tmdb_api_token
With Bearer API-Read-Access-Token
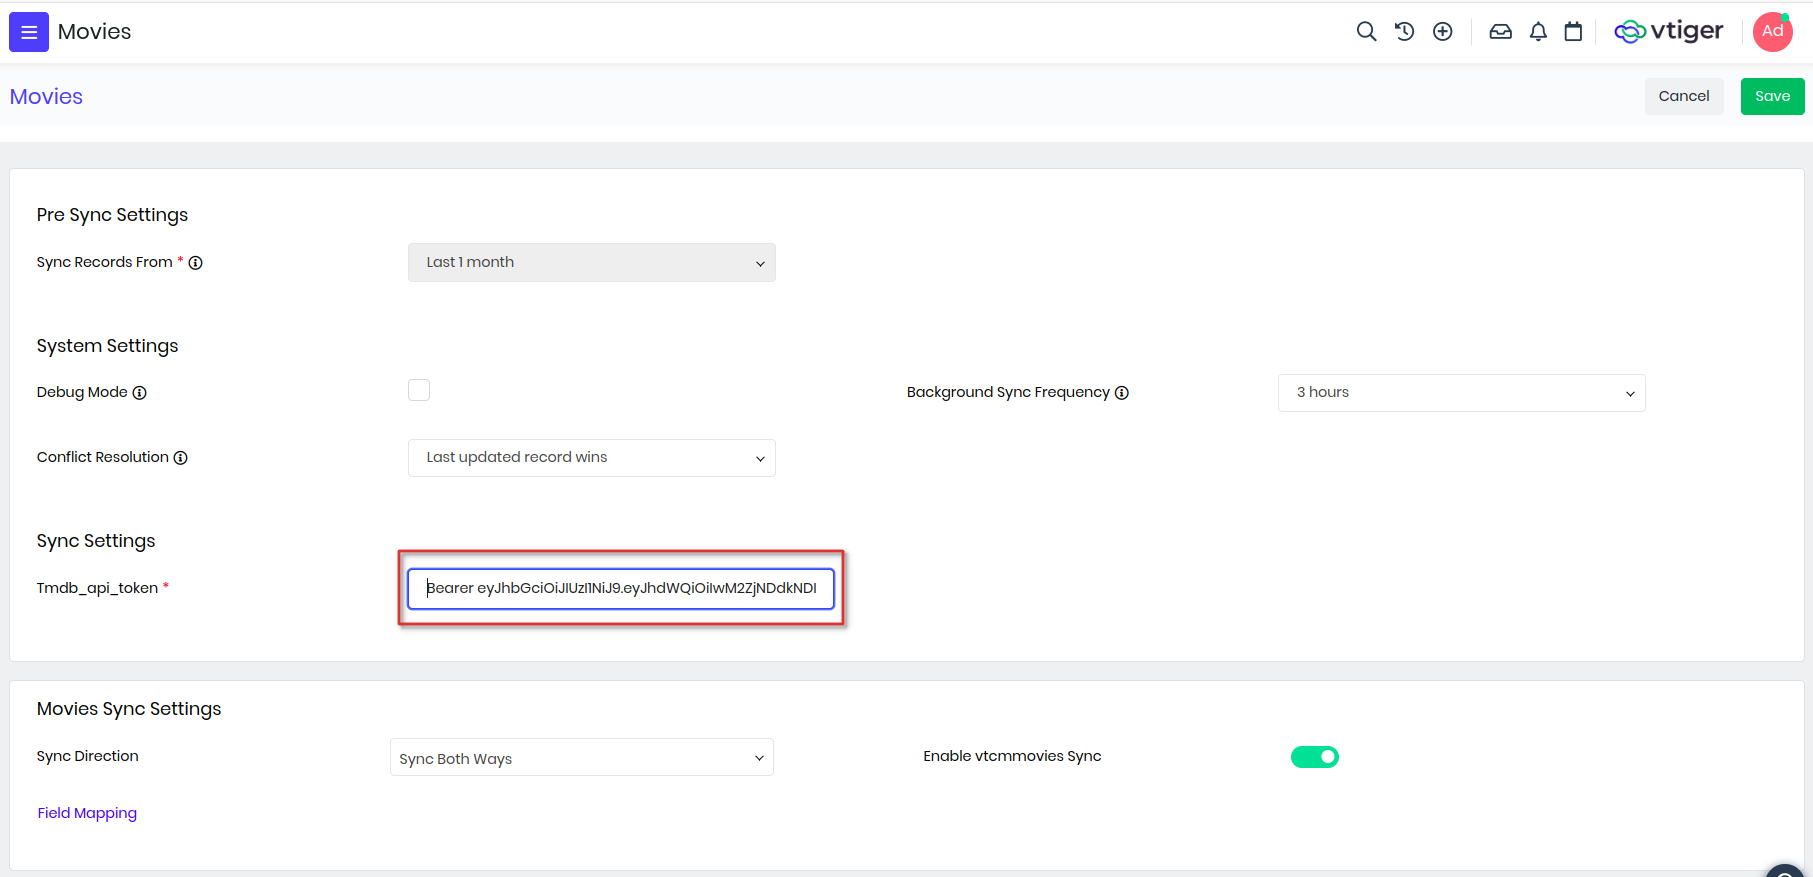
Click Save. We are ready to Sync Now
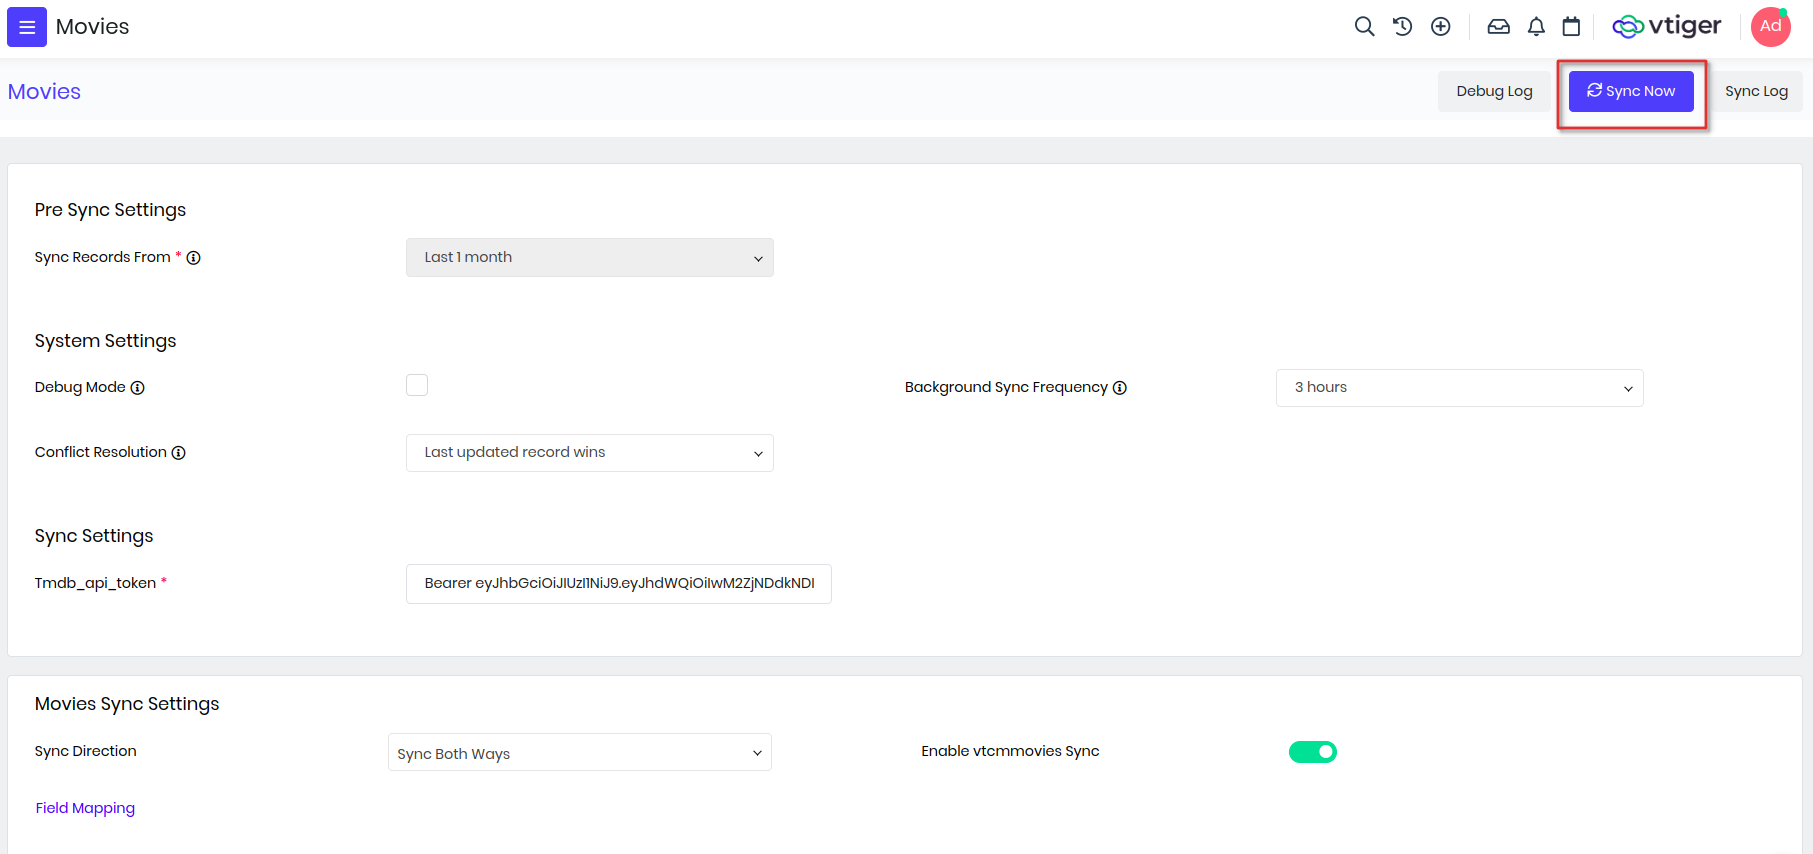
With Sync Now success you will be able to check the Sync Log

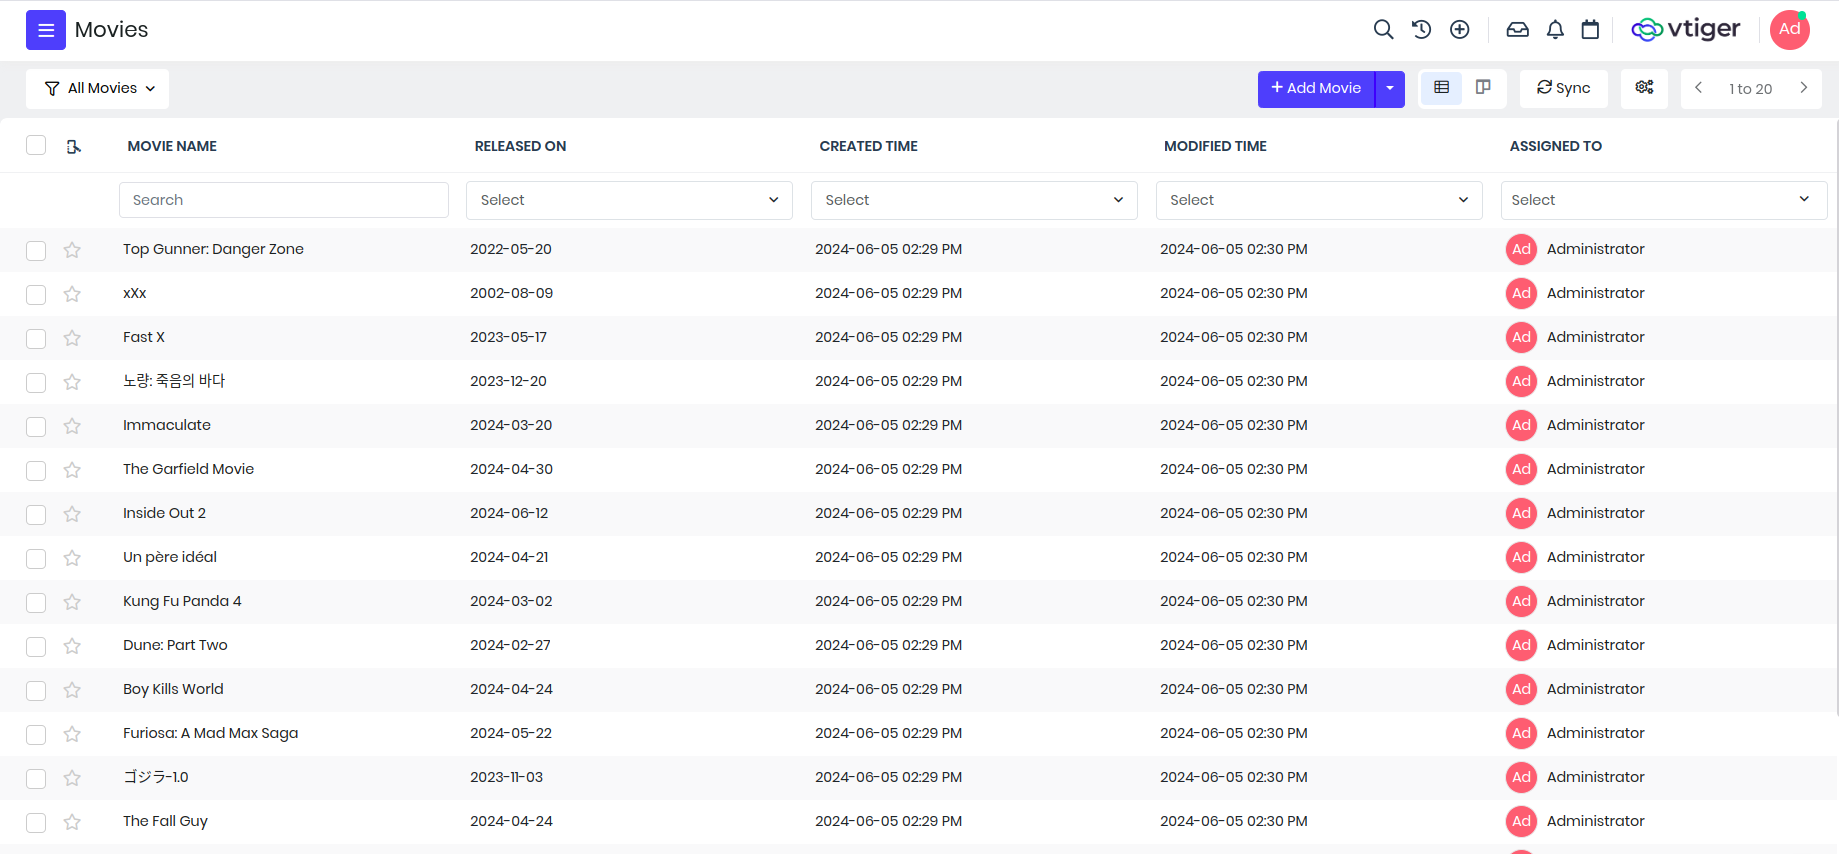
Popular movies will appear in the Movies ListView.
You can learn more about Data Sync connector.
To stay focused now let us proceed with API Integration
API Integration
TMDB GET /search API enables search of movie by name and release year.
curl --request GET \
     --url 'https://api.themoviedb.org/3/search/movie?query=Atlas&include_adult=false&language=en-US&page=1&year=2024-05-23' \
     --header 'Authorization: Bearer api_read_access_token' \
     --header 'accept: application/json'
Allow Domain
Click on Gear / Cog-wheel icon.

Add Allowed domains https://api.themoviedb.org. Click Save
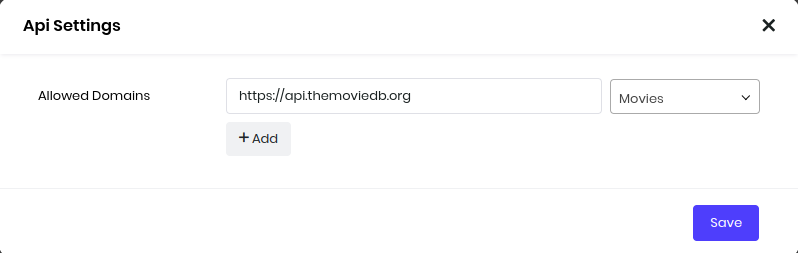
We now granted permission for CRM to interact with TMDB Service APIs.
Add API
Click on + Add API.
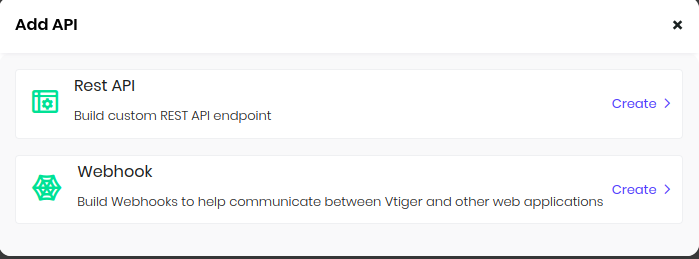
Choose Rest Api.
Publish
You can copy-and-paste the VADL code below.
<?xml version="1.0"?>
<api method="get">
    <rest method="get">
        <url>https://api.themoviedb.org/3/search/movie</url>
        <headers>
            <header name="Authorization" value="Bearer eyJhbGciOiJIUzI1NiJ9.eyJhdWQiOiIwM2ZjNDdkNDIzNjFjMDc5MmQ1ZWQ0Y2NmNmFkMTQzMSIsInN1YiI6IjY2NWQ3NjU5ZTI2MDUxMTA5ODkwNmQ5ZCIsInNjb3BlcyI6WyJhcGlfcmVhZCJdLCJ2ZXJzaW9uIjoxfQ.ZCr_HrIWH-PMlvq5bcZ8hh5TTsIKCKXgHwAwZB0iBm0"></header>
        </headers>
        <parameters>
            <parameter name="query" value="@moviename"></parameter>
            <parameter name="year" value="@releasedon" presence="optional"></parameter>
            <parameter name="include_adult" value="false"></parameter>
        </parameters>
    </rest>
</api>
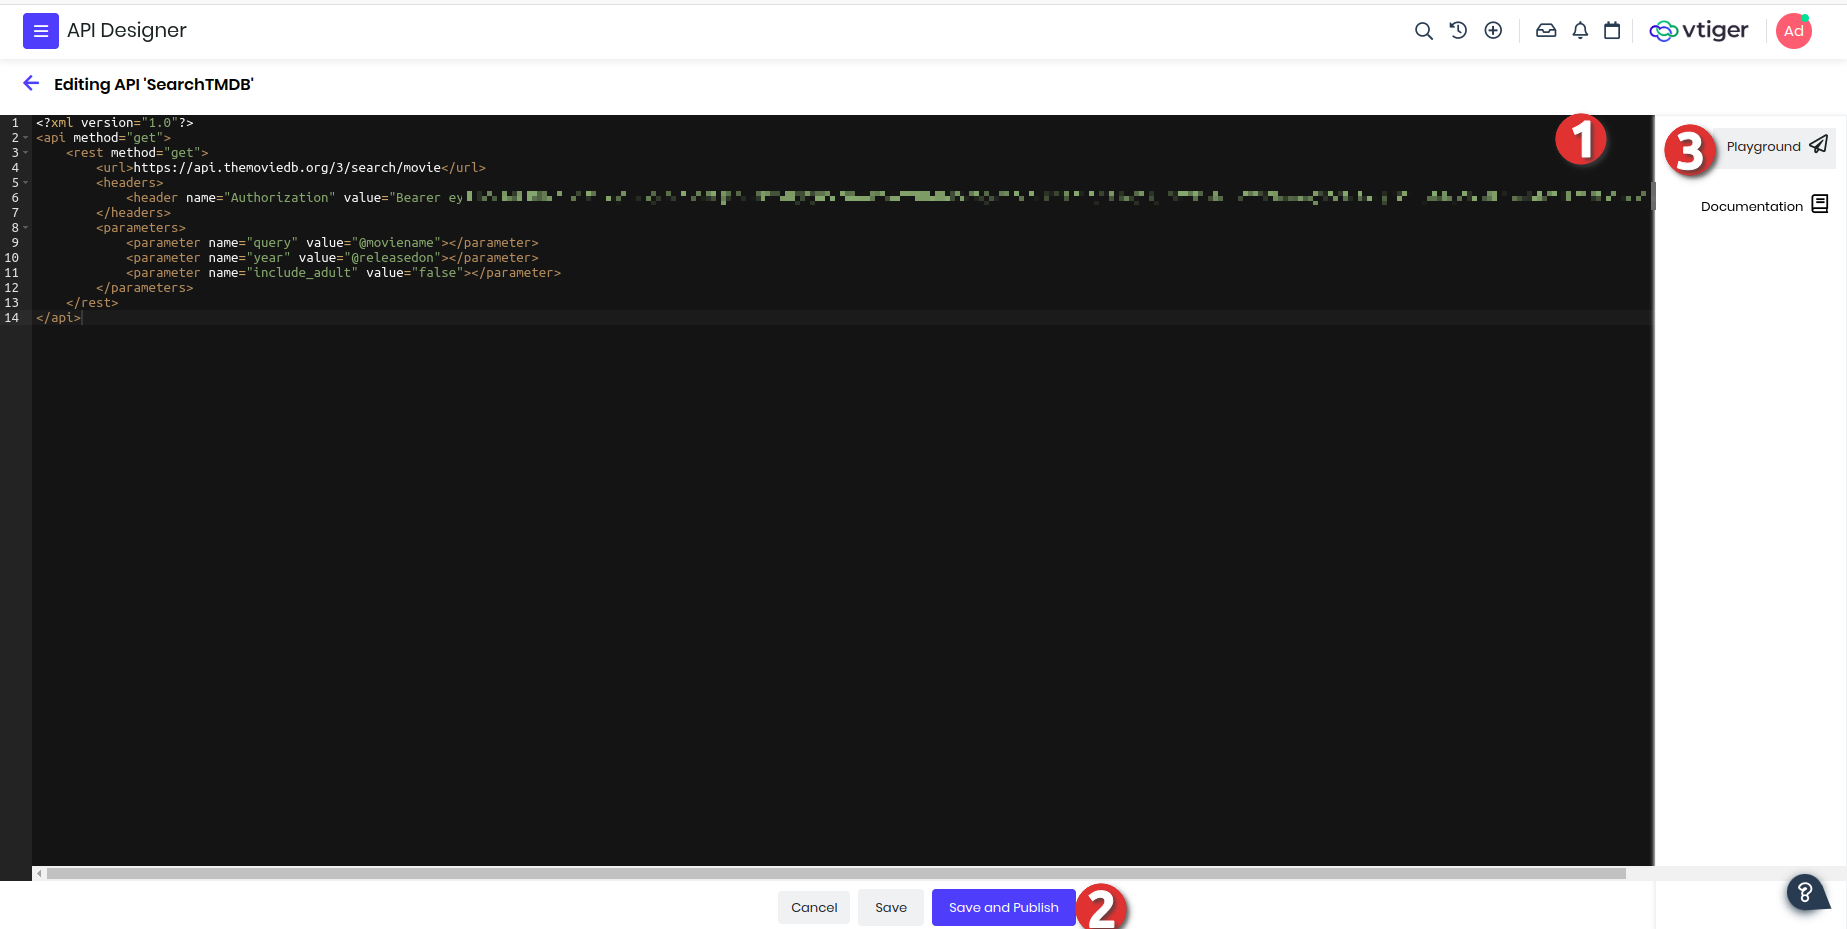
Validate
Open Playground to validate with sample input.
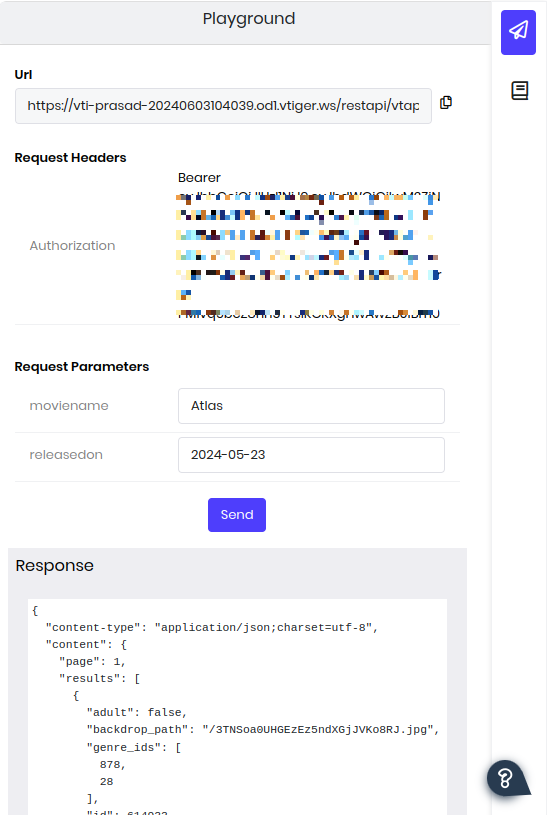
It worked.
In-App Customization
Module Designer allow you to customize in-app experience.
Navigate to Main Menu > Platform > Module Designer
Custom Component
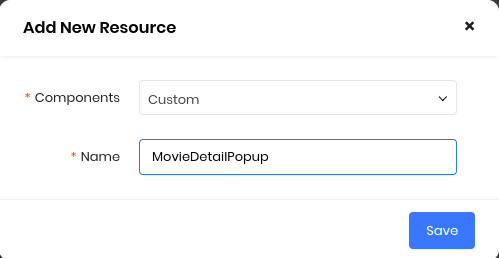
Choose Movies Module.
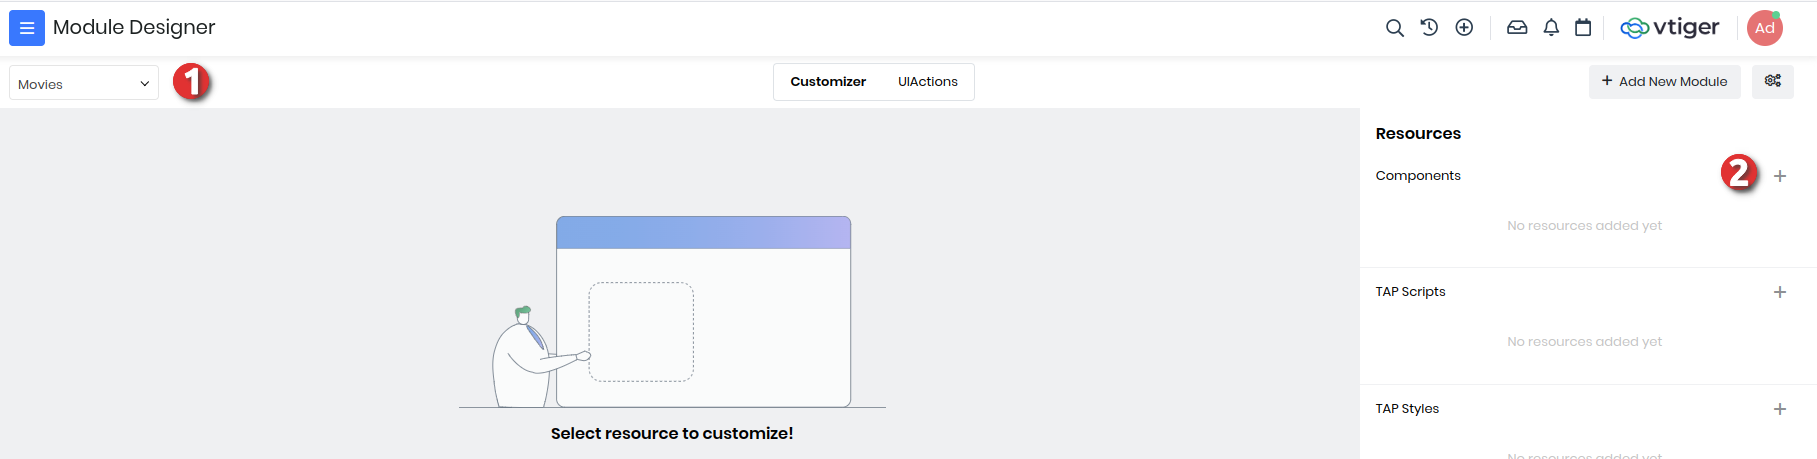
Click + Component and add Custom MovieDetailPopup component.
Copy-and-Paste the component definition below:
var vtcmmovies_Component_MovieDetailPopup = VTAP.Component.Core.extend({
    /* caller will send the attribute */
    props: ["movieinfo"],
    template: `<b-modal :title="movieinfo.title">{{movieinfo.overview}}
        <p><img width="100%" height="480px"
            :src="'http://image.tmdb.org/t/p/w500/' + movieinfo.poster_path"></p>
        </b-modal>`
});
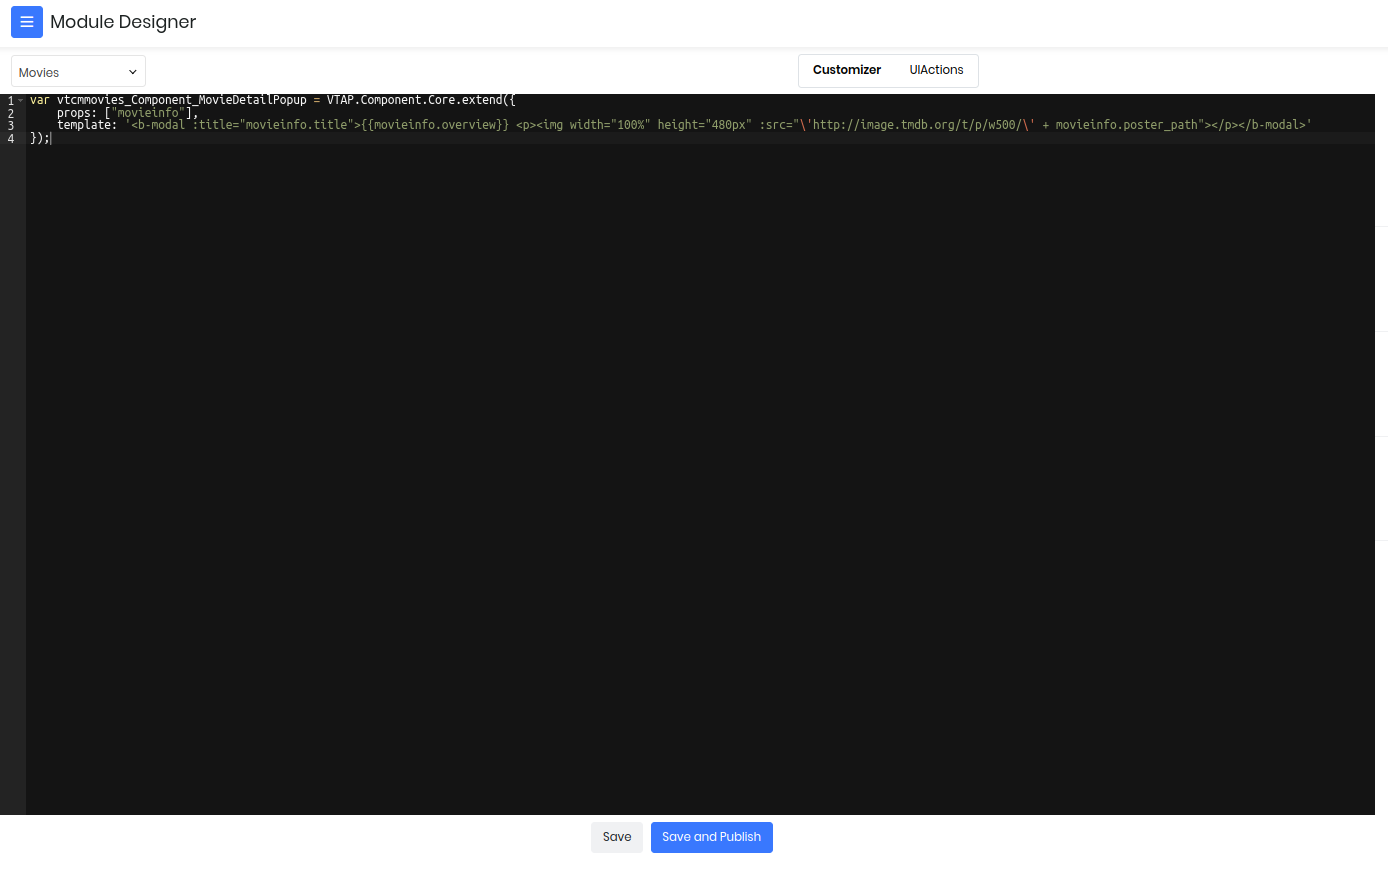
Click Save and Publish
Custom Button
Switch to UI Actions

Now Add UI Component
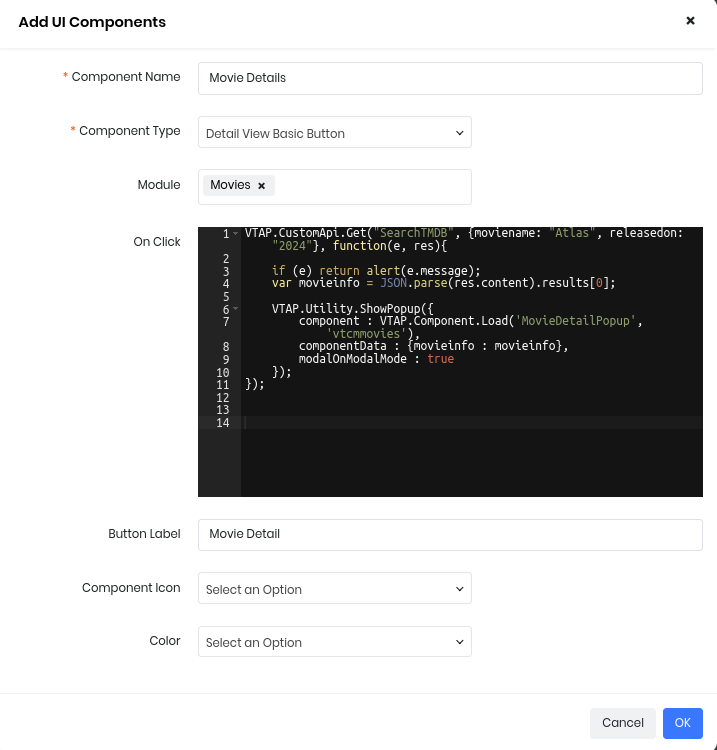
OnClick Javascript code with VTAP JS runtime:
VTAP.Detail.Record().then( (record) => {
    VTAP.CustomApi.Get("SearchTMDB",
        {moviename: record["fld_vtcmmoviesname"], releasedon: record["fld_releasedon"]},
        (e, res) => {
            if (e) return alert(e.message);
            var results = JSON.parse(res.content).results;

            VTAP.Utility.ShowPopup({
                /* To load vtcmmovies_Component_MovieDetailPopup */
                component : VTAP.Component.Load('MovieDetailPopup', 'vtcmmovies'),
                /* and bind to component property */
                componentData : {movieinfo : results[0]},
                modalOnModalMode : true
            });
        }
    );
});
Click OK
Result
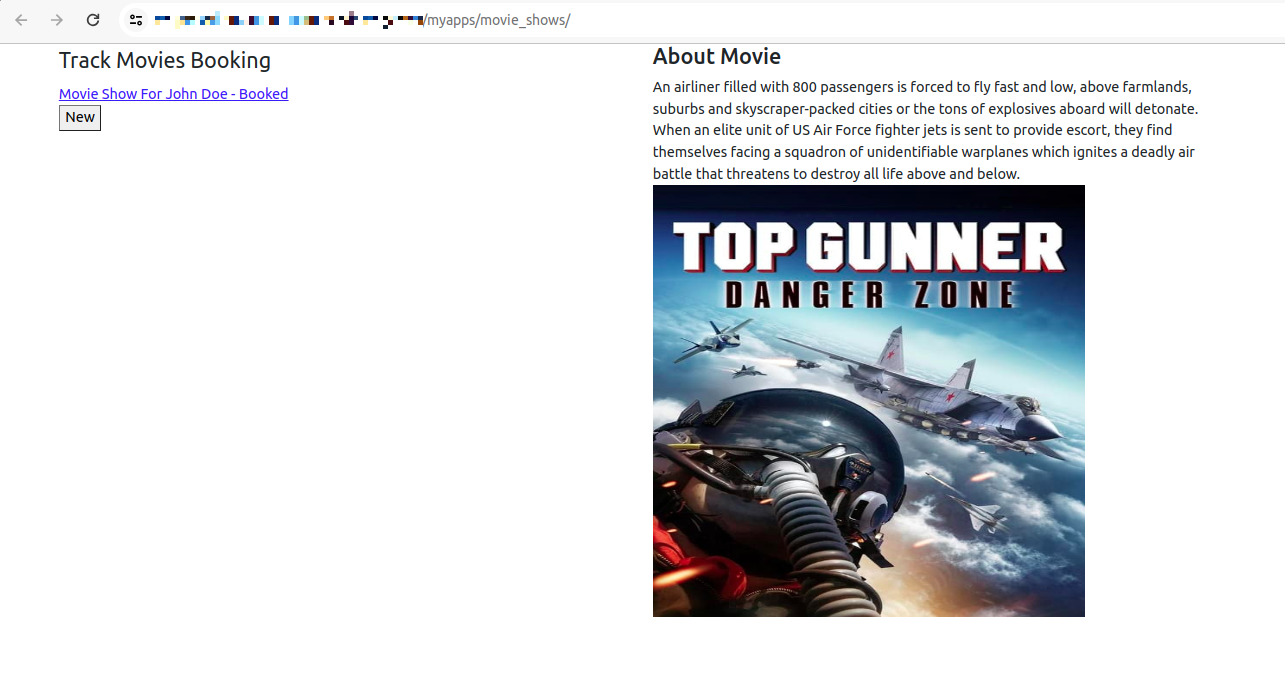
Movie Detail Button

OnClick Popup

We have now made Agent life easier to get details of movie within CRM!
Custom App
With App Creator you can enhance the UX (User-Experience) that suits your business flow. Lets now create an application that simplifies the steps Agent takes to get Movie Show Booked.
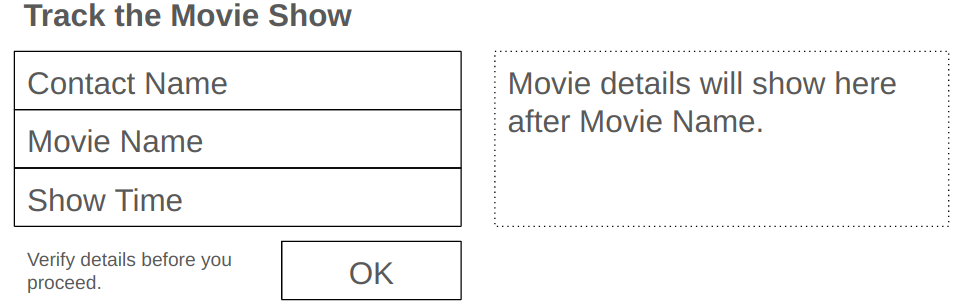
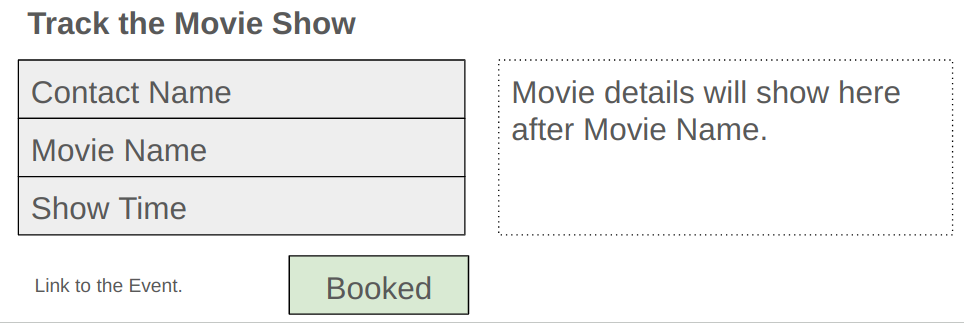
Mockup Plan
Niche UI can improve productivity to good extent. Planning & Design is the first step.
Create App
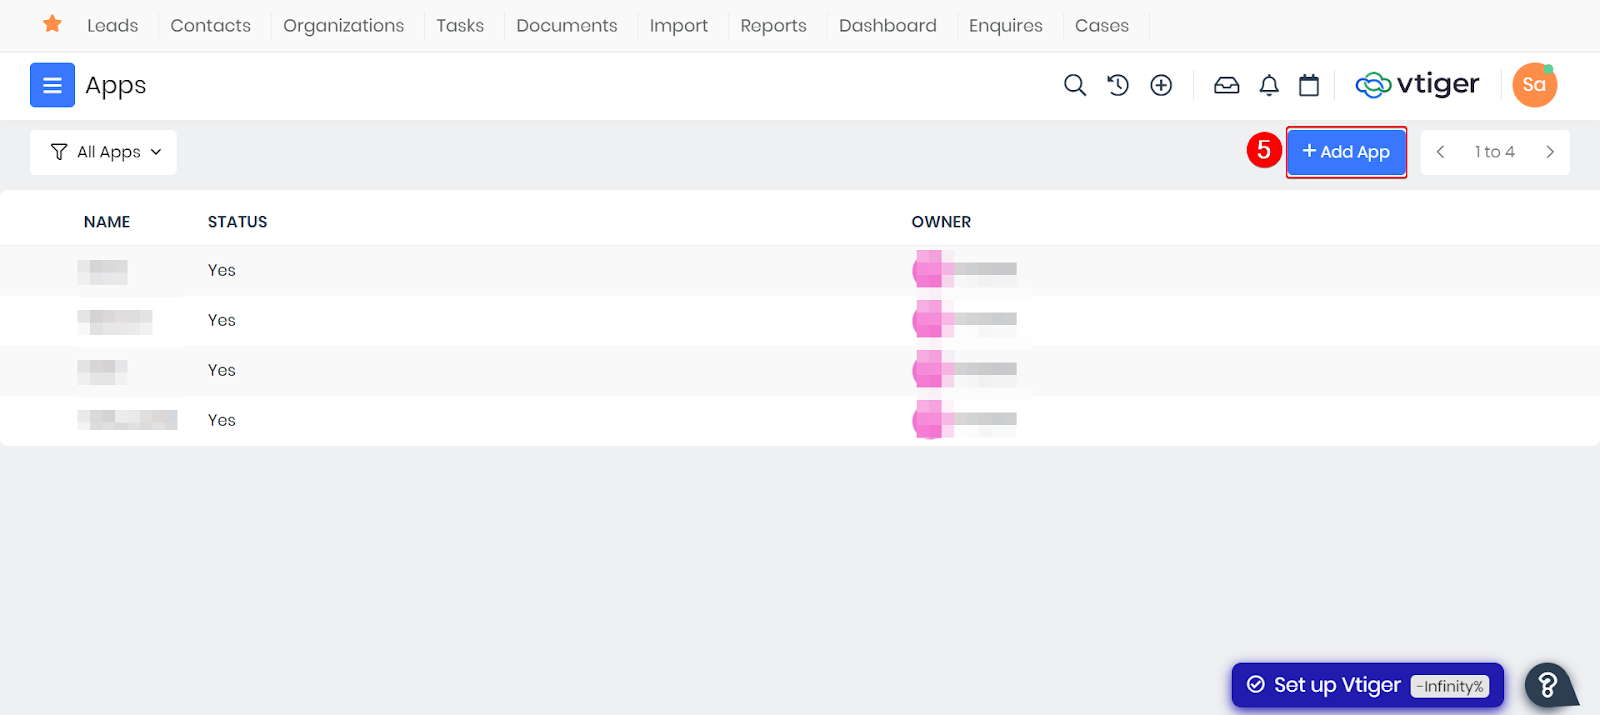
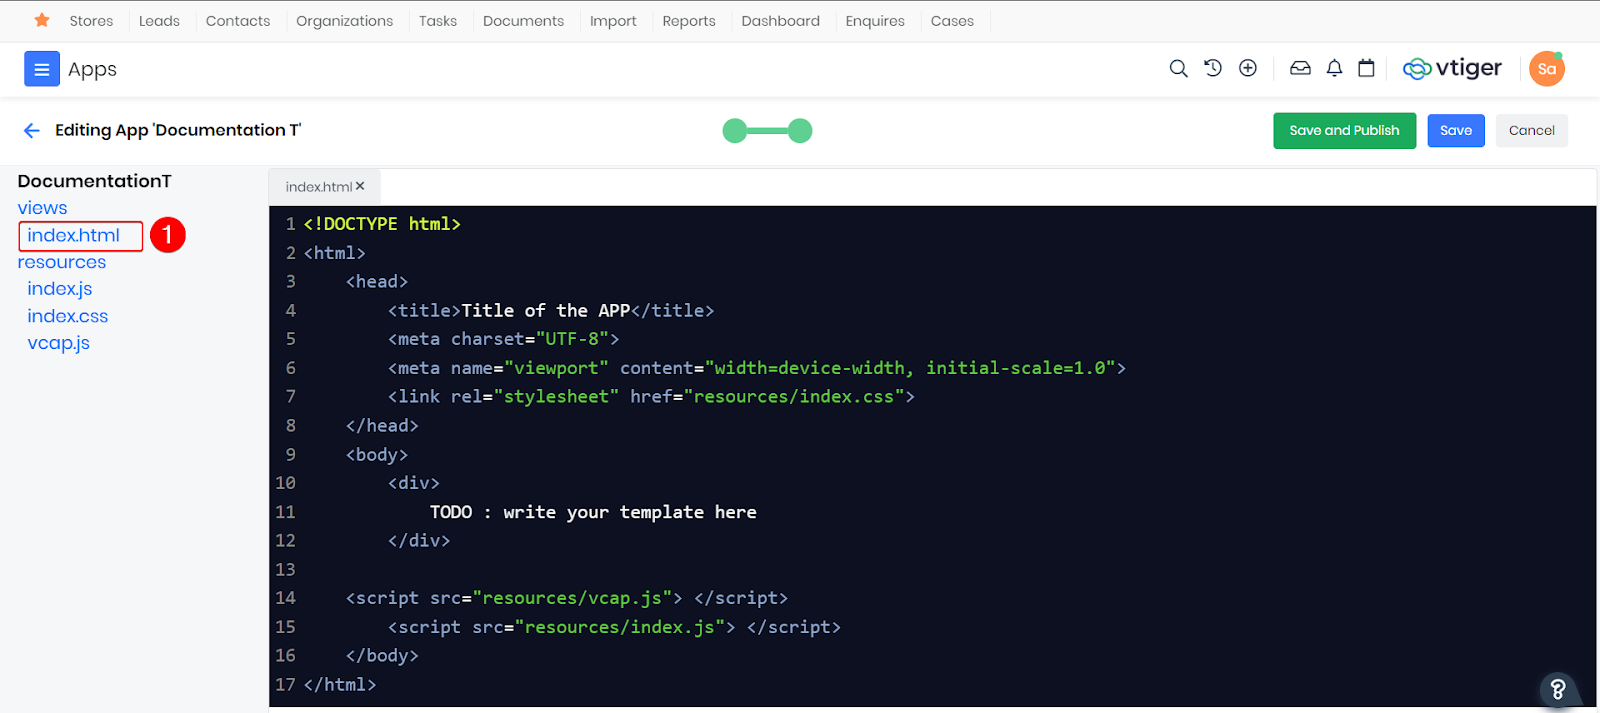
Navigate Main Menu > Platform > App Creator
Click Add App
Fill the form and Save
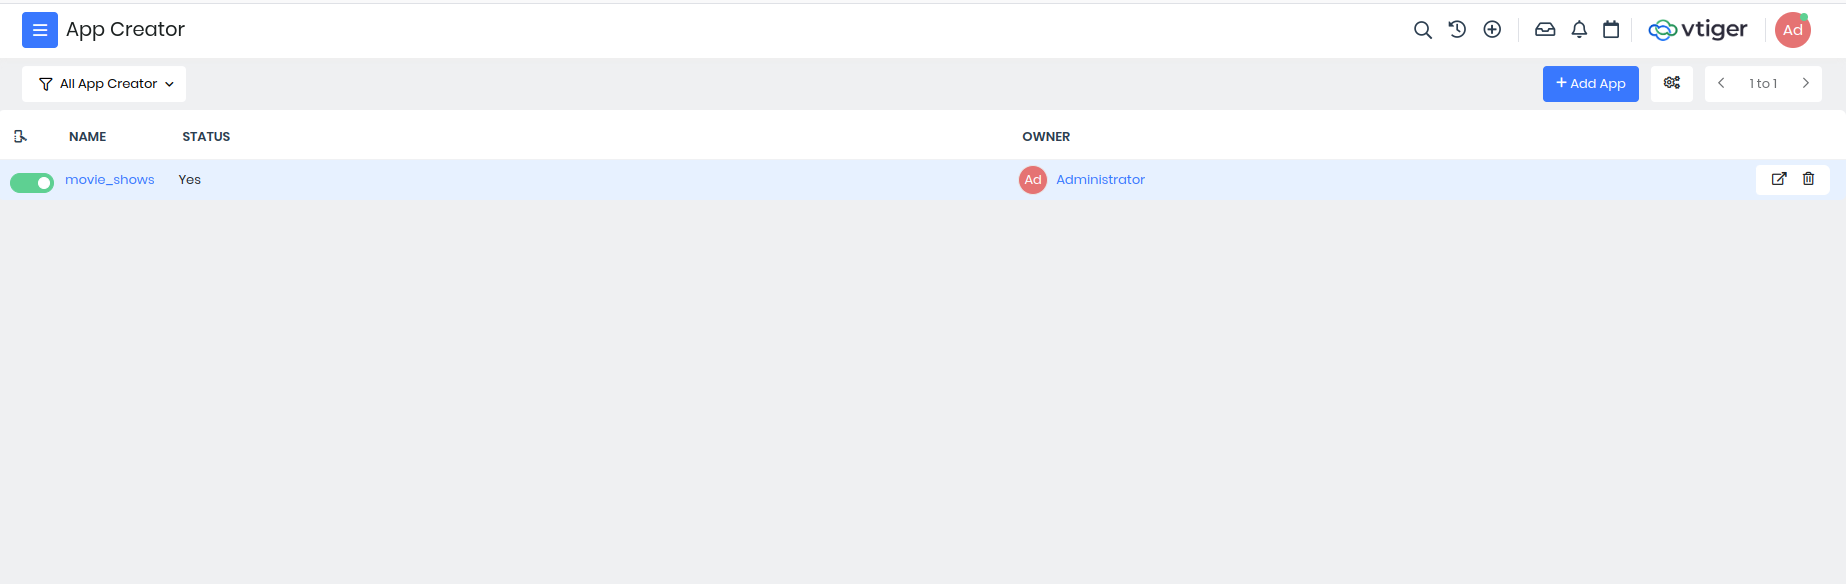
Click movie_shows app to edit.
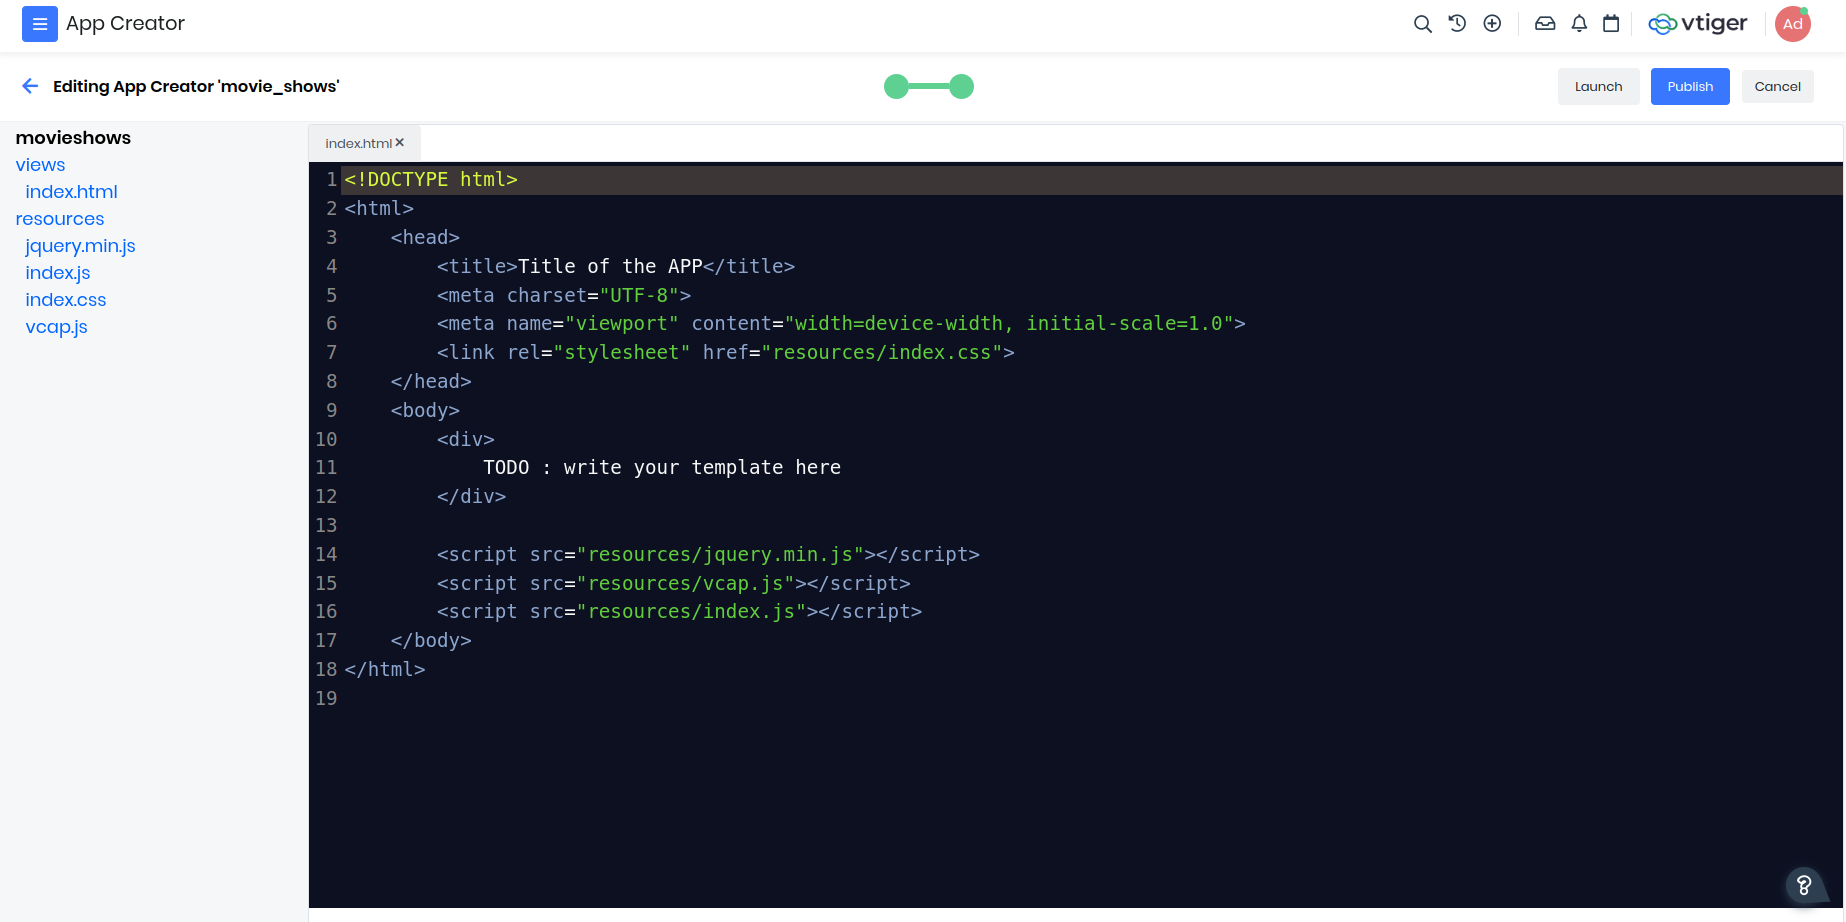
views/index.html
Copy-and-paste the HTML code below which uses Bootstrap, jQuery, Select2 plugins with VCAP and index.js runtime.
<!DOCTYPE html>
<html>
    <head>
        <title>Movie Shows</title>
        <meta charset="UTF-8">
        <meta name="viewport" content="width=device-width, initial-scale=1.0">
		<link rel="stylesheet" href="https://cdn.jsdelivr.net/npm/bootstrap@5.0.2/dist/css/bootstrap.min.css">
		<link rel="stylesheet" href="https://cdnjs.cloudflare.com/ajax/libs/select2/4.0.13/css/select2.min.css">
    	<link rel="stylesheet" href="resources/index.css">
    </head>
    <body>
        <div class="container">
			<div class="row">
            	<form id="movieshowform" class="col">
					<legend>Track Movies Booking</legend>
					<fieldset>
					<p>
						<select id="formovie" class="form-control" data-placeholder="Choose Movie" required></select>
					</p>
					<p>
						<select id="forcontact" class="form-control" data-placeholder="Choose Contact" required></select>
					</p>
					<p>
						<input id="showdate" type="date" required>
					</p>
					<button type="submit">OK</button>
					</fieldset>
				</form>
				<div class="col" id="movieinfo">
					<h4>About Movie</h4>
					<div class="overview"></div>
					<div><img class="poster" height="480px" width="480px"></div>
				</div>
			</div>
        </div>

        <script src="resources/jquery.min.js"></script>
		<script src="https://cdnjs.cloudflare.com/ajax/libs/select2/4.0.13/js/select2.full.min.js"></script>
	    <script src="resources/vcap.js"></script>
        <script src="resources/index.js"></script>
    </body>
</html>
Click Crtl+S to save IDE changes.
resources/index.js
Copy-and-paste index.js handler code which initializes the form inputs and dynamic behaviour for the app.
window.addEventListener('load', () => {

	/**
	 * Config and State management for Searching.
	 */
	var searchState = {
		Contacts: {
			fields: ["firstname", "lastname"],
			filterid: 7,  /* Contacts: All Contacts filter */
			term: null,
			progress: false,
			result: null
		},
		vtcmmovies: {
			fields: ["fld_vtcmmoviesname"],
			filterid: 144, /* Movies: All Movies filter */
			term: null,
			progress: false,
			result: null
		}
	}

	/* helper function to build (q) clause with or-term startwith search */
	function searchWithOrClause(fields, term) {
		var q_and = [];
		var q_or = [];
		for (var i in fields) {
			q_or.push([fields[i], "startwith", term]);
		}
		return [ q_and, q_or ];
	}

	/* build custom transport for select2 specific to module and fields */
	function searchParamsInModule (module, fields, filterid) {
		/* transport function that gets callback from select2 */
		return function (params, success, failure) {
			var term = params.data.term;

			/* avoid search if last-one has not completed to avoid server overload */
			if (searchState[module].progress) {
				return;
			}

			/* if new-term is has not completely changed consider earlier result */
			if (searchState[module].term && term.indexOf(searchState[module].term) === 0) {
				return success(searchState[module].result);
			}

			/* prepare for async search */
			var response = new Promise((resolve, reject) => {
				/* mark the state */
				searchState[module].progress = true;
				searchState[module].term = term;

				/* do the search */
				VCAP.userapi.records.get({
					module: module, filterid: filterid,
					q: JSON.stringify( searchWithOrClause(fields, term) )
				}, (e, records) => {
					/* update the state */
					searchState[module].progress = false;
					searchState[module].result = records;

					/* return result */
					resolve(records);
				});
			});

			/* bind to success callback */
			response.then(success);

			return response;
		}
	}

	/* custom transformer to convert record to show in select2 dropdown */
	function transformRecordsToSelect2Options() {
		/* callback function after search */
		return function(records) {
			/* add text field */
			for (var i in records) records[i].text = records[i].label;
			return {results: records }
		}
	}

	/* select2 plugin activation for Movies */
	jQuery("#formovie").select2({
		minimumInputLength: 3,
		allowClear: true,
		ajax: {
			transport: searchParamsInModule("vtcmmovies", searchState["vtcmmovies"].fields, searchState["vtcmmovies"].filterid),
			processResults: transformRecordsToSelect2Options()
		}
	}).on("change", function(ev) {
		/* If movie selection changes */
		var choice = jQuery(this).select2('data');

		/* hide the last movie info */
		jQuery("#movieinfo").hide();

		/* movie was unselected or cleared? */
		if (!choice.length) return;

		/*
		 * There was movie selection change
		 * use customapi created earlier for movie search
		 * show the overview and poster image.
		 */
		var movie = choice[0];
		VCAP.customapi.get("SearchTMDB", {
			moviename: movie["text"]
		}, (e, movieres) => {
			if (e) return alert(e.message);
			var movieinfo = JSON.parse(movieres.content).results[0];
			jQuery("#movieinfo .overview").text(movieinfo.overview);
			jQuery("#movieinfo .poster").attr(
				"src", "https://image.tmdb.org/t/p/w500" + movieinfo.poster_path);
			jQuery("#movieinfo").show();
		});
	});

	/* select2 plugin activation for Contact lookup */
	jQuery("#forcontact").select2({
		minimumInputLength: 3,
		allowClear: true,
		ajax: {
			transport: searchParamsInModule("Contacts", searchState["Contacts"].fields, searchState["Contacts"].filterid),
			processResults: transformRecordsToSelect2Options()
		}
	});

	/* form submit handler */
	jQuery("#movieshowform").submit(function(ev) {
		/* take custom control */
		ev.preventDefault();

		/* to disable when processing */
		var fieldset = jQuery("fieldset", this);

		/* field inputs */
		var contactid = jQuery("#forcontact").val();
		var movieid = jQuery("#formovie").val();
		var showdate = jQuery("#showdate").val();

		/* invalid state - return */
		if (!contactid || !movieid) return;

		/* about to process - disable changes */
		fieldset.attr("disabled", true);

		/* create event */
		VCAP.userapi.records.post({
			module      : "Events",
			subject     : "Movie Show For " + jQuery("#forcontact").select2("data")[0].text,
			eventstatus : "Booked",
			activitytype: "Movie Show",
			date_start  : showdate,
			time_start  : "09:00", /* todo: accept input */
			due_date    : showdate,
			time_end    : "10:30", /* todo: determine based on movie length */
			cf_calendar_movie: movieid,
			contact_id: contactid
		}, (e, event) => {

			/* renable form */
			fieldset.attr("disabled", null);

			/* error - show message */
			if (e) return alert(e.message);

			/* success - show feedback */
			fieldset.html(
				"<a target='_blank' href='/view/detail?module=Events&id=" + event.id  +"'>" + event.subject +" - Booked</a><br>" +
				"<button onclick='location.reload()'>New</button>"
			);
		});
	});
});
Click Crtl+S to save IDE changes.
Publish & Launch App
After saving file changes you need to Publish app for reflecting them others.
You can Launch app (or reload app if launched previously)


Awesome! we have now achieved enhancing user-experience with this niche custom app.
FAQs
Why am I not seeing published changes?
During development Browser cache can trouble new changes.
- Hard refresh the app after launch.
- You can disable cache that should help.
VCAP - Custom App Runtime.
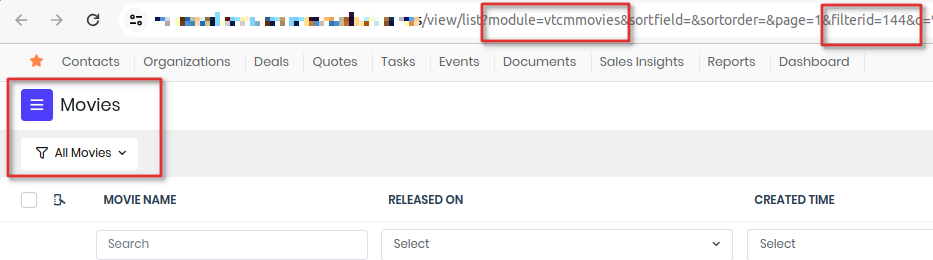
How to find the fieldname?
How to find the modulename and filterid?
Platform
To discover each of the tool capability in more detail you can follow the links below:
- Module Designer
- Process Designer
- Api Designer
- App Creator
- Insights Designer
- Layouts Designer
- Server Scripts
- Add-ons Publisher
- REST API
Availability
VTAP Tools are only available in specific versions of Vtiger CRM.
See the table's below to find out if your current Vtiger edition has access to the feature and limits.
(i) Module Designer And API Designer
| Edition | Module Designer (Limit) | API Designer (Limit) |
|---|---|---|
| Pilot | No | No |
| Exclusive | No | No |
| Sales Starter | No | No |
| Sales Professional | Yes (25) | Yes (25) |
| Sales Enterprise | Yes (25) | Yes (50) |
| Support Starter | No | No |
| Support Professional | Yes (25) | Yes (25) |
| One Professional | Yes (25) | Yes (25) |
| One Enterprise | Yes (25) | Yes (50) |
(ii) Process Designer
| Edition | Standard Processes per Module | Scheduled Processes per Instance |
|---|---|---|
| One Pilot | 1 Process | 0 |
| One Growth | 1 Process | 1 |
| One Professional | 3 Processes | 2 |
| One Enterprise | 5 Processes / Module, 5 flows, 10 Actions | 3 |
(iii) App Creator
App Creator (App Designer) is now available by default for Learning and Developer editions of Vtiger CRM.
(iv) Insights Designer
| Edition | Insights Designer |
|---|---|
| One Pilot | |
| One Growth | |
| One Professional | 3 Dashboards |
| One Enterprise | 5 Dashboards |
(v) Layouts Designer
| Feature Availability | One Pilot | One Growth | One Professional | One Enterprise |
|---|---|---|---|---|
| Layout Designer | - | - | ✓ | ✓ |
(vi) Server Scripts
| Edition | Available | Server Script execution daily limit | Server Job execution daily limit |
|---|---|---|---|
| Starter | No | - | - |
| Exclusive | No | - | - |
| Growth | Yes | 100 | 1 |
| Professional | Yes | 300 | 3 |
| Enterprise | Yes | 500 | 5 |
Module Designer
Module Designer allows you to create or extend the modules of Vtiger CRM.
Modules are of 3 types:
-
Entity - follows standard conventions of (fields, records and relations). Provides out-of-box features like Access control, Reports, Workflows, Approvals etc. Example: Contacts, Organizations, Deals, Invoices, and many more.
-
Extension - free of any conventions. Provides specailized features. Example: Sales Insights, Keyboard shortcuts etc.
-
Virtual - connects to remote data-source enabling interaction without copy-of-data to CRM.
Following are some of the customization use-cases where you may find Module Designer helpful:
- Add a button in the list/detail page
- Add a custom widget on the detail page
- Add an icon when you hover over list page records
- Have a notification appear when conditions are met
- Design a custom page in a module or create a brand new module.
- Change the look and feel of Vtiger UI.
- Add custom components(html components) which can be used at multiple places including custom pages.
- Build SMS, Whatsapp, Data Sync connectors to build communication channels using various providers and provide 1-way/2-way crm data sync with external applications.
API Designer
API Designer provides a workbench for developers to build custom HTTP based APIs which can be exposed to the VTAP Javascript APIs or the external application for integration easily.
APIs can be defined using VADL specification. Platfrom takes care of user authorization and record-access control as per configuration in the CRM.
You Can Use API Designer for different purposes :
- To Build Vtiger custom REST APIs. Combine multiple API operations in one API call.
- To Build custom incoming webhook end points.
- When you want Vtiger Javascript APIs to connect and directly interact with 3rd party applications.
- To integrate with any applications that has basic authentication, secret key based, bearer based or oauth2 based APIs enabled.
Process Designer
Vtiger CRM’s Process Designer module provides users with a graphical interface that simplifies the creation of systematic business workflows. This is designed to help users design and streamline their business processes using a convenient flowchart tool.
The Vtiger CRM Process Designer:
- Provides you with an easy-to-use interface with tools and components to create a workflow or a flowchart.
- Lets you configure various business activities including conditions, actions, and duration as needed for the process.
- Helps you publish a workflow or activate it or save it as a draft.
- Automatically triggers and executes the workflow for your business in the CRM once you publish it.
- Allows you edit flows that are in saved or draft stage.
- Is accessible to all (admin and non-admin) users in Vtiger CRM.
- It is a very user-friendly feature enabled for all users. Any Vtiger CRM user can very conveniently access and use the Process Designer and design their business processes.
Benefits of using Process Designer :
- Allows you to configure a business process’s workflows, etc., available on different paths into a single flow chart.
- Helps you identify gaps and errors in the process.
- Offers smart administration by easily translating flowcharts to real business workflows. Helps you troubleshoot and smoothen the process.
For more details and examples on Process Designer refer this guide
App Creator
VTAP platform provides an App Creator toolkit to build creative applications that solve business needs that are beyond CRM configuration. App Creator runtime provides developers capabilities to extend CRM functionality, strengthen business integration or custom needs, and requires limited coding knowledge.
Using the App Creator, you can:
- Build specialized cloud web applications for clients.
- Use rich client-side web applications, by developing using any framework.
Benefits
- Develop with just HTML, CSS and Javascript knowledge.
- Deliver advanced business UX flow using the CRM platform without reinventing the wheel.
- Distribute the built applications so other users can use them to expand the CRM capabilities.
In this article, we will learn how to develop an application using VTAP App Creator.
Create Application
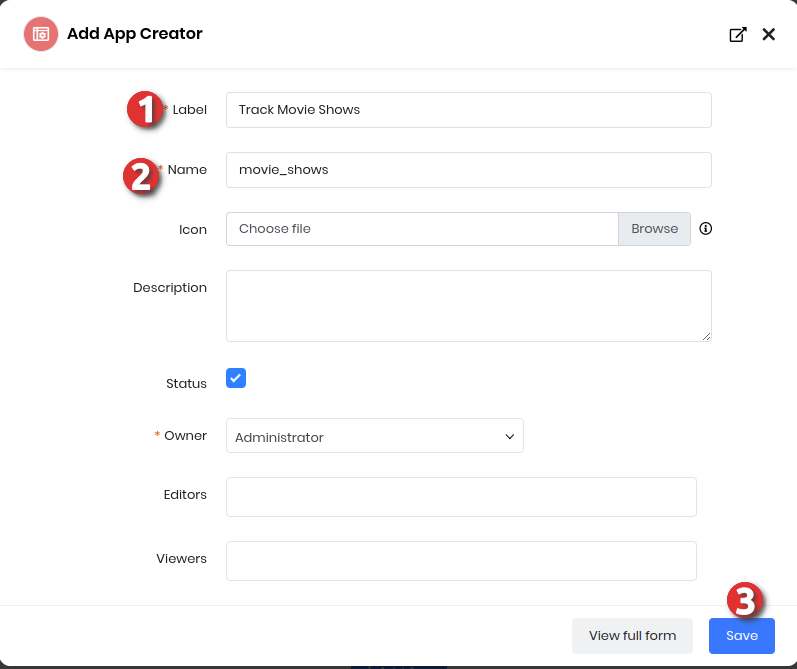
STEP 1 : Login into your CRM and navigate Main Menu > Platform > App Creator > +Add App
Enter the information for the following:
| Name | Enter a name for the application. |
| Icon | Browse and choose an icon for the application. |
| Description | Enter a brief description of the application. |
| Status | Click the checkbox to set the application status to active. |
| Owner | Select the owner of the application from the drop-down. |
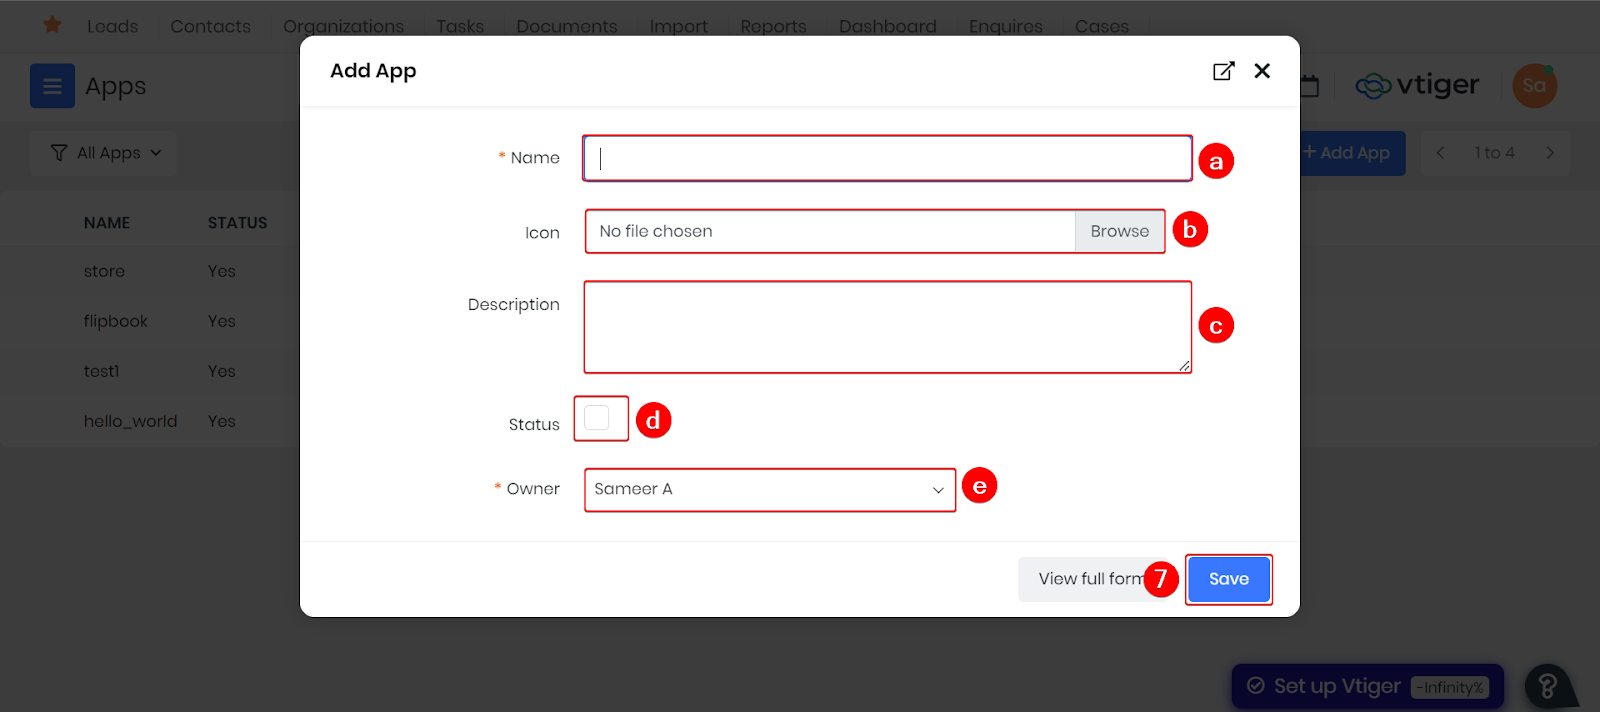
Click Save. Application is now created for you to code.

For more information on how to use the App Creator refer this guide
Insights Designer
If your data is voluminous and distributed across different apps, you need a tool that can pull, analyze, and present data in easy-to-understand charts and graphs.
Vtiger Insights Designer helps you analyze vast amounts of data and build custom reports. The feature provides full control to CRM users to build specific BI reports suited to their needs.
Application and Use Cases of Insights Designer
Using the Insights Designer, you can:
- Create an Insight page with multiple report widgets
- Fetch data from different endpoints. It supports the following queries
- Vtiger Webservice query
- Custom Rest APIs from Vtiger API Designer
- Visualize and display data in various modes
- Table
- Pivot
- Different types of charts
- Pin the designed Insight (report) to the Dashboard
- Share generated insights with other users
- Insights Designer can be used in a wide range of industries.
Following are a few use cases:
- E-commerce: Insights Designer can help online retailers track and analyze customer behavior, such as browsing and purchasing habits, to optimize their website and product offerings.
- Finance: Insights Designer can be used to analyze financial data, such as stock prices and market trends, to inform investment decisions and predict future market trends.
- Healthcare: Insights Designer can help healthcare providers analyze patient data, such as medical histories and treatment outcomes, to improve patient care and treatment protocols.
- Marketing: Insights Designer can help marketing teams analyze customer data to develop more targeted and effective marketing campaigns.
- Supply Chain Management: Insights Designer can analyze supply chain operations data, such as inventory levels and shipping times, to optimize supply chain efficiency and reduce costs.
- Social Media: Insights Designer can help social media managers track and analyze user engagement metrics, such as likes and shares, to inform content creation and marketing strategies.
- Education: Insights Designer can be used to analyze student data, such as test scores and attendance records, to inform curriculum development and improve student outcomes.
Insights Designer Components
The following are the components available in the Insights Designer:
- Insight - A record in the Insights Designer module is called an Insight.
- Widget - Each report inside an Insight is called a Widget.
- Input - Data sources that are used to fetch the data.
- Transform - Ability to write javascript code to alter the data if needed.
- Output - Where you can set up the output details for data visualization.
For more details and information on how to use the Insights Designer refer this guide
Layout Designer
The Layout Designer in Vtiger CRM is a powerful tool that allows users to create custom UI layouts for each module, tailoring the CRM experience to specific business needs. Whether you’re tired of the default module layouts or struggling to find widgets that suit your workflow, the Layout Designer offers a solution by providing a flexible, user-friendly interface for designing personalized layouts.

The above image shows the Layout Editor.
Layout Editor Can be used for creating :
-
Customizable Column Layouts: Users can configure module layouts by selecting from one, two, or three-column basic blocks. For example, selecting a two-column layout divides the screen into two columns where widgets can be easily dragged and dropped.
-
Drag-and-Drop Interface: The intuitive drag-and-drop interface allows users to customize various elements such as fields, icons, and related lists. This makes it possible to design layouts that are perfectly aligned with users' roles and responsibilities.
-
Field Customization: In specific modules like Contacts, users can organize fields like Salutation, First Name, Last Name, Primary Email, Date of Birth, and more. This customization ensures that all relevant information is easily accessible within the layout.
-
Inclusion of Related Lists: Users can add related lists—such as Organizations, Deals, and Sales Orders—directly into the layout, making it easy to access all pertinent data within a single view.
-
Dynamic Element Integration: The Layout Designer supports the addition of dynamic elements like images and tables. Widgets can be deleted or replaced using the drag-and-drop method, offering flexibility in layout design.
-
Support for Dynamic Dependencies: Fields can be displayed, hidden, or made mandatory based on the values of other fields, providing a dynamic and responsive CRM experience. For instance, a field's visibility or required status is determined by its dependency settings in the Module Layouts and Fields.
-
Enhanced Usability and Effectiveness: By allowing users to create contextually relevant layouts, the Layout Designer improves data alignment, streamlines workflows, and enhances the overall user experience in Vtiger CRM.
Benefits of Using Layout Designer
-
Personalized User Experience: By allowing users to add custom fields and organize them according to their preferences, Layout Designer enhances the user experience and makes the CRM more intuitive.
-
Better Data Management: Layout Designer enables the customization of fields and their placement, improving data organization and management. It also allows for the hiding of sensitive information and the highlighting of relevant data.
-
UI Enhancements: The tool improves the visual appeal and usability of the CRM by providing options to arrange and customize widgets and fields, making user interaction more efficient and enjoyable.
-
Scalability and Flexibility: As business processes evolve, Layout Designer offers the flexibility to modify layouts to meet new requirements, ensuring that Vtiger CRM remains scalable and adaptable over time.
For more information on how to use the Layout Designer you can refer this guide
Server Scripts
Server Scripts and Jobs empower you to craft server-side scripts for executing diverse tasks. Often there arises a necessity for customized processing on the server, either triggered by record updates or scheduled intervals. This module empowers Vtiger users to author server-side scripts for executing diverse tasks. Through this capability, users can enact custom actions upon record saving or upon approval or rejection. Moreover, they can devise bespoke background tasks to execute at predetermined intervals.
Use Cases
- Validate contact email addresses.
- Enhance lead information.
- Sync customer credit scores with CRM.
- Execute business rule-based actions, like checking if it's a weekend.
- Regularly import leads from external sources.
- Update parent or child records based on business rules.
- Merge CRM data with external data to create or update related records.
- Send CRM data to a data warehouse.
- Integrate AI for customer sentiment analysis in feedback. These are just a few examples of what you can do.
Server Scripts : Server Scripts are triggered by specific actions, such as when a record is saved, approved, or rejected. They're ideal for lighter tasks like updating fields based on business logic.
- Triggered during record save, approval, or rejection.
- Access both the record data and user information.
- Useful for tasks like updating fields, creating records in other modules, or sending emails.
- Changes made to the record data are updated in the CRM.
- Execute immediately but can slow down record saves if too complex.
Server Jobs : Server Jobs run at scheduled intervals, making them perfect for heavier, periodic tasks.
- Run in the background at set times (e.g., hourly, daily, weekly).
- Do not use user or record data, but operate under the owner user's context.
- Ideal for tasks like fetching or sending data to external services. They don't interfere with CRM operations as they run in the background.
For more information and details on how to use the Server Scripts refer this guide
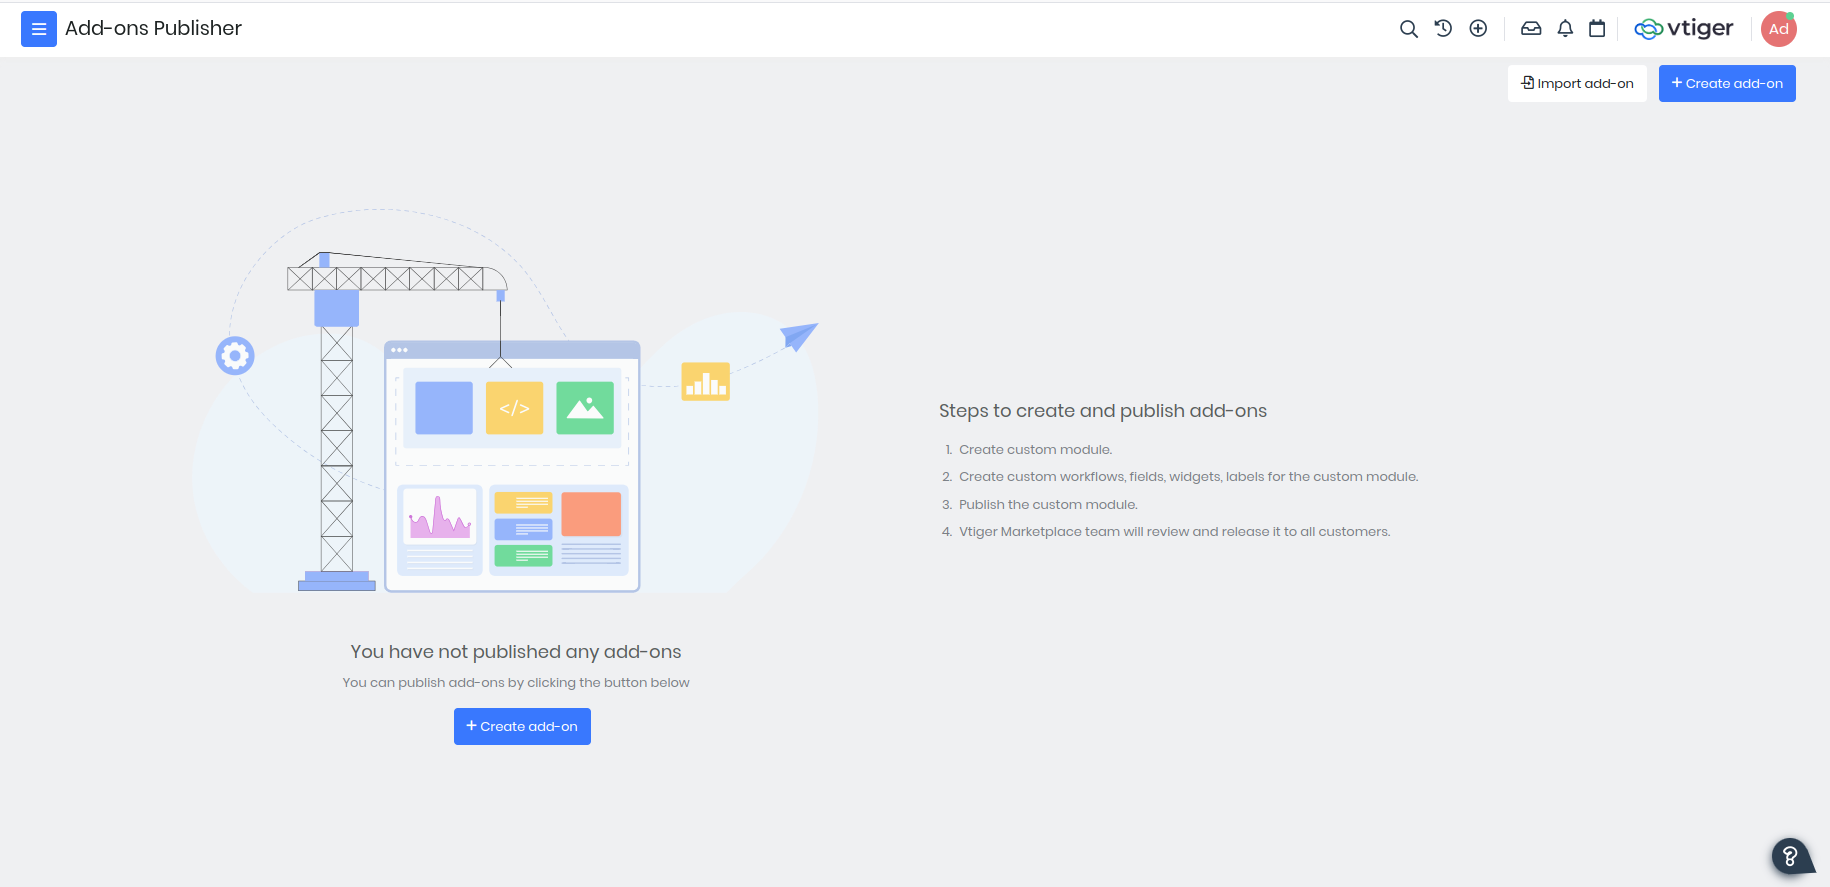
Add-ons Publisher
The Add-On Publisher is a newly introduced feature in VTAP that empowers developers to create and publish custom packages or bundles directly to the Vtiger marketplace. This feature provides a unique opportunity for developers to build functionalities tailored to their specific instance needs, which can then be made available for all Vtiger users to download and utilize.
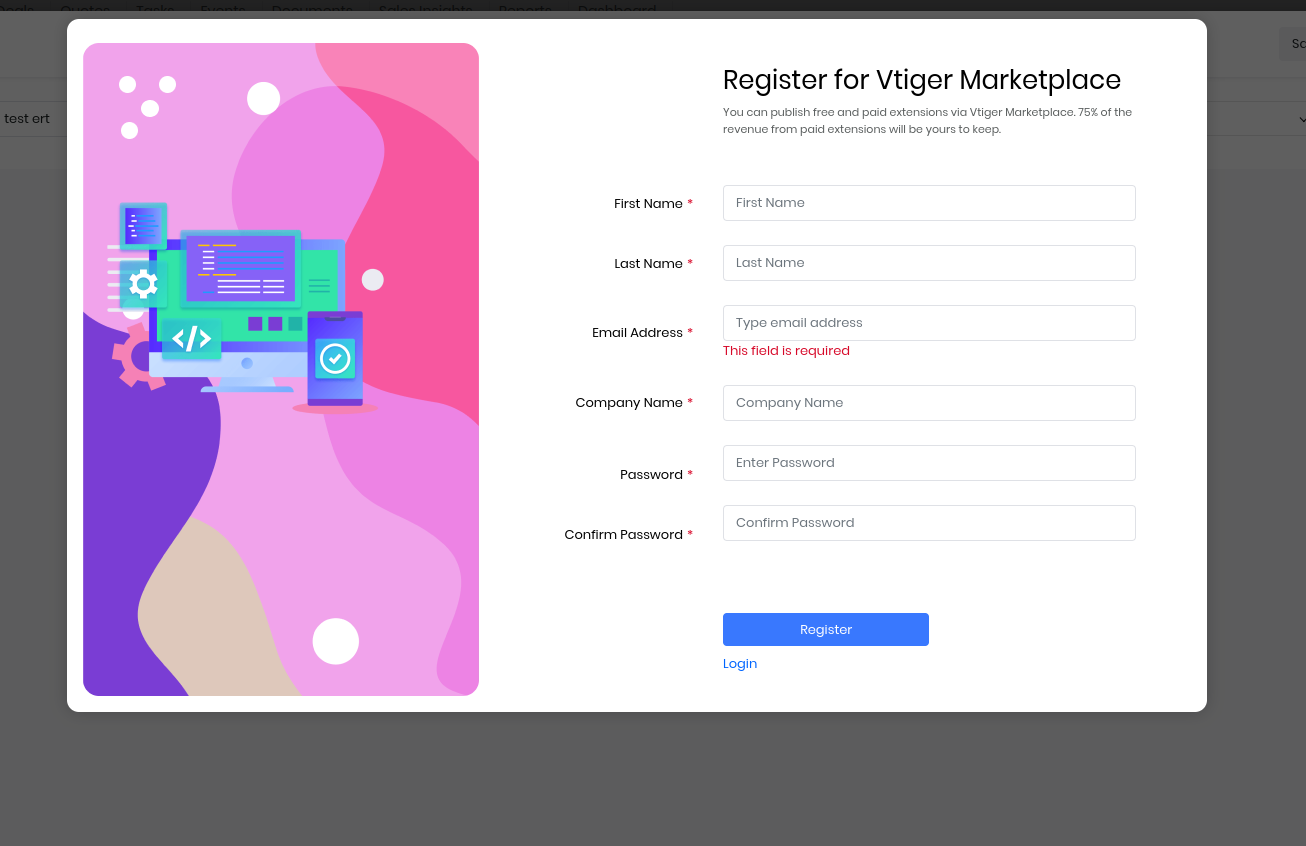
To get started, create an account through the VTAP Add-On Publisher portal. Once your account is set up, log in to your instance, navigate to the Modules section, and search for "Add-On Publisher" to begin building and publishing your custom add-ons.
Create
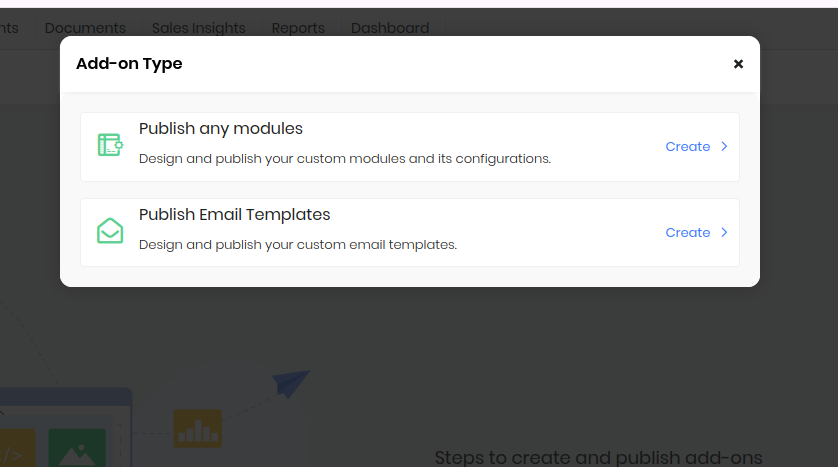
Steps to create a new addon.
-
Click on create add-on.
-
Select publish any modules - This will create a bundle of modules to be published and used in the main instance.
-
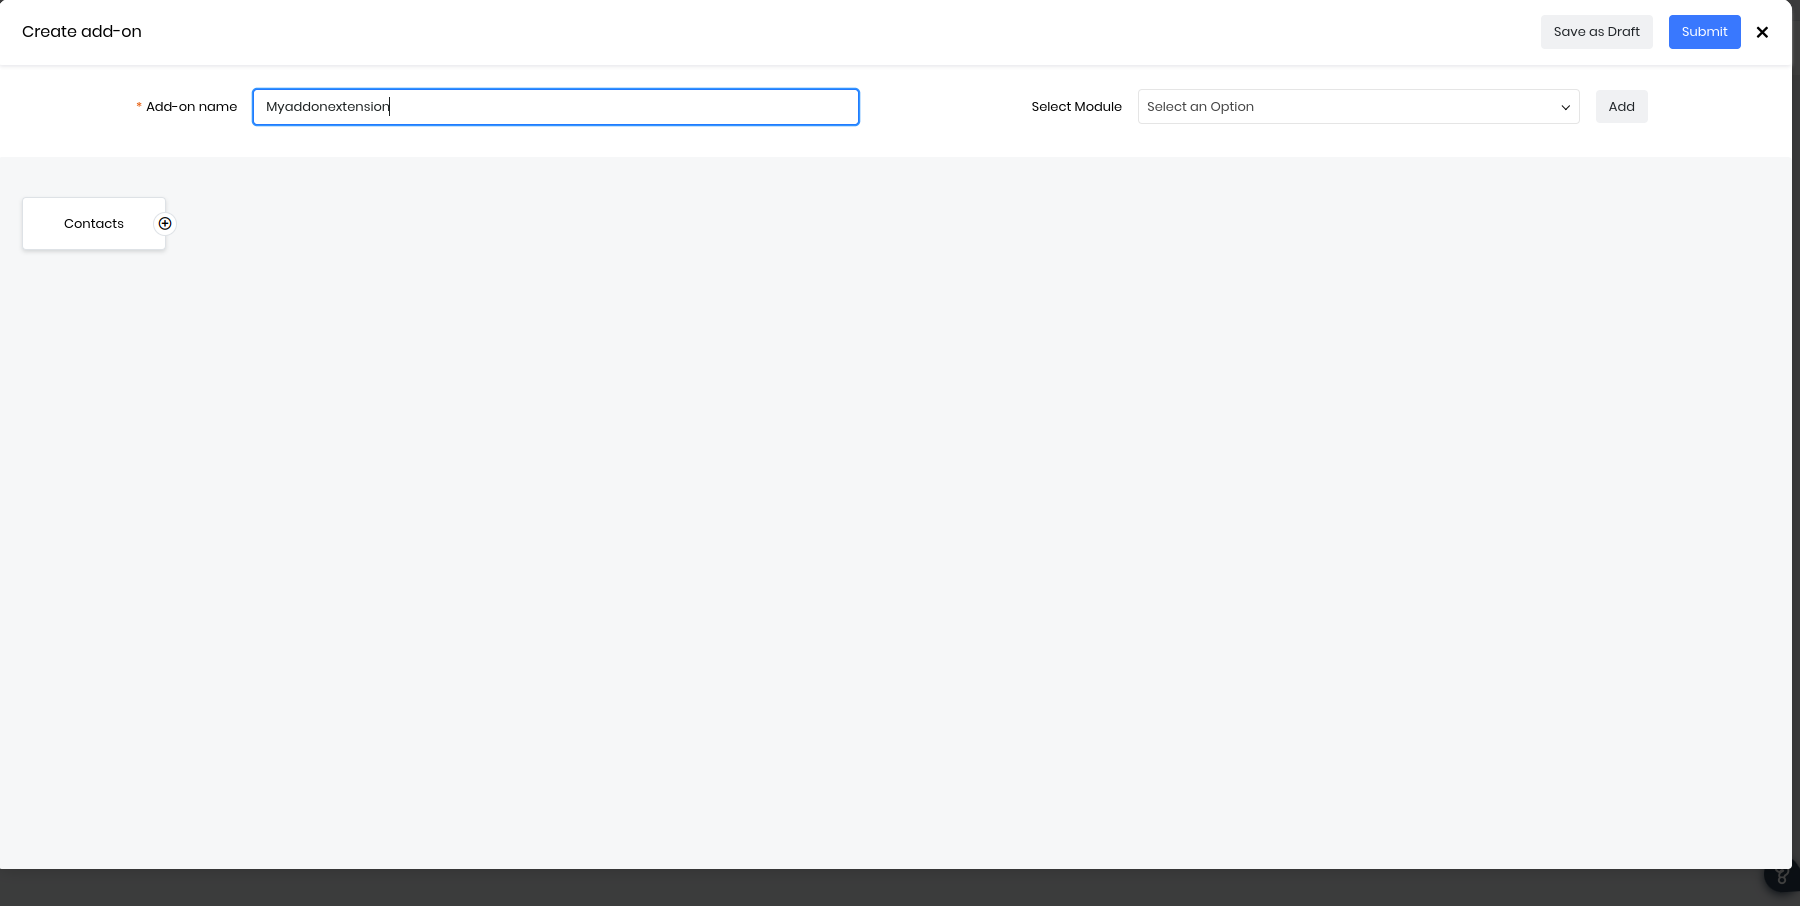
Add-on name - The name of the Add-on.
-
Select module - Select any module and click on add.
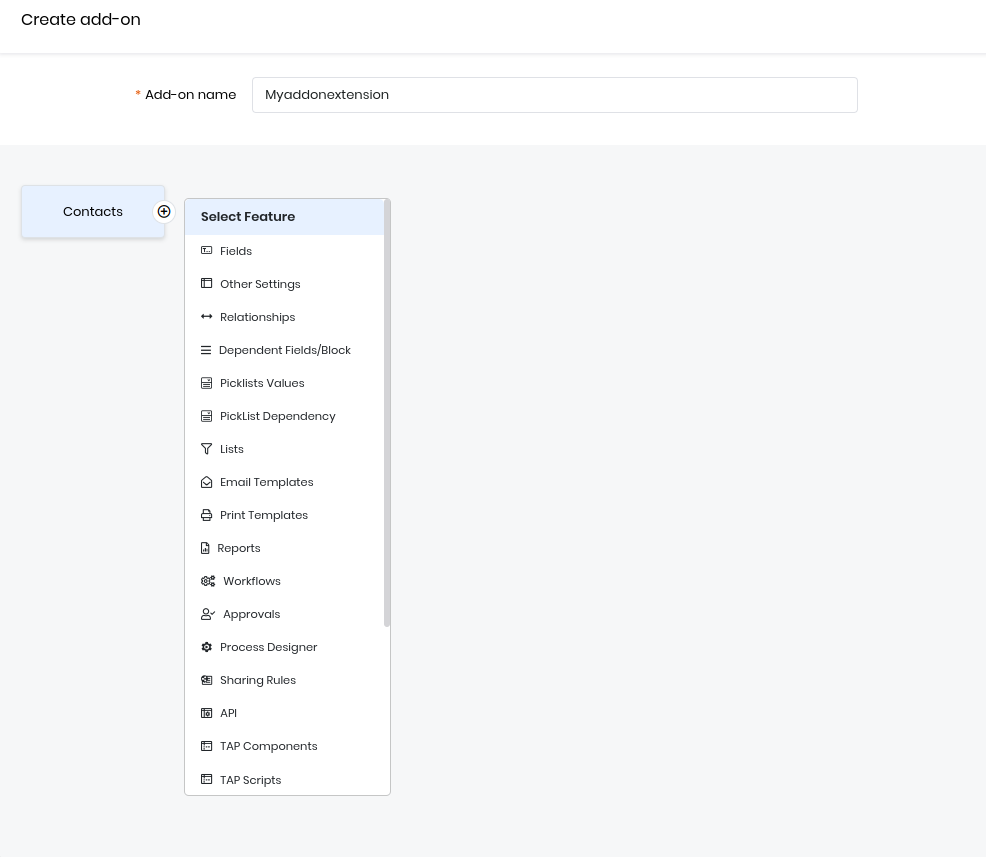
-
Once you select module you will be able to see that module now click on the + icon and select any feature which is required.
Features Available:
- Fields - Any custom field which is needed can be selected here.
- Other Settings - Settings such as closed states, duplicate prevention can be selected here.
- Relationships - Custom relations ships.
- Dependent Fields/Block - Field dependencies settings.
- Picklists Values - All picklist values.
- PickList Dependency - All picklist dependencies.
- Lists - All the filters in that module.
- Email Templates - All the templates created in that module.
- Print Templates - All the templates created in that modules.
- Reports - All the reports in the module.
- Workflows - All the workflows in the module.
- Approvals - Approvals in the module.
- Process Designer - Processes in the module.
- Sharing Rules - Rules added in the module.
- API - Rest api's and webhooks created for the module.
- TAP Components - module designer component.
- TAP Scripts - module designer scripts.
- TAP Styles - modules designer styles.
- TAP Pages - modules designer pages.
- TAP Connectors - connectors.
- Labels - labels.
- Module Designer Domains - Whitelisted domains.
- Api Designer Domains - Whitelisted Api-designer domains.
- UIActions Components - UI actions in the module.
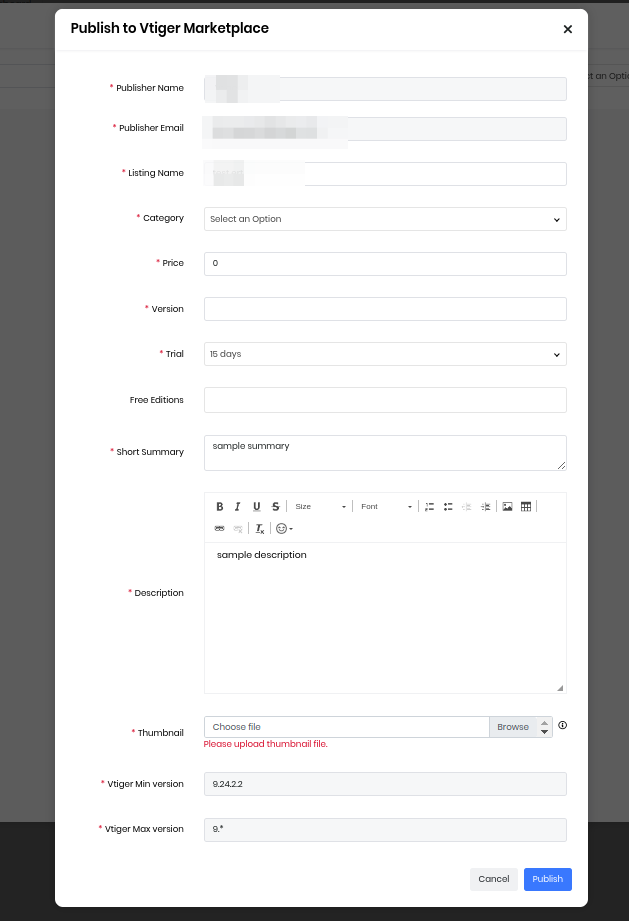
- Once the required modules and features are selected submit it for review.
- Once it is submitted.
- The Vtiger team will review the changes.
- If any changes are required vtiger team will notify the owner.
- Once all the validations and checks are completed. It is added to addons/ marketplace.
- Now you can login to any account and install this add on.
Build your own
Build an add-on for the contacts module to add a new field, list.
Prerequisites
- Go to contacts module, modules&layouts add a new field say test and save it.
- Go to contacts module and add a new filter say AllRecords.
Steps to build a add on & Submit for review
Create a new addon.
- Select contacts as module.
- Now select fields, select the custom field which is needed.
- Select the filter which is required.
- Add the necessary features and click on submit.
vtapit
https://help.vtiger.com/article/156233487-VTAPIT---Command-line-tool
vtapit is a Command line tool that enables you to develop and manage VTAP Apps created from the App Creator (Platform > App Creator). It has sub-commands similar to the git which makes it easy to learn and get started.
Get Started
Create a new application (testapp) on Main Menu > Platform > App Creator
Download your OS compatible with executable - https://extend.vtiger.com/vtap/vtapit/dist
Sub Commands
| clone | Makes a copy of the application created in the CRM to your local working directory. |
| run | Enables runtime on the local working directory, which uses local files and CRM Apis for data. |
| add | Lets you add newly created local files to the CRM app. |
| status | Lets you check status of newly added or modified local files. |
| push | Uploads all the local changes (add or modify functions) made to the files to the CRM app. |
| publish | When all local changes are pushed - use this sub-command to make it available. |
| pull | Downloads all the changes from the CRM app back to a local working directory. A conflict marker file is created if a file has changed in the CRM but not in the local directory. You need to use the diff tool to compare changes and then use the Resolve sub-command. |
| resolve | Confirm the conflict (diff) changes you have managed to review. |
Clone
This will copy the files of the custom app to your local system.
vtapit clone --crmapp=CRMAPP --crmurl=CRMURL DIRECTORY
- CRMAPP - App name that you have provided in the App Creator Module
- CRMURL - URL to your CRM Account
- DIRECTORY - The local directory where the cloned application files will be saved. Ensure this path is correct and writable
Example:
vtapit clone --crmapp=testapp --crmurl=https://your.odx.vtiger.crm local_dir/testapp
You will be prompted for CRM Username and Password for authentication
Run
This command will run the custom app on your local server. After running this command, you can access it http://localhost:8080/myapps/YOUR_APPNAME
cd local_dir/testapp
vtapit run
Add
This command will add a new file to your application.
cd local_dir/testapp
touch path_to_new_file
vtapit add path_to_new_file
Status
This command will show status of files in local directory of application.
cd local_dir/testapp
vtapit status
Push
This command will send the updated files and commit them to the app creator.
cd local_dir/testapp
vtapit push
Publish
Applies the changed files (saved throgh Push) to application. Users can view the new changes to the app.
cd local_dir/testapp
vtapit publish
Pull
This command will pull the changes done on the app creator by other developers to your local copy.
cd local_dir/testapp
vtapit pull
Resolve
In case of conflict resolution, this command will mark the file path to resolve so it can be published to the app creator.
cd local_dir/testapp
vtapit resolve path_to_file
Note: You can set up CRM environment variables to avoid repeating on the command line.
CRM_URL=https://crm.url.tld
CRM_USER=user@abc.com
CRM_PASSWORD=password
CRM_APP=appname
VSCode
You can use VSCode extension too.
REST API
Vtiger Cloud offers REST APIs which can be used for integration with external application.
Endpoint: https://CRM_URL/restapi/v1/vtiger/default
Authentication: HTTP Basic (CRM Username and Access Key). You can find Access Key under My Preferences in the CRM.
Response Format
| Status | Body | Remarks |
|---|---|---|
| 200 | JSON | { success: true, result: JSON_VAL } |
| 4xx | - | Failure. Header line with error message |
| 5xx | - | Failure. Header line with error message |
Record ID
Webservice ID of the form (ModuleTypeIDxRecordID) is used to represent record references.
Described below are the details of API. You can use this postman collection to explore against your CRM instance.
/me - User Profile
This API helps you to get the logged in user profile or context (like UserID, Name).
GET Endpoint/me
{
    success: true,
    result: {
        id: user_record_id,
        user_name: string,
        fist_name: string,
        last_name: string,
        email1: string
    }
}
/listtypes - Modules List
Use this API to get details of the accessible list of modules and basic metadata of module.
GET Endpoint/listtypes?fieldTypeList=null
| Parameter | Remarks |
|---|---|
| fieldTypeList | null - for any. fieldTypeList[]=typename for specific type. (typename = email, grid etc...) |
{
    success: true,
    result: {
        types: [
            module_name
        ],
        information: {
            module_name: {
                isEntity: boolean,
                label: string,
                singular: string
            }
        }
    }
}
/describe - Module Metadata
Use this API to get metadata of module comprising of fields, blocks, permissions.
GET Endpoint/describe?elementType=module_name
| Parameter | Remarks |
|---|---|
| elementType | Module name |
{
    success: true,
    result: {
        name: string,
        label: string,
        createable: boolean,
        updateable: boolean,
        deleteable: boolean,
        retrieveable: boolean,
        fields: [
            {
                name: string,
                label: string,
                mandatory: boolean,
                quickcreate: boolean,
                summaryfield: boolean,
                headerfield: boolean,
                default: value,
                type: {
                    name: string,
                    length: size,
                    refersTo: [ reference_module_name ],
                    picklistValues: [ {value: val, label: lbl} ],
                    defaultValue: picklist_value
                },
                isunique: boolean,
                nullable: boolean,
                editable: boolean,
                data: json // extended info
            }
        ],
        inactivefields: [ field_info ],
        idPrefix: module_type_id,
        isEntity: boolean,
        allowDuplicates: boolean,
        labelFields: string_or_arrayOfString
    }
}
/create
This API enables you to create a single entity record. You are expected to send all the mandatory field values along with the optional fields for successful record creation.
POST Endpoint/create?elementType=moduleName&element=convert_into_json_string ({field1:value1, field2:value2})
| Parameter | Remarks |
|---|---|
| elementType | Target Module Name |
| element | ({field1: value1, field2:value2}) |
{
    "success": true,
    "result": {
        "notes_title": "Sample_file_1",
        "document_source": "Vtiger",
        "assigned_user_id": "",
        "note_no": "DOC19",
        "folderid": "22x1",
        "createdtime": "2023-06-13 05:46:59",
        "modifiedtime": "2023-06-13 05:46:59",
        "modifiedby": "",
        "created_user_id": "",
        "source": "WEBSERVICE",
        "starred": "0",
        "tags": "",
        "record_currency_id": "",
        "record_conversion_rate": "",
        "filelocationtype": "I",
        "filestatus": "1",
        "filename": "",
        "filesize": "0",
        "filetype": "",
        "fileversion": "",
        "filedownloadcount": "",
        "share_count": "0",
        "email_open_count": "0",
        "open_count": "0",
        "shared_download_count": "0",
        "reshares_count": "0",
        "unique_open_count": "0",
        "deal_conversion_rate": "0",
        "avg_time_spent": "0",
        "total_time_spent": "0",
        "document_type": "Public",
        "notecontent": "",
        "id": "7x549",
        "isclosed": 0,
        "label": "Sample_file_1",
        "url": "https://{{your_domain}}/view/detail?module=Documents&id=549"
    }
}
/retrieve
You can pull a piece of specific record information using this API.
GET Endpoint/retrieve?id=record_Id
| Parameter | Remarks |
|---|---|
| id | record_Id - Restapi uses a composite key to represent record id, a combination of (module-type-id and module-record-id) separated by (x). |
{
    "success": true,
    "result": {
        "notes_title": "Sample_file_1",
        "document_source": "Vtiger",
        "assigned_user_id": "",
        "note_no": "DOC14",
        "folderid": "22x1",
        "createdtime": "2023-06-09 06:11:18",
        "modifiedtime": "2023-06-09 06:11:18",
        "modifiedby": "",
        "created_user_id": "",
        "source": "WEBSERVICE",
        "starred": "0",
        "tags": "",
        "record_currency_id": "",
        "record_conversion_rate": "",
        "filelocationtype": "I",
        "filestatus": "1",
        "filename": "Sample_1.odt",
        "filesize": "22728",
        "filetype": "application/vnd.oasis.opendocument.text",
        "fileversion": "",
        "filedownloadcount": "18",
        "share_count": "0",
        "email_open_count": "0",
        "open_count": "0",
        "shared_download_count": "0",
        "reshares_count": "0",
        "unique_open_count": "0",
        "deal_conversion_rate": "0",
        "avg_time_spent": "0",
        "total_time_spent": "0",
        "document_type": "Public",
        "notecontent": "",
        "id": "7x521",
        "isclosed": 0,
        "imageattachmentids": "7x522",
        "label": "Sample_file_1",
        "url": "https://{{your_domain}}/view/detail?module=Documents&id=521"
    }
}
/query
Retrieve one or more records matching filtering field conditions.
GET Endpoint/query?query=query_string;
| Parameter | Remarks |
|---|---|
| query | query_string |
{
    "success": true,
    "result": [
        {
            "notes_title": "testing 123",
            "document_source": "Vtiger",
            "assigned_user_id": "",
            "note_no": "DOC11",
            "folderid": "22x1",
            "createdtime": "2023-06-09 05:57:13",
            "modifiedtime": "2023-06-09 05:57:13",
            "modifiedby": "",
            "created_user_id": "",
            "source": "WEBSERVICE",
            "starred": "0",
            "tags": "",
            "record_currency_id": "",
            "record_conversion_rate": "",
            "filelocationtype": "",
            "filestatus": "1",
            "filename": "",
            "filesize": "0",
            "filetype": "",
            "fileversion": "",
            "filedownloadcount": "",
            "share_count": "0",
            "email_open_count": "0",
            "open_count": "0",
            "shared_download_count": "0",
            "reshares_count": "0",
            "unique_open_count": "0",
            "deal_conversion_rate": "0",
            "avg_time_spent": "0",
            "total_time_spent": "0",
            "document_type": "Public",
            "notecontent": "",
            "id": "7x517",
            "isclosed": "0",
            "record_currency_symbol": null
        }
    ]
}
/update
When you intend to update specific fields of existing records, you can use this or Revise API. Note: This API expects all the mandatory fields to be re-stated as part of the element parameter.
POST Endpoint/update?element={"id":"record_id", "field1":"revalue1", "field2":"value2"}
| Parameter | Remarks |
|---|---|
| element | {"id":"record_id", "field1":"revalue1", "field2":"value2"} |
{
    "success": true,
    "result": {
        "productname": "test1",
        "productcode": "",
        "discontinued": "1",
        "product_type": "Solo",
        "productcategory": "",
        "vendor_id": "",
        "manufacturer": "",
        "sales_start_date": "",
        "sales_end_date": "",
        "start_date": "",
        "expiry_date": "",
        "serial_no": "",
        "mfr_part_no": "",
        "vendor_part_no": "",
        "website": "",
        "glacct": "",
        "productsheet": "",
        "createdtime": "2023-06-08 09:35:49",
        "modifiedtime": "2023-06-13 05:47:40",
        "product_no": "PRO15",
        "modifiedby": "",
        "created_user_id": "",
        "source": "WEBSERVICE",
        "starred": "0",
        "tags": "",
        "record_currency_id": "21x2",
        "record_conversion_rate": "1.00000",
        "item_barcode": "",
        "hsn_code": "",
        "unit_price": "0.00000000",
        "commissionrate": "",
        "taxclass": "",
        "purchase_cost": "0.00000000",
        "purchase_cost_currency_value": "",
        "billing_type": "One time",
        "usageunit": "",
        "qty_per_unit": "",
        "qtyinstock": "0.000",
        "reorderlevel": "0",
        "assigned_user_id": "19x1",
        "qtyindemand": "",
        "defect_qtyinstock": "0.000",
        "reorder_qty": "0.000",
        "availablestock": "0.000",
        "committedstock": "0.000",
        "incomingstock": "0.000",
        "imagename": "",
        "description": "",
        "id": "6x502",
        "isclosed": 0,
        "label": "test1",
        "url": "https://{{your_domain}}/view/detail?module=Products&id=502",
        "currency1": 0,
        "currency2": 0,
        "currency_id": "21x2"
    }
}
/revise
This is similar to Update API but relaxes the constraint of re-stating the mandatory fields but expects target fields that need to be updated.
POST Endpoint/revise?element={"id":"record_id", "field2":"revalue2"}
| Parameter | Remarks |
|---|---|
| element | {"id":"record_id", "field2":"revalue2"} |
{
    "success": true,
    "result": {
        "productname": "sample",
        "productcode": "",
        "discontinued": "1",
        "product_type": "Solo",
        "productcategory": "",
        "vendor_id": "",
        "manufacturer": "",
        "sales_start_date": "",
        "sales_end_date": "",
        "start_date": "",
        "expiry_date": "",
        "serial_no": "",
        "mfr_part_no": "",
        "vendor_part_no": "",
        "website": "",
        "glacct": "",
        "productsheet": "",
        "createdtime": "2023-06-08 09:35:49",
        "modifiedtime": "2023-06-13 05:47:56",
        "product_no": "PRO15",
        "modifiedby": "",
        "created_user_id": "",
        "source": "WEBSERVICE",
        "starred": "0",
        "tags": "",
        "record_currency_id": "21x2",
        "record_conversion_rate": "1.00000",
        "item_barcode": "",
        "hsn_code": "",
        "unit_price": "0.00000000",
        "commissionrate": "",
        "taxclass": "",
        "purchase_cost": "0.00000000",
        "purchase_cost_currency_value": "",
        "billing_type": "One time",
        "usageunit": "",
        "qty_per_unit": "",
        "qtyinstock": "0.000",
        "reorderlevel": "0",
        "assigned_user_id": "",
        "qtyindemand": "",
        "defect_qtyinstock": "0.000",
        "reorder_qty": "0.000",
        "availablestock": "0.000",
        "committedstock": "0.000",
        "incomingstock": "0.000",
        "imagename": "",
        "description": "",
        "id": "6x502",
        "isclosed": 0,
        "label": "sample",
        "url": "https://{{your_domain}}/view/detail?module=Products&id=502",
        "currency1": 0,
        "currency2": 0,
        "currency_id": "21x2"
    }
}
/sync
When you need to fetch records that changed their state from the last-known time, you can use this API.
GET Endpoint/sync?modifiedTime=timestamp&elementType=moduleName&syncType=sync_type
| Parameter | Remarks |
|---|---|
| modifiedTime | Last known modified time from where you expect state changes of records should be in UNIX timestamp. For example 1561718898 |
| elementType | Target module name. |
| syncType | user: fetch records restricted to the assigned owner of the record. userandgroup: fetch records restricted to the assigned owner of own’s group. application: fetch records without restriction on the assigned owner. |
{
    "success": true,
    "result": {
        "updated": [
            {
                "salutationtype": "",
                "firstname": "",
                "lastname": "Ram",
                "email": "",
                "phone": "",
                "mobile": "",
                "homephone": "",
                "birthday": "",
                "fax": "",
                "account_id": "",
                "title": "",
                "department": "",
                "contact_id": "",
                "leadsource": "",
                "secondaryemail": "",
                "assistant": "",
                "assigned_user_id": "",
                "assistantphone": "",
                "donotcall": "0",
                "notify_owner": "0",
                "emailoptout": "0",
                "createdtime": "2023-06-09 04:36:47",
                "modifiedtime": "2023-06-12 07:20:52",
                "contact_no": "CON24",
                "modifiedby": "",
                "isconvertedfromlead": "0",
                "created_user_id": "",
                "primary_twitter": "",
                "source": "WEBSERVICE",
                "engagement_score": "0",
                "last_contacted_on": "",
                "last_contacted_via": "",
                "slaid": "",
                "contacttype": "Lead",
                "contactstatus": "Cold",
                "happiness_rating": "",
                "record_currency_id": "",
                "record_conversion_rate": "",
                "profile_score": "0",
                "profile_rating": "0",
                "referred_by": "",
                "emailoptin": "singleoptinuser",
                "emailoptin_requestcount": "0",
                "emailoptin_lastrequestedon": "",
                "smsoptin": "singleoptinuser",
                "language": "",
                "primary_phone_field": "",
                "primary_email_field": "",
                "isclosed": "0",
                "source_campaign": "",
                "otherphone": "",
                "portal": "0",
                "support_start_date": "",
                "support_end_date": "",
                "mailingcountry": "",
                "othercountry": "",
                "mailingstreet": "",
                "otherstreet": "",
                "mailingpobox": "",
                "otherpobox": "",
                "mailingcity": "",
                "othercity": "",
                "mailingstate": "",
                "otherstate": "",
                "mailingzip": "",
                "otherzip": "",
                "mailing_gps_lat": "-360.0000000",
                "mailing_gps_lng": "-360.0000000",
                "description": "",
                "imagename": "",
                "primary_linkedin": "",
                "followers_linkedin": "",
                "primary_facebook": "",
                "followers_facebook": "",
                "facebookid": "0",
                "instagramid": "",
                "twitterid": "",
                "id": "4x506",
                "_module": "Contacts"
            },
            {
                "salutationtype": "",
                "firstname": "Shri",
                "lastname": "Ram",
                "email": "ram12@gmail.com",
                "phone": "+911234567890",
                "mobile": "",
                "homephone": "",
                "birthday": "",
                "fax": "",
                "account_id": "",
                "title": "",
                "department": "",
                "contact_id": "",
                "leadsource": "",
                "secondaryemail": "",
                "assistant": "",
                "assigned_user_id": "",
                "assistantphone": "",
                "donotcall": "0",
                "notify_owner": "0",
                "emailoptout": "0",
                "createdtime": "2023-06-09 05:31:14",
                "modifiedtime": "2023-06-12 12:45:36",
                "contact_no": "CON25",
                "modifiedby": "",
                "isconvertedfromlead": "0",
                "created_user_id": "",
                "primary_twitter": "",
                "source": "WEBSERVICE",
                "engagement_score": "0",
                "last_contacted_on": "",
                "last_contacted_via": "",
                "slaid": "",
                "contacttype": "Lead",
                "contactstatus": "Cold",
                "happiness_rating": "",
                "record_currency_id": "",
                "record_conversion_rate": "",
                "profile_score": "0",
                "profile_rating": "0",
                "referred_by": "",
                "emailoptin": "none",
                "emailoptin_requestcount": "0",
                "emailoptin_lastrequestedon": "0000-00-00 00:00:00",
                "smsoptin": "singleoptinuser",
                "language": "",
                "primary_phone_field": "",
                "primary_email_field": "",
                "isclosed": "0",
                "source_campaign": "",
                "otherphone": "",
                "portal": "0",
                "support_start_date": "",
                "support_end_date": "",
                "mailingcountry": "",
                "othercountry": "",
                "mailingstreet": "",
                "otherstreet": "",
                "mailingpobox": "",
                "otherpobox": "",
                "mailingcity": "",
                "othercity": "",
                "mailingstate": "",
                "otherstate": "",
                "mailingzip": "",
                "otherzip": "",
                "mailing_gps_lat": "-360.0000000",
                "mailing_gps_lng": "-360.0000000",
                "description": "",
                "imagename": "",
                "primary_linkedin": "",
                "followers_linkedin": "",
                "primary_facebook": "",
                "followers_facebook": "",
                "facebookid": "0",
                "instagramid": "",
                "twitterid": "",
                "id": "4x515",
                "_module": "Contacts"
            }
        ],
        "deleted": [
            "4x503"
        ],
        "more": false,
        "lastModifiedTime": 1686573936
    }
}
/delete
Delete existing records through this API.
POST Endpoint/delete?id=record_Id
| Parameter | Remarks |
|---|---|
| id | record_Id |
{
    "success": true,
    "result": {
        "status": "successful"
    }
}
/relatedtypes
What relationship a module has with others can be obtained through this API.
GET Endpoint/relatedtypes?elementType=moduleName
| Parameter | Remarks |
|---|---|
| elementType | Target module name. |
{
    "success": true,
    "result": {
        "types": [
            "Potentials",
            "Calendar",
            "Emails",
            "Quotes",
            "PurchaseOrder",
            "SalesOrder",
            "Products",
            "Calendar",
            "Documents",
            "Campaigns",
            "Invoice",
            "ServiceContracts",
            "Services",
            "Project",
            "Assets",
            "EmailCampaigns",
            "Vendors",
            "ModComments",
            "Cases",
            "Olark",
            "WorkOrders",
            "PhoneCalls",
            "Esign",
            "Webchat",
            "SMSNotifier"
        ],
        "information": {
            "18": {
                "name": "Potentials",
                "label": "Potentials",
                "translated_label": "Deals",
                "isEntity": "1",
                "relation_id": "18",
                "actions": "add"
            },
            "19": {
                "name": "Calendar",
                "label": "Activities",
                "translated_label": "Activities",
                "isEntity": "1",
                "relation_id": "19",
                "actions": "add"
            },
            "20": {
                "name": "Emails",
                "label": "Emails",
                "translated_label": "Emails",
                "isEntity": "1",
                "relation_id": "20",
                "actions": "add"
            },
            "22": {
                "name": "Quotes",
                "label": "Quotes",
                "translated_label": "Quotes",
                "isEntity": "1",
                "relation_id": "22",
                "actions": "add"
            },
            "23": {
                "name": "PurchaseOrder",
                "label": "Purchase Order",
                "translated_label": "Purchase Orders",
                "isEntity": "1",
                "relation_id": "23",
                "actions": "add"
            },
            "24": {
                "name": "SalesOrder",
                "label": "Sales Order",
                "translated_label": "Sales Orders",
                "isEntity": "1",
                "relation_id": "24",
                "actions": "add"
            },
            "25": {
                "name": "Products",
                "label": "Products",
                "translated_label": "Products",
                "isEntity": "1",
                "relation_id": "25",
                "actions": "select"
            },
            "26": {
                "name": "Calendar",
                "label": "Activity History",
                "translated_label": "Activity History",
                "isEntity": "1",
                "relation_id": "26",
                "actions": "add"
            },
            "27": {
                "name": "Documents",
                "label": "Documents",
                "translated_label": "Documents",
                "isEntity": "1",
                "relation_id": "27",
                "actions": "add,select"
            },
            "28": {
                "name": "Campaigns",
                "label": "Campaigns",
                "translated_label": "Campaigns",
                "isEntity": "1",
                "relation_id": "28",
                "actions": "select"
            },
            "29": {
                "name": "Invoice",
                "label": "Invoice",
                "translated_label": "Invoices",
                "isEntity": "1",
                "relation_id": "29",
                "actions": "add"
            },
            "91": {
                "name": "ServiceContracts",
                "label": "Service Contracts",
                "translated_label": "Service Contracts",
                "isEntity": "1",
                "relation_id": "91",
                "actions": "ADD"
            },
            "106": {
                "name": "Services",
                "label": "Services",
                "translated_label": "Services",
                "isEntity": "1",
                "relation_id": "106",
                "actions": "SELECT"
            },
            "123": {
                "name": "Project",
                "label": "Projects",
                "translated_label": "Projects",
                "isEntity": "1",
                "relation_id": "123",
                "actions": "add"
            },
            "373": {
                "name": "Assets",
                "label": "Assets",
                "translated_label": "Assets",
                "isEntity": "1",
                "relation_id": "373",
                "actions": "ADD"
            },
            "404": {
                "name": "EmailCampaigns",
                "label": "List and Campaigns",
                "translated_label": "List and Campaigns",
                "isEntity": "1",
                "relation_id": "404",
                "actions": "ADD"
            },
            "474": {
                "name": "Vendors",
                "label": "Vendors",
                "translated_label": "Vendors",
                "isEntity": "1",
                "relation_id": "474",
                "actions": "SELECT"
            },
            "565": {
                "name": "ModComments",
                "label": "ModComments",
                "translated_label": "Comments",
                "isEntity": "1",
                "relation_id": "565",
                "actions": "ADD"
            },
            "584": {
                "name": "Cases",
                "label": "Cases",
                "translated_label": "Cases",
                "isEntity": "1",
                "relation_id": "584",
                "actions": "ADD"
            },
            "593": {
                "name": "Olark",
                "label": "Olark",
                "translated_label": "Olark Chats",
                "isEntity": "1",
                "relation_id": "593",
                "actions": ""
            },
            "1021": {
                "name": "WorkOrders",
                "label": "WorkOrders",
                "translated_label": "Work Orders",
                "isEntity": "1",
                "relation_id": "1021",
                "actions": "ADD"
            },
            "2420": {
                "name": "PhoneCalls",
                "label": "Phone Calls",
                "translated_label": "Phone Calls",
                "isEntity": "1",
                "relation_id": "2420",
                "actions": ""
            },
            "2882": {
                "name": "Esign",
                "label": "Esign",
                "translated_label": "Esign Documents",
                "isEntity": "1",
                "relation_id": "2882",
                "actions": "ADD,SELECT"
            },
            "4370": {
                "name": "Webchat",
                "label": "Webchat",
                "translated_label": "Live Chats",
                "isEntity": "1",
                "relation_id": "4370",
                "actions": ""
            },
            "6569": {
                "name": "SMSNotifier",
                "label": "SMSNotifier",
                "translated_label": "SMS Messages",
                "isEntity": "1",
                "relation_id": "6569",
                "actions": " "
            }
        }
    }
}
/reopen
Reopen closed record if permitted.
POST Endpoint/reopen
| Body - urlencoded | Remarks |
|---|---|
| id | record_Id |
{
    "success": true,
    "result": {
        "message": "Record reopened successfully."
    }
}
/delete_related
When you are looking to break the existing relationship between two records, you can use this API.
POST Endpoint/delete_related
| Body - urlencoded | Remarks |
|---|---|
| sourceRecordId | record_id |
| relatedRecordId | target_record_id |
{
    "success": true,
    "result": {
        "message": "successful"
    }
}
/tags_add
Add tags to the target record.
POST Endpoint/tags_add
| Body - urlencoded | Remarks |
|---|---|
| id | record_Id |
| tags | ["tag1", "tag2"] |
{
    "success": true,
    "result": {
        "message": "tags added"
    }
}
/tags_retrieve
Fetch tags applied on target record.
GET Endpoint/tags_retrieve?id=record_Id
| Parameter | Remarks |
|---|---|
| id | record_Id |
{
    "success": true,
    "result": {
        "tags": []
    }
}
/tags_delete
Drop tag(s) applied on the target record or across all records.
POST Endpoint/tags_delete
| Body - urlencoded | Remarks |
|---|---|
| id | record_Id |
| tags | ["tag"] |
| delete_all | boolean |
{
    "success": true,
    "result": {
        "message": "tags deleted"
    }
}
/get_account_hierarchy
Accounts can be linked to parent Accounts and hence form a hierarchy.
GET Endpoint/get_account_hierarchy?id=record_Id
| Parameter | Remarks |
|---|---|
| id | record_Id |
{
    "success": true,
    "result": [
        {
            "id": "3x539",
            "name": "TATA",
            "level": 1,
            "label": "Parent Org",
            "current": "false"
        },
        {
            "id": "3x540",
            "name": "tcs",
            "level": 2,
            "label": "Org",
            "current": "true"
        }
    ]
}
/lookup
This API enables you to search records with a phone or email id in different modules and fields.
GET Endpoint/lookup?type=phone/email&value=xxx&searchIn=["moduleName"]
| Parameter | Remarks |
|---|---|
| type | phone/email |
| value | xxx |
| searchIn | ["moduleName"] |
{
    "success": true,
    "result": [
        {
            "salutationtype": "",
            "firstname": "Shri",
            "lastname": "Ram",
            "email": "ram12@gmail.com",
            "phone": "+911234567890",
            "mobile": "",
            "homephone": "",
            "birthday": "",
            "fax": "",
            "account_id": "",
            "title": "",
            "department": "",
            "contact_id": "",
            "leadsource": "",
            "secondaryemail": "",
            "assistant": "",
            "assigned_user_id": "",
            "assistantphone": "",
            "donotcall": "0",
            "notify_owner": "0",
            "emailoptout": "0",
            "createdtime": "2023-06-09 05:31:14",
            "modifiedtime": "2023-06-12 12:45:36",
            "contact_no": "CON25",
            "modifiedby": "",
            "isconvertedfromlead": "0",
            "created_user_id": "",
            "primary_twitter": "",
            "source": "WEBSERVICE",
            "engagement_score": "0",
            "last_contacted_on": "",
            "last_contacted_via": "",
            "slaid": "",
            "starred": "0",
            "tags": "",
            "contacttype": "Lead",
            "contactstatus": "Cold",
            "happiness_rating": "",
            "record_currency_id": "",
            "record_conversion_rate": "",
            "profile_score": "0",
            "profile_rating": "0",
            "referred_by": "",
            "emailoptin": "none",
            "emailoptin_requestcount": "0",
            "emailoptin_lastrequestedon": "0000-00-00 00:00:00",
            "smsoptin": "singleoptinuser",
            "language": "",
            "primary_phone_field": "",
            "primary_email_field": "",
            "isclosed": 0,
            "source_campaign": "",
            "otherphone": "",
            "portal": "0",
            "support_start_date": "",
            "support_end_date": "",
            "mailingcountry": "",
            "othercountry": "",
            "mailingstreet": "",
            "otherstreet": "",
            "mailingpobox": "",
            "otherpobox": "",
            "mailingcity": "",
            "othercity": "",
            "mailingstate": "",
            "otherstate": "",
            "mailingzip": "",
            "otherzip": "",
            "mailing_gps_lat": "-360.0000000",
            "mailing_gps_lng": "-360.0000000",
            "description": "",
            "imagename": "",
            "primary_linkedin": "",
            "followers_linkedin": "",
            "primary_facebook": "",
            "followers_facebook": "",
            "facebookid": "0",
            "instagramid": "",
            "twitterid": "",
            "id": "4x515",
            "label": "Shri Ram",
            "url": "https://{{your_domain}}/view/detail?module=Contacts&id=515"
        }
    ]
}
/picklist_dependency
You can get dependency between two picklist fields.
GET Endpoint/picklist_dependency?module=moduleName&sourcefield=sourceFieldName&targetfield=targetFieldName
| Parameter | Remarks |
|---|---|
| module | moduleName |
| sourcefield | sourceFieldName |
| targetfield | targetFieldName |
{
    "success": true,
    "result": {
        "sourcefield": "contacttype",
        "targetfield": "contactstatus",
        "valuemapping": [
            {
                "sourcevalue": "Lead",
                "targetvalues": [
                    "Cold",
                    "Warm",
                    "Hot",
                    "NLWC",
                    "Inactive"
                ]
            },
            {
                "sourcevalue": "Sales Qualified Lead",
                "targetvalues": [
                    "Accepted",
                    "Lost",
                    "Rejected"
                ]
            },
            {
                "sourcevalue": "Customer",
                "targetvalues": [
                    "Active",
                    "NLWC",
                    "Inactive"
                ]
            },
            {
                "sourcevalue": "Partner",
                "targetvalues": [
                    "Active",
                    "NLWC",
                    "Inactive"
                ]
            },
            {
                "sourcevalue": "Analyst",
                "targetvalues": [
                    "Positive",
                    "Neutral",
                    "Negative",
                    "NLWC",
                    "Inactive"
                ]
            },
            {
                "sourcevalue": "Competitor",
                "targetvalues": [
                    ""
                ]
            },
            {
                "sourcevalue": "Vendor",
                "targetvalues": [
                    "Active",
                    "NLWC",
                    "Inactive"
                ]
            },
            {
                "sourcevalue": "Marketing Qualified Lead",
                "targetvalues": [
                    "Not reached",
                    "Reached",
                    "Interested"
                ]
            }
        ]
    }
}
/convertlead
Use this API to achieve lead conversion.
POST Endpoint/convertlead
| Body - urlencoded | Remarks |
|---|---|
| element | {"leadId":"2x3072","entities":{"Contacts":{"create":true},"Accounts":{"create":true},"Potentials":{"create":true}}} |
/add_related
Establish a relationship between the two records.
POST Endpoint/add_related
| Body - urlencoded | Remarks |
|---|---|
| sourceRecordId | record_id |
| relatedRecordId | target_record_id |
| relationIdLabel | target_relation_label |
{
    "success": true,
    "result": {
        "message": "successful"
    }
}
/retrieve_related
When you need related records of a target, record this API to go with.
GET Endpoint/retrieve_related?id=record_Id&relatedLabel=target_relationship_label&relatedType=target_moduleName
| Parameter | Remarks |
|---|---|
| id | record_Id |
| relatedLabel | target_relationship_label |
| relatedType | target_moduleName |
{
    "success": true,
    "result": [
        {
            "productname": "sample",
            "productcode": "",
            "discontinued": "1",
            "product_type": "Solo",
            "productcategory": "",
            "vendor_id": "",
            "manufacturer": "",
            "sales_start_date": "",
            "sales_end_date": "",
            "start_date": "",
            "expiry_date": "",
            "serial_no": "",
            "mfr_part_no": "",
            "vendor_part_no": "",
            "website": "",
            "glacct": "",
            "productsheet": "",
            "createdtime": "2023-06-08 09:35:49",
            "modifiedtime": "2023-06-13 05:48:06",
            "product_no": "PRO15",
            "modifiedby": "",
            "created_user_id": "",
            "source": "WEBSERVICE",
            "starred": "0",
            "tags": "",
            "record_currency_id": "21x2",
            "record_conversion_rate": "1.00000",
            "item_barcode": "",
            "hsn_code": "",
            "unit_price": "0.00000000",
            "commissionrate": "",
            "taxclass": "",
            "purchase_cost": "0.00000000",
            "purchase_cost_currency_value": "",
            "billing_type": "One time",
            "usageunit": "",
            "qty_per_unit": "",
            "qtyinstock": "0.000",
            "reorderlevel": "0",
            "assigned_user_id": "",
            "qtyindemand": "",
            "defect_qtyinstock": "0.000",
            "reorder_qty": "0.000",
            "availablestock": "0.000",
            "committedstock": "0.000",
            "incomingstock": "0.000",
            "imagename": "",
            "description": "",
            "id": "6x502",
            "isclosed": "0",
            "record_currency_symbol": "₹"
        }
    ]
}
/query_related
Fetch related records matching a search criteria using this API.
GET Endpoint/query_related?query=query_string&id=record_id&relatedLabel=target_moduleName
| Parameter | Remarks |
|---|---|
| query | query_string |
| id | record_id |
| relatedLabel | target_moduleName |
{
    "success": true,
    "result": [
        {
            "notes_title": "file upload",
            "document_source": "Vtiger",
            "assigned_user_id": "",
            "note_no": "DOC13",
            "folderid": "22x1",
            "createdtime": "2023-06-09 05:59:50",
            "modifiedtime": "2023-06-09 05:59:50",
            "modifiedby": "",
            "created_user_id": "",
            "source": "WEBSERVICE",
            "starred": "0",
            "tags": "",
            "record_currency_id": "",
            "record_conversion_rate": "",
            "filelocationtype": "I",
            "filestatus": "1",
            "filename": "Test1.odt",
            "filesize": "13104",
            "filetype": "application/vnd.oasis.opendocument.text",
            "fileversion": "",
            "filedownloadcount": "18",
            "share_count": "0",
            "email_open_count": "0",
            "open_count": "0",
            "shared_download_count": "0",
            "reshares_count": "0",
            "unique_open_count": "0",
            "deal_conversion_rate": "0",
            "avg_time_spent": "0",
            "total_time_spent": "0",
            "document_type": "Public",
            "notecontent": "",
            "id": "7x519",
            "isclosed": "0",
            "imageattachmentids": "7x520",
            "record_currency_symbol": null
        },
        {
            "notes_title": "Sample_file_1",
            "document_source": "Vtiger",
            "assigned_user_id": "",
            "note_no": "DOC14",
            "folderid": "22x1",
            "createdtime": "2023-06-09 06:11:18",
            "modifiedtime": "2023-06-09 06:11:18",
            "modifiedby": "",
            "created_user_id": "",
            "source": "WEBSERVICE",
            "starred": "0",
            "tags": "",
            "record_currency_id": "",
            "record_conversion_rate": "",
            "filelocationtype": "I",
            "filestatus": "1",
            "filename": "Sample_1.odt",
            "filesize": "22728",
            "filetype": "application/vnd.oasis.opendocument.text",
            "fileversion": "",
            "filedownloadcount": "18",
            "share_count": "0",
            "email_open_count": "0",
            "open_count": "0",
            "shared_download_count": "0",
            "reshares_count": "0",
            "unique_open_count": "0",
            "deal_conversion_rate": "0",
            "avg_time_spent": "0",
            "total_time_spent": "0",
            "document_type": "Public",
            "notecontent": "",
            "id": "7x521",
            "isclosed": "0",
            "imageattachmentids": "7x522",
            "record_currency_symbol": null
        }
    ]
}
/files_retrieve
This special API lets you pull the content of the linked image (Contacts, Products) that are not embedded as part of the record.
GET Endpoint/files_retrieve?id=resource_Id
| Parameter | Remarks |
|---|---|
| id | resource_Id - You obtain this value through record retrieve (example: imageattachmentids field value of Contacts module record). |
{
    "success": true,
    "result": [
        {
            "fileid": "522",
            "filename": "Sample_1.odt",
            "filetype": "application/vnd.oasis.opendocument.text",
            "filesize": 22728,
            "filecontents": "UEsDBBQAAAgAAC0xyVZexjIMJwAAACcAAAAIAAAAbWltZXR5cGVhcHBsaWNhdGlvbi92bmQub2FzaX ........."
        }
    ]
}
Customize
With VTAP tool you can customize CRM to your business need either through in-app customization or developing niche application tailored to your needs. Navigate ahead to explore the step-by-step examples.
CRM Look & Feel
You can change the look and feel of the CRM, change the color of the buttons, increase/decrease the font size, change the size of default icons etc. To change these styles in Vtiger you need to be familiar with css.
(i) Go to Module Designer and create new TAP Style by providing it with a name and optional module. In the example below lets build a new theme for Vtiger, let me call it a BrownTheme and apply for all the module.
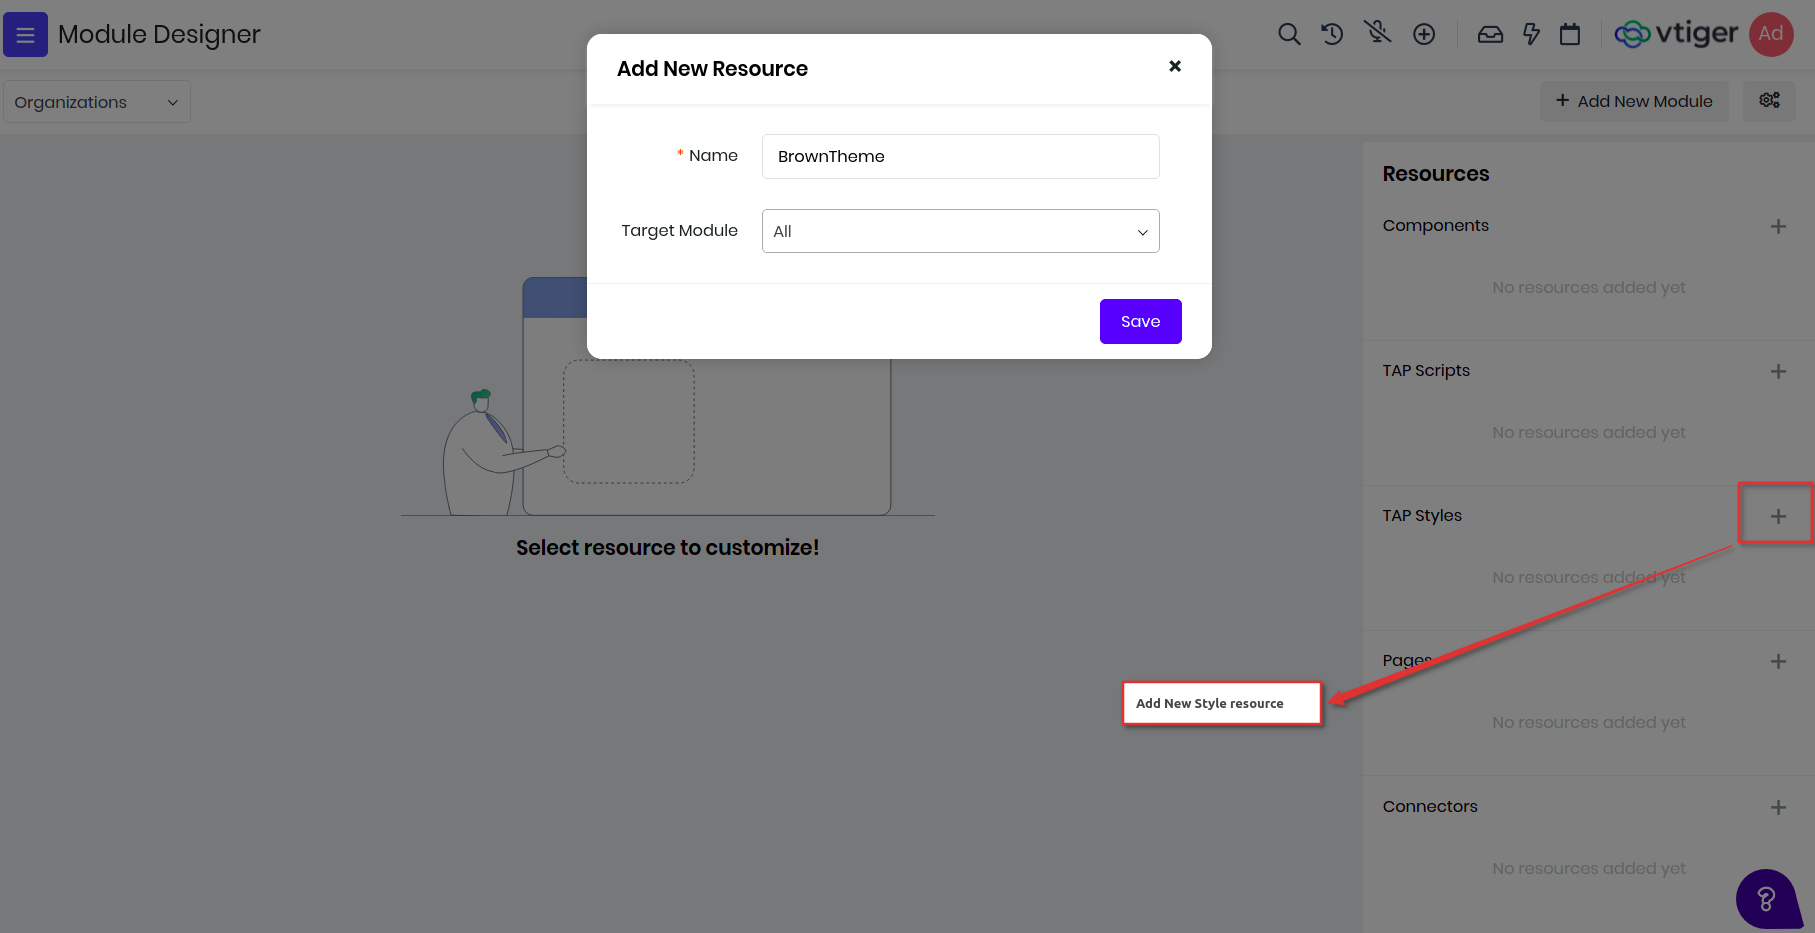
(ii) Add the below styles for changing the primary button colors, we use bootstrap framework for layout. Save and publish to reflect the changes, go to Contacts page and refresh it see it in action.
.btn-primary, .btn-primary:active {
    background-color : #d2a07b !important;
    border : 1px solid #a99e90 !important;
}
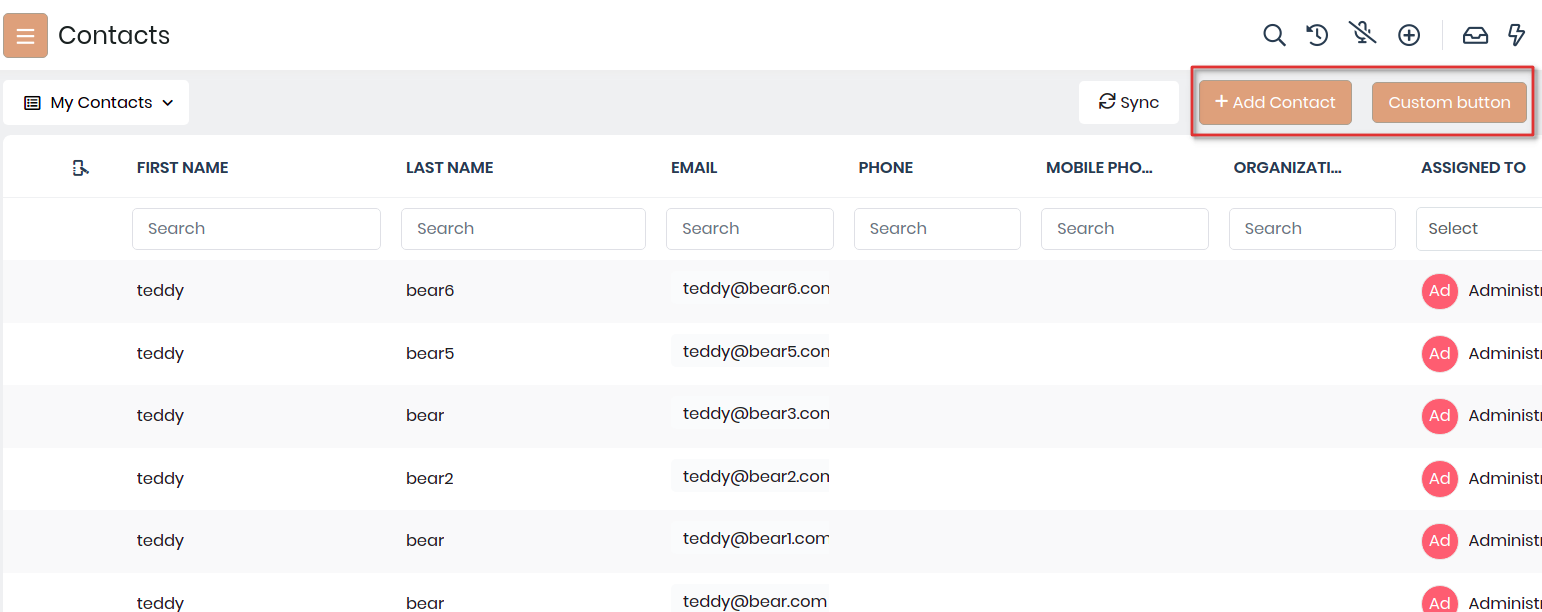
(iii) To change the top header, body header and body content changing the background colors, like below. Save and Publish and refresh to see the changes.
#topbar {
    background-color : #c0a793 !important;
}
.vds-body, .vds-bodyfixedheader {
    background-color : #f5e6df !important;
}
.vds-bodycontents {
    background-color : #c0a793 !important;
}
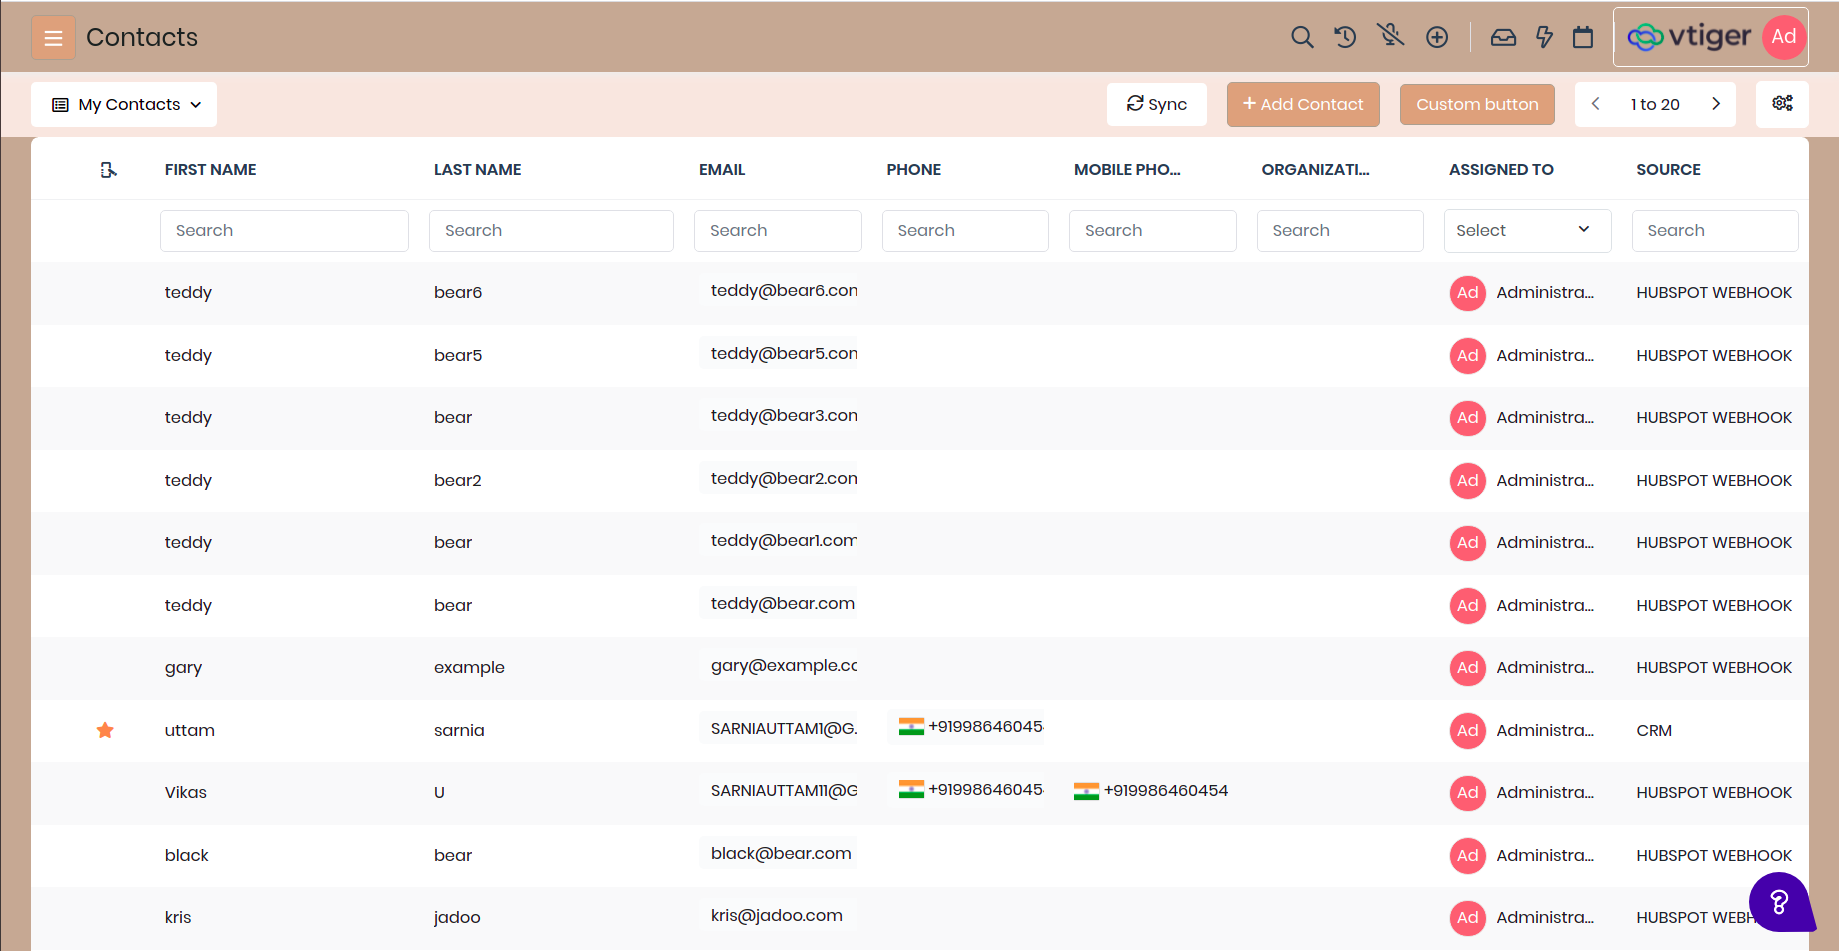
(iv) Like wise we have added more changes in to reflect brown theme are different parts of the product. Below have added css content of the BrownTheme styles. Though this is not 100% ready but it is still give you an idea on how you can build more such themes.
.btn-primary, .btn-primary:active {
    background-color : #d2a07b !important;
    border : 1px solid #a99e90 !important;
}
button.btn-primary:hover, .bg-primary-active,
    .filterTypes .filterTypesContainer:hover,
    .btn-primary:not(:disabled):not(.disabled).active,
    .btn-primary:not(:disabled):not(.disabled):active {
        background-color : #c1a692 !important;
        border : 1px solid #a99e90 !important;
}
.border-primary {
    border-color : #c1a692 !important;
}
.active-shadow {
    box-shadow : 0 0 0 0.08rem rgb(210,160,123) !important;
}
#topbar {
    background-color : #c0a793 !important;
}
.vds-body, .vds-bodyfixedheader {
    background-color : #f5e6df !important;
}
.vds-bodycontents {
    background-color : #c0a793 !important;
}
#listview-table .resize-body tr:hover:not(.selectedRow) td, .selectedRow td {
    background-color : #ffd9c4 !important;
}
#detailHeader {
    background-color : #e0dbd7 !important;
}
.detailBody, .bg-grey-hue-7 {
    background-color : #d6bcae !important;
}
.vt-checkbox-container input:checked ~.roundedCheckmark:not(.filter-checkmark),
    .select2-container--default .select2-results__option--highlighted[aria-selected],
    .bg-blue-5 {
    background-color : #d2a07b !important;
}
.activeApp, .blockSideLabel.active {
    border-left : 4px solid #c1a692;
}
.form-control:focus {
    border-color : #c1a692 !important;
    box-shadow : 0 0 0 0.08rem rgb(210,160,123) !important;
}
.blockSideLabel.active,
.dropdown-item:focus,
.dropdown-item:hover,
.listViewFilters .dropdown-item:hover{
    background-color : #f5e6df !important;
}
Final screens would like:

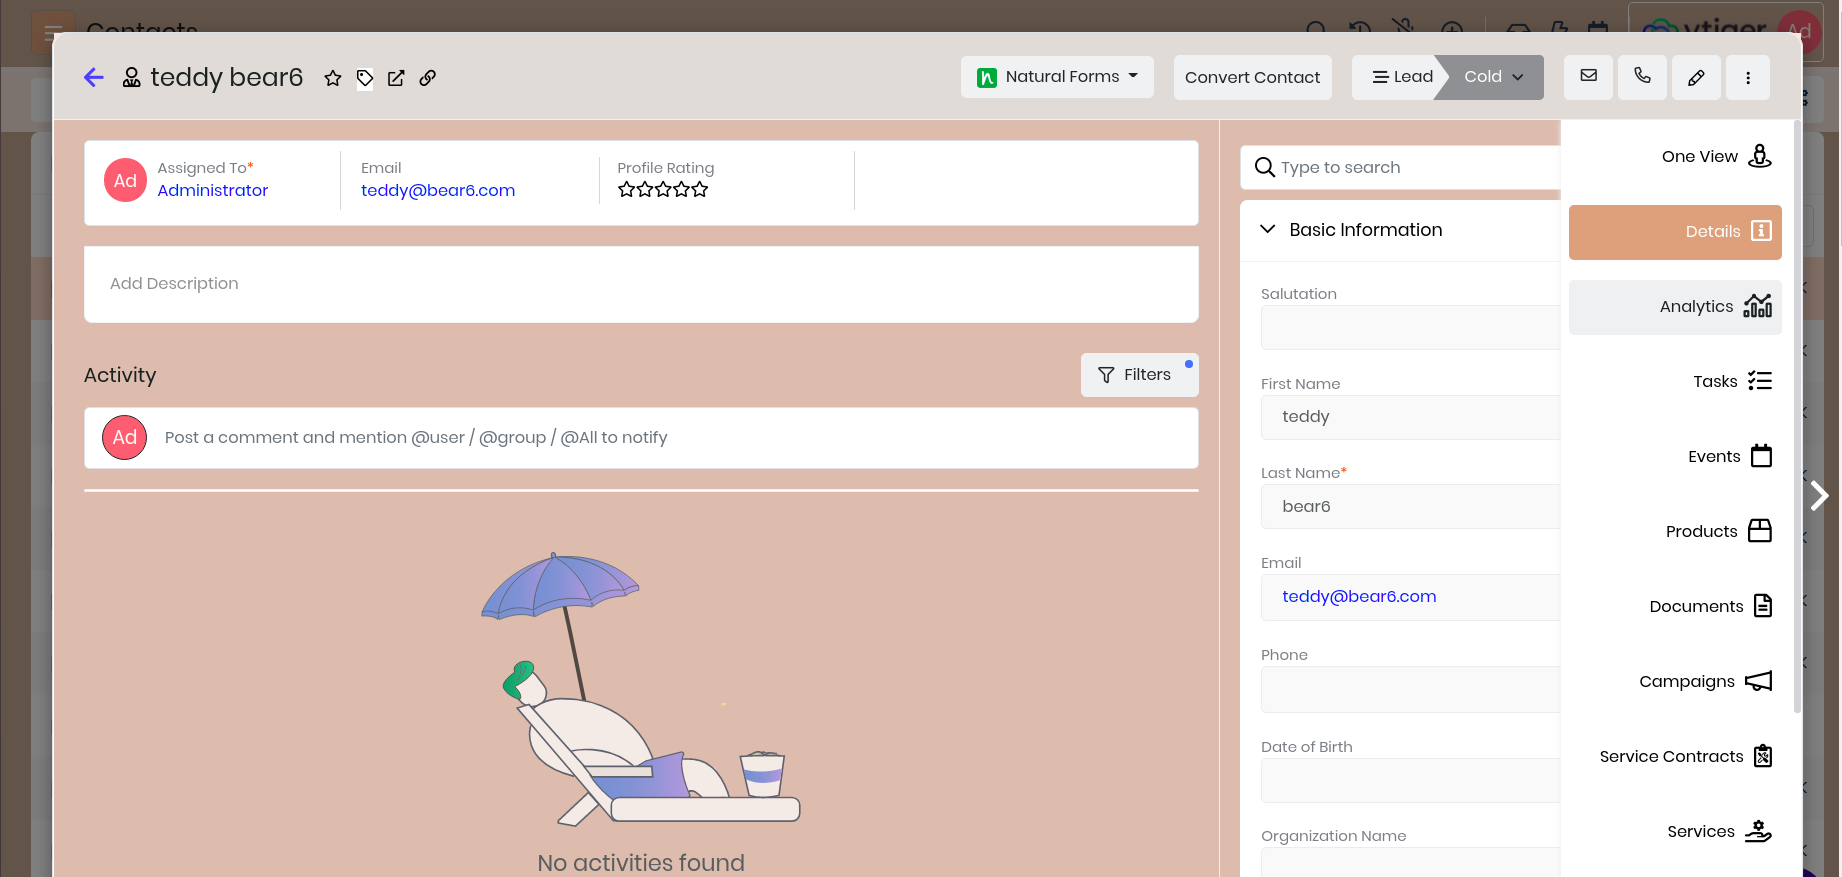
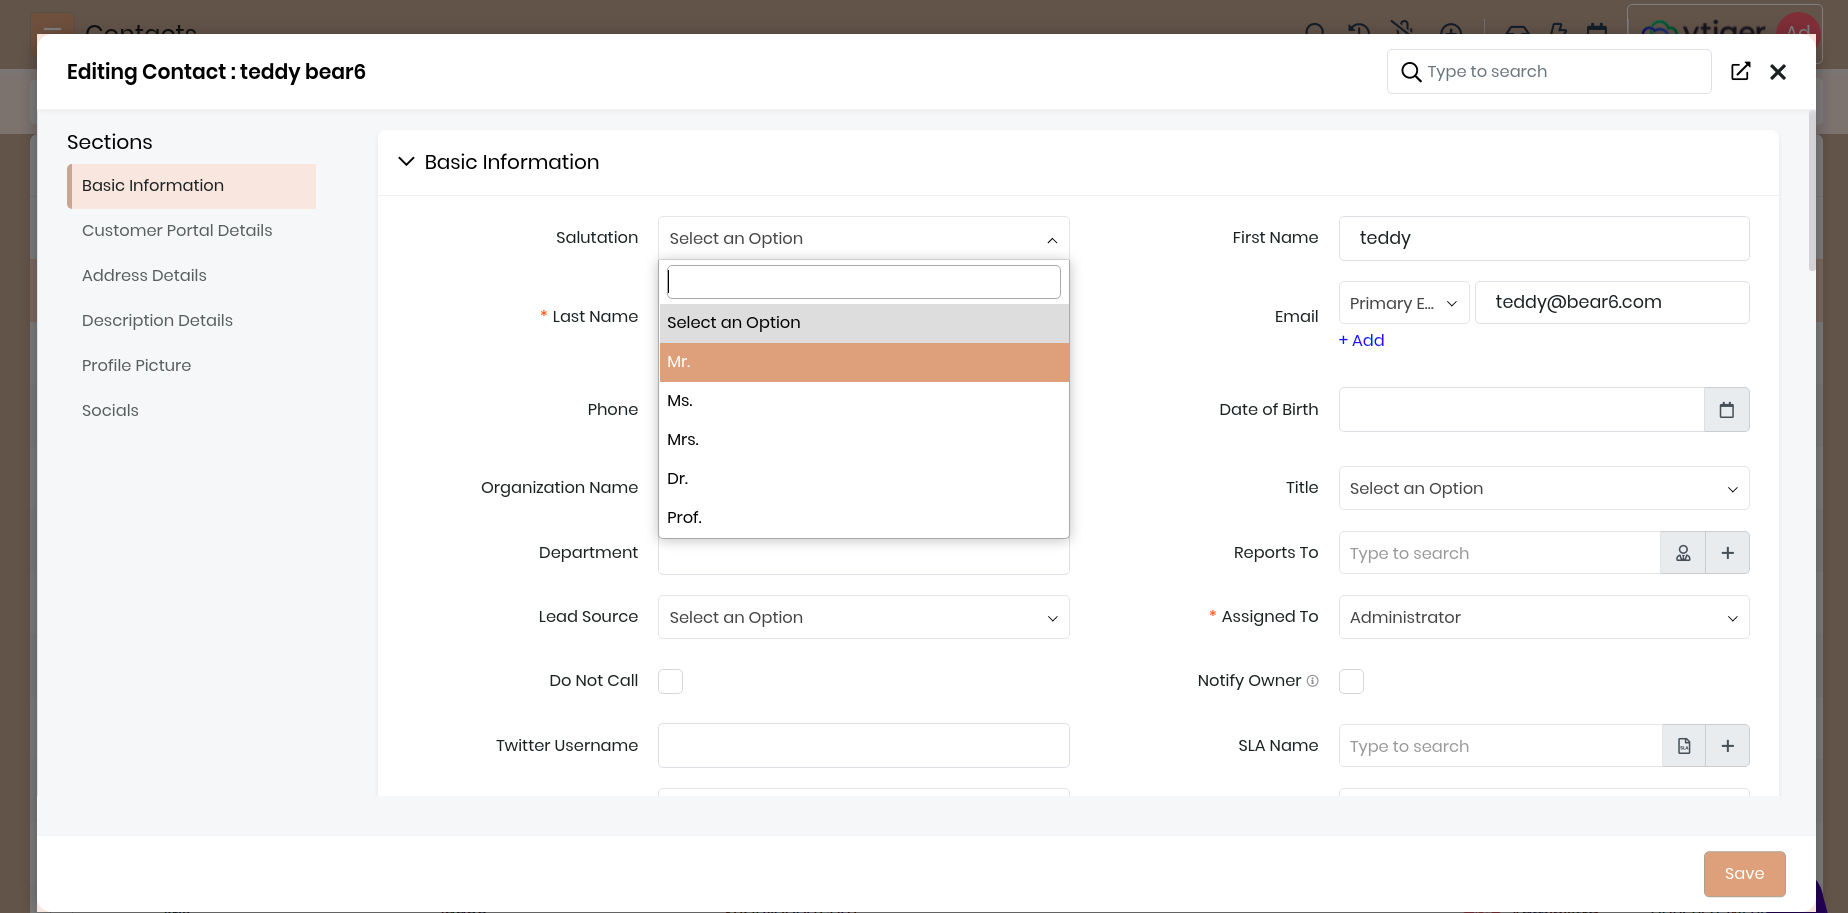
UI Component
Module Designer allows you to build 3 different types of components, Custom, List View, and Detail View components.You can navigate to Module Designer > Components to add the component you want.
Types Of Component :
- Custom Components: These are independent of the existing components in Vtiger CRM and can be reused across different custom pages and other custom components. If you are unfamiliar with what a component is, its importance, and its structure, please review the this document.
- List View Components: This component extends the main ListView component of Vtiger CRM, enabling you to add extra features to the existing ListView, according to your specific needs.
- Detail View Components: This component extends the main DetailView component of Vtiger CRM, enabling you to add extra features to the existing DetailView, according to your specific needs.
Note : While custom components are designed for reuse across various custom pages and other components, these changes won't automatically apply to the CRM interface. To see your customizations reflected in the CRM, you must add the custom component to Module Designer > TAP Scripts and then save and publish your changes. This step ensures that your modifications are integrated into the CRM's workflow and are visible in the interface.
Enabling UI Components in Designer Mode
When "Designer mode" is enabled within the Module Designer's Customizer Settings, the "Add UI Component" feature becomes available. This allows for the creation and placement of:
- Global Actions
- List View Actions
- Detail View Actions
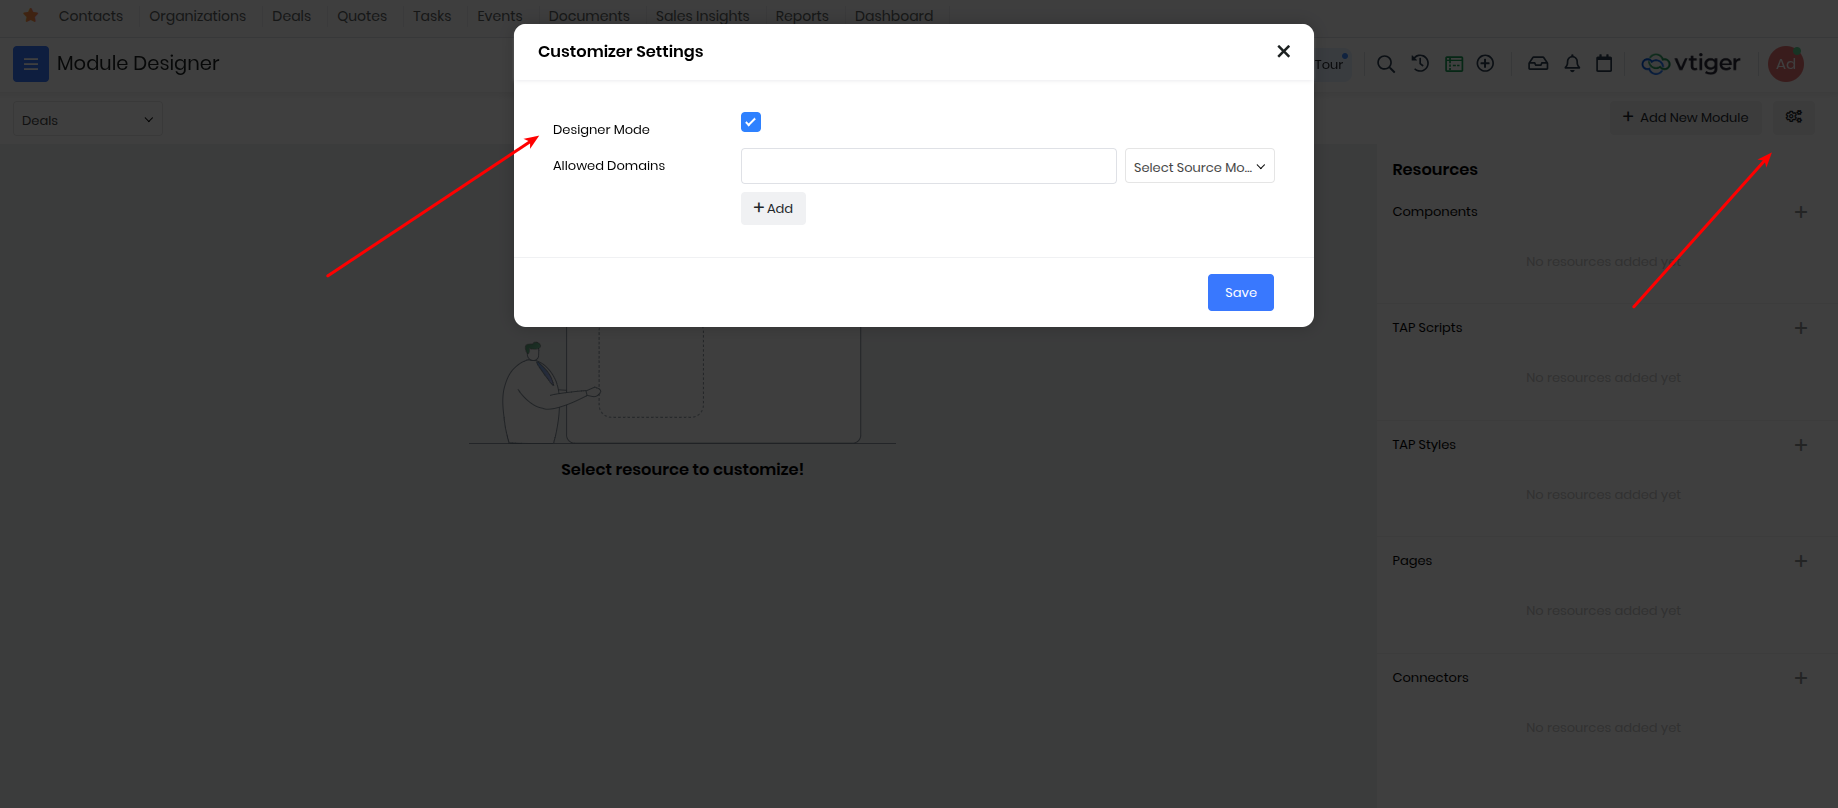
Custom Component
Custom Components are reuseable across multiple Custom Pages or other components built using TAP Scripts.
To add custom component, go to Module Designer and select any module and add Component under resources.
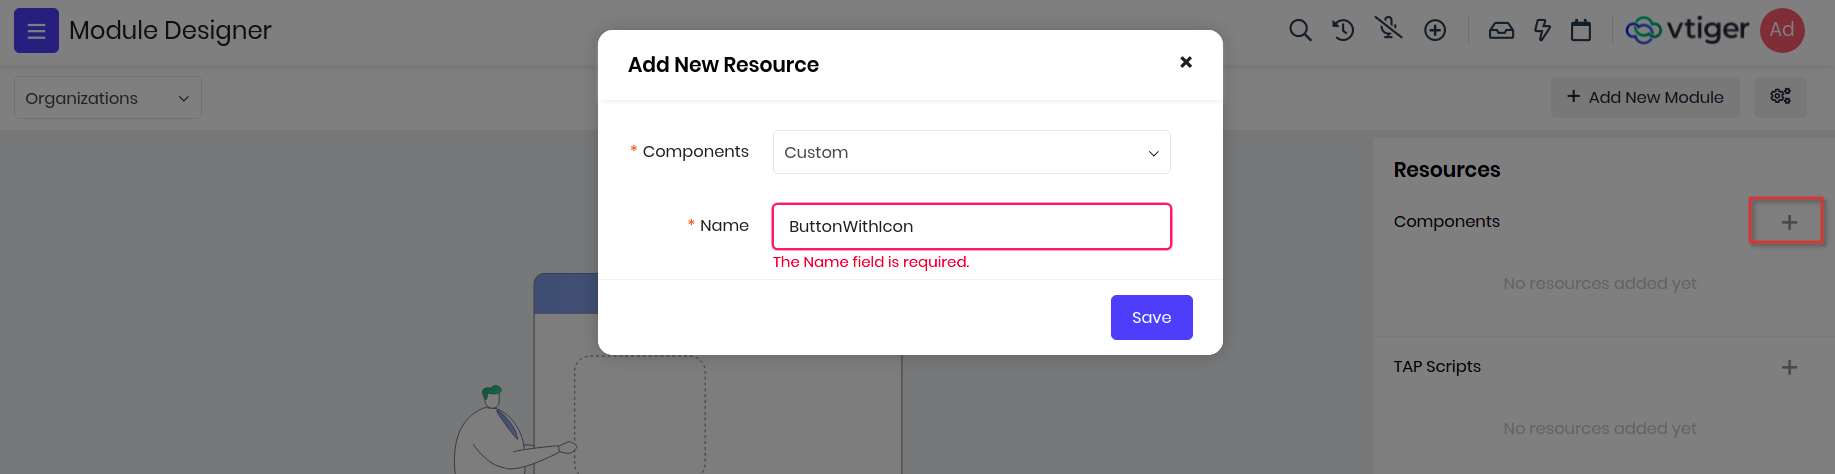
In the below example we will define a custom component that will show an icon inside the button. We will name it ButtonWithIcon and create it in Contacts module, you will see the IDE with default component name.
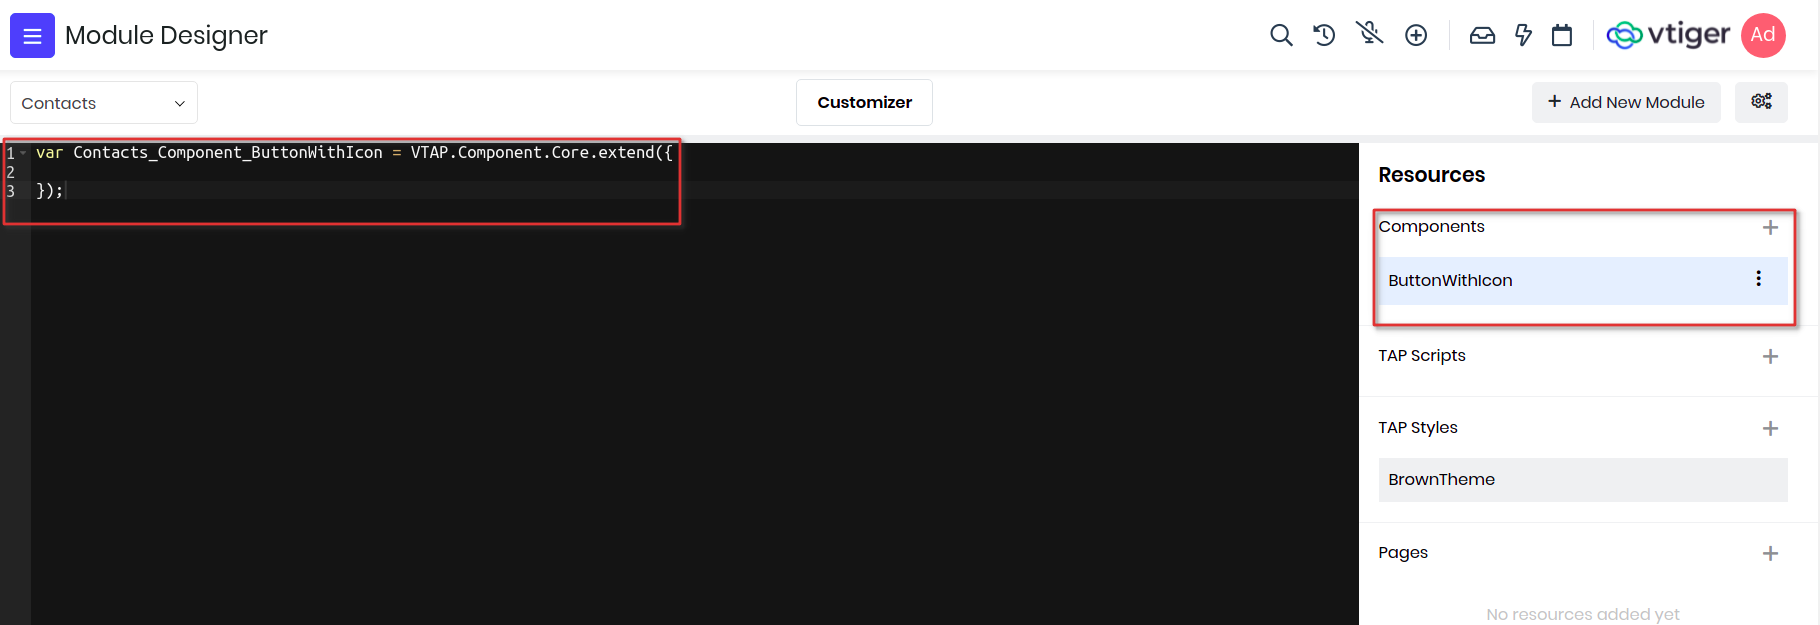
Example 1:
Lets start writing the component, first is the name of the component with "ButtonWithIcon". Since we want to add this in Contacts module, the final name would be Contacts_Component_ButtonWithIcon.
Note: Please be sure to follow the syntax for naming the component i.e ModuleName_Componet_Componentname, where Component is a standard keyword and ComponentName is the one that you provided while creating the component.
We want to give label to the button and pass an icon name to display before the label. These will be provided by the parent component as attributes so we need to add them in props properties. For icons we will make use of font awesome classes.
props : ["label", "icon"]
Finally we will add html which will be used to display in DOM to the template property. Notice the use of props in templates, if used to display as text then place them under curly braces, if passed to attribute then activate reactivity by binding with colon(:).
var Contacts_Component_ButtonWithIcon = VTAP.Component.Core.extend({

    //add props to get icon name and button label from parent component
    props : ['icon', 'label', 'varient'],

    //dynamic property defines button varient
    computed : {
        buttonClass() {
            if(this.varient == '') this.varient = 'primary';
            return 'btn btn-'+this.varient;
        }
    },

    //button html
    template :
        `<button :class="buttonClass">
            <i :class="icon"></i>
                {{label}}
            </button>`
});
See here on how the custom components are used in custom pages.
Example 2:
Lets create another component AdvancedSettings which would add a Custom Setting for the LIST_ADVANCED_SETTING hook present in the List View.
To know more about LIST_ADVANCED_SETTING hook please refer CRM Hooks.
var Contacts_Component_AdvancedSettings = VTAP.Component.Core.extend({

    created() {
        VTAP.Component.Register('LIST_ADVANCED_SETTING',
                                {name:'Custom Settings',
                                clickHandler:() => {
                                    alert('redirect to settings page');
                                }
                            });
    }
});
Example 3:
Lets create another component GlobalAction which would add an action fot the GLOBAL_ACTION hook present in the List View.
To know more about GLOBAL_ACTION hook please refer CRM Hooks.
var Contacts_Component_CustomGlobalIcon = VTAP.Component.Core.extend({
    methods : {
            click(){
                    alert('click on global action icon');
            }
    },
    template:`<ispan class='btn p-2' @click=click()><ii class='fa fa-cloud'><i/i><i/span>`
});
Click here to see how the CustomGlobalIcon component is used in another component built using TAP Scripts.
Save and Publish the component and it will be available for any custom page to include.
List View Component
Consider a scenario where you have developed a custom page for the Contacts module, you’ll have to type the entire url every time you want to access the custom page, but using the list view component you can create a LIST_BASIC_BUTTON which on click will redirect you to the custompage.
Navigate Module Designer -> Select Module -> Component -> List View
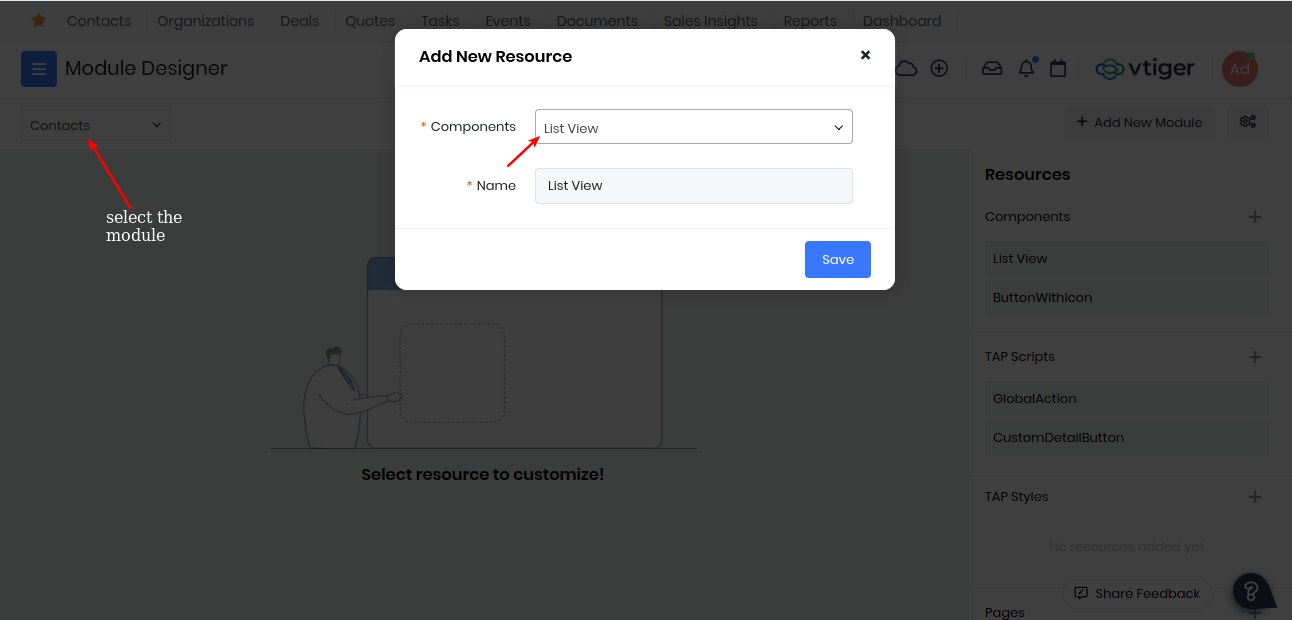
Add the code for creating the button which redirects to the custom page on clicking
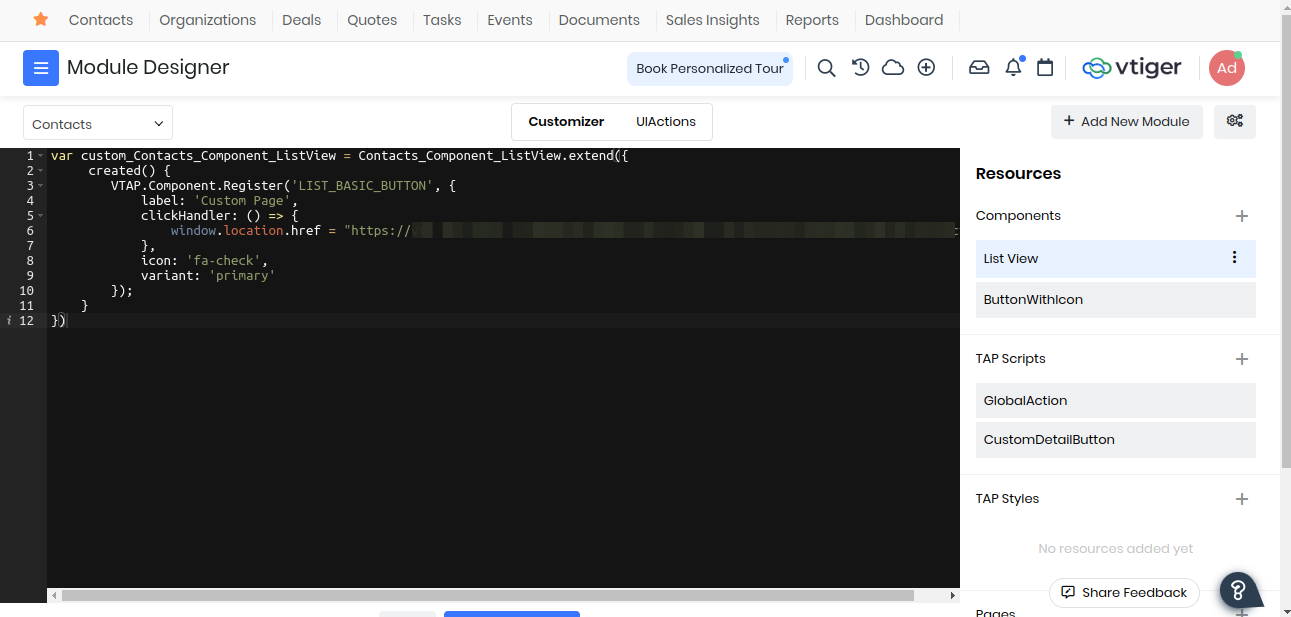
var custom_Contacts_Component_ListView = Contacts_Component_ListView.extend({
     created() {
        VTAP.Component.Register('LIST_BASIC_BUTTON', {
            label: 'Custom Page',
            clickHandler: () => {
                window.location.href = "https://vti-shrravya-a-20240721120901.od1.vtiger.ws/view/custompage?module=Contacts";
            },
            icon: 'fa-check',
            variant: 'primary'
        });
    }
});
Save And Publish. Now go back and refresh you should be able to see, the custom page button will be added to your List View of Contacts Module which onclick will redirect you to your custom page.
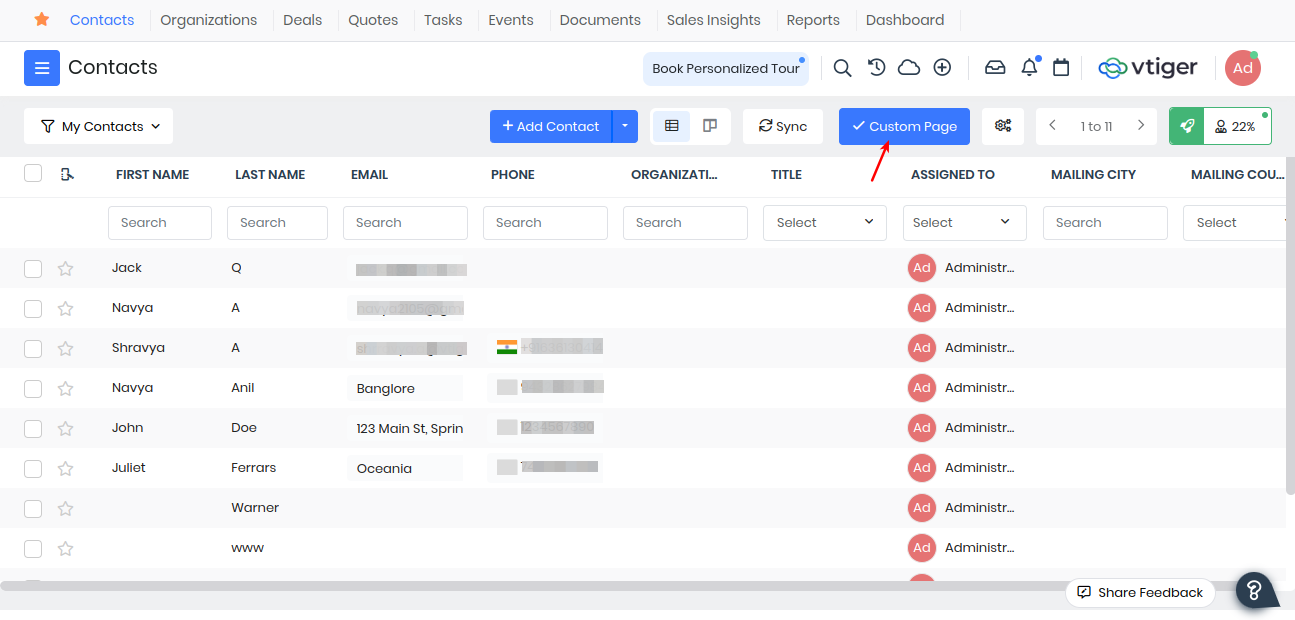
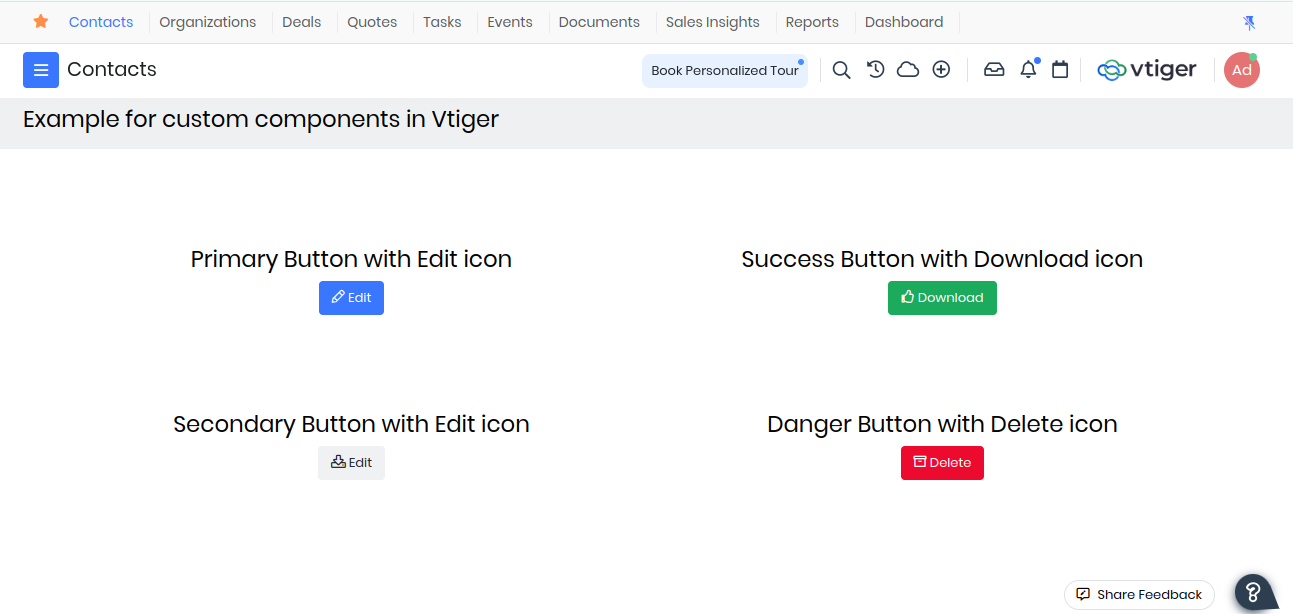
Detail View Component
Consider an example where you want to create a record for Deals in the Detail View of Contacts Module. We can add a button to the Detail View which on click will open the quick create of the Deals Module. Navigate Module Designer -> Select Module -> Component -> Detail View
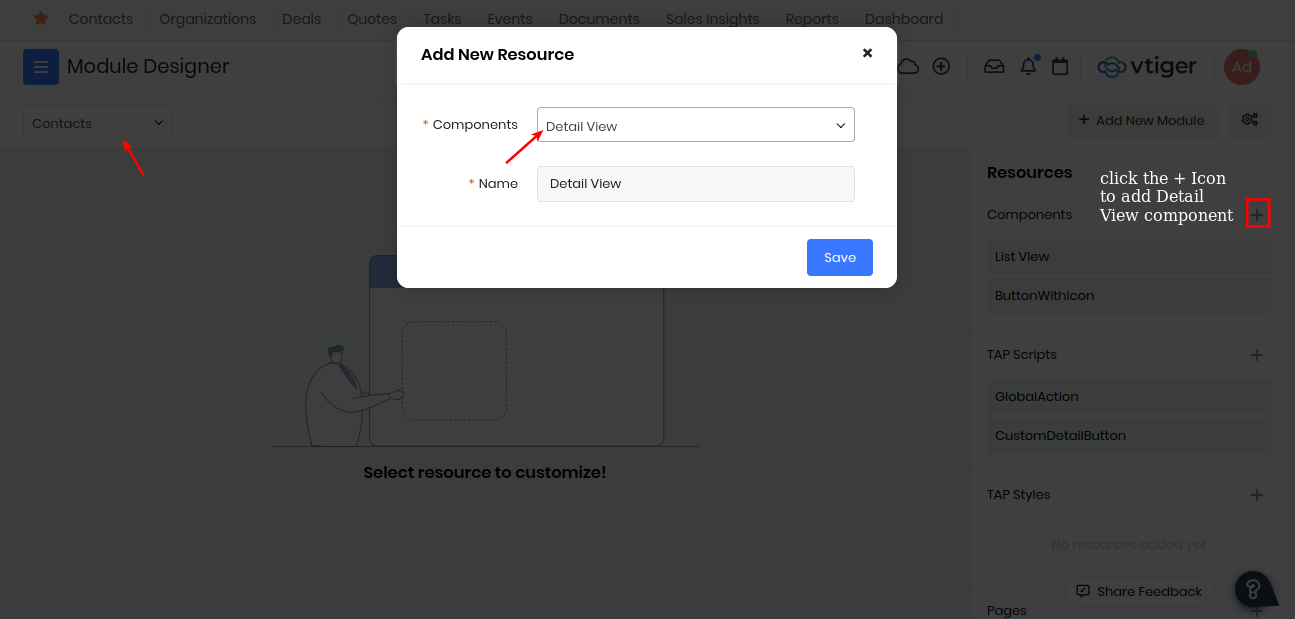
Add the code for creating a deals quick create button
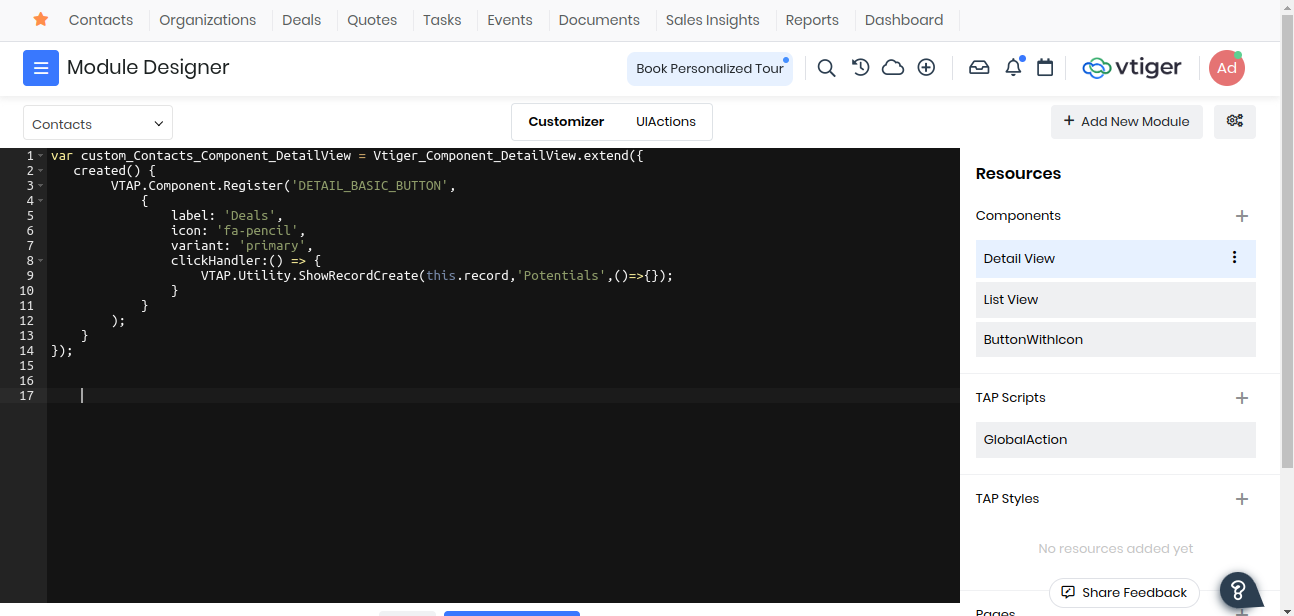
var custom_Contacts_Component_DetailView = Vtiger_Component_DetailView.extend({
   created() {
        VTAP.Component.Register('DETAIL_BASIC_BUTTON',
            {
                label: 'Deals',
                icon: 'fa-pencil',
                variant: 'primary',
                clickHandler:() => {
                    VTAP.Utility.ShowRecordCreate(this.record,'Potentials',()=>{});
                }
            }
        );
    }
});
Save And Publish. Now go back and refresh you should be able to see your Deals Quick Create Button in the detail view which on click will show a quick create of Deals.
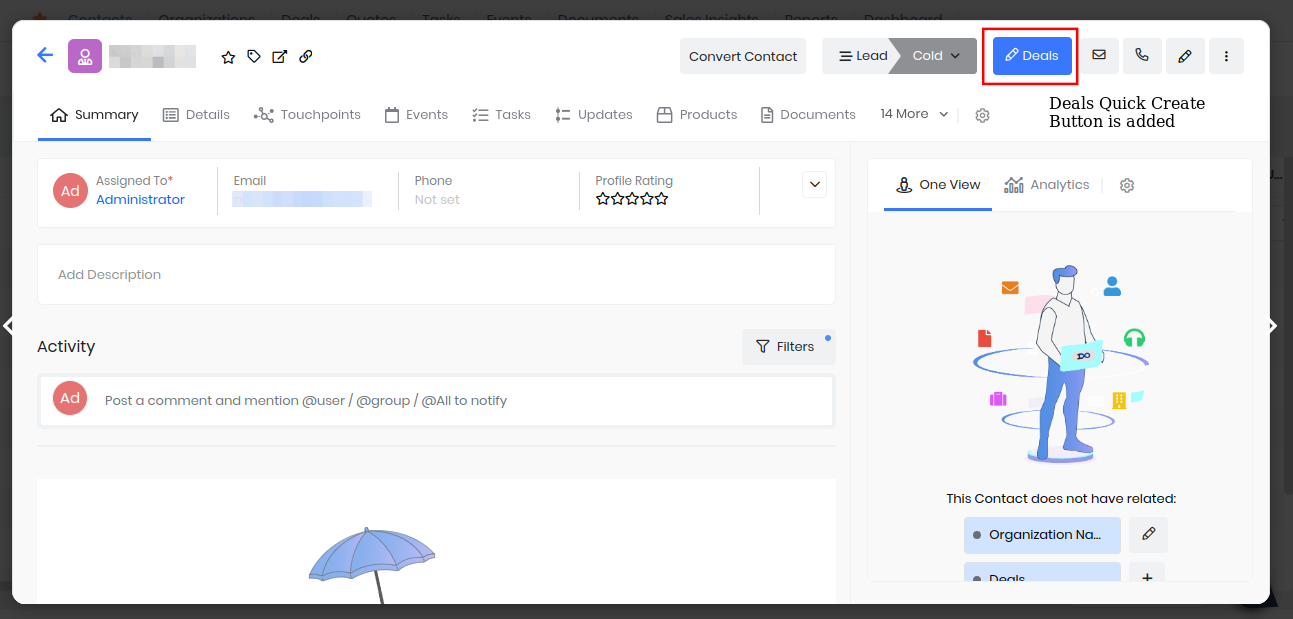
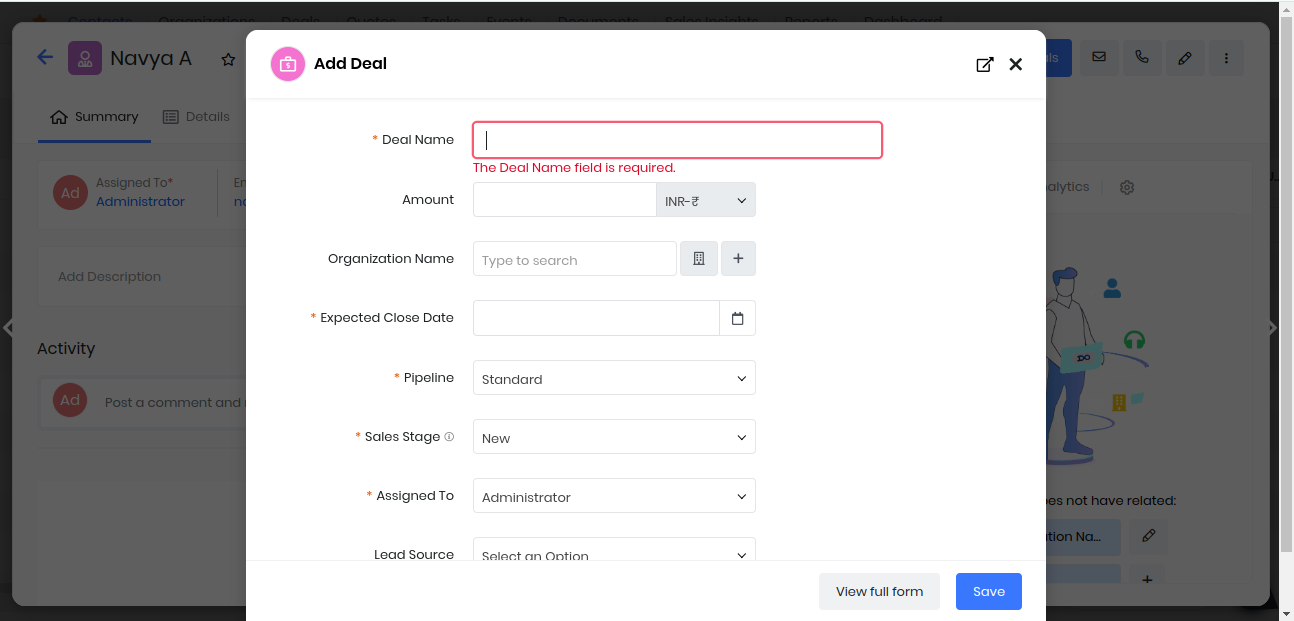
TAP Scripts
TAP Scripts enables you to extend or customize the functionality of standard Vtiger CRM pages, such as ListView and DetailView by subscribing to the event hooks and reacting to the triggers at runtime etc.
This process integrates your customizations into the CRM's workflow, making them visible and functional in the user interface.
To use TAP Scripts got to Module Designer -> TAP Scripts -> Add
Enter the component name and the Module it has to effect. Now you will get a basic component structure where you can write your code for customizing or extending the CRM functionality.
Example 1 :
Lets use the Global Action component created in custom components and register a global action for the CRM.
var Contacts_Component_GlobalAction = VTAP.Component.Core.extend({
    created() {
        VTAP.Component.Register('GLOBAL_ACTION',
                                {},
                                VTAP.Component.Load('CustomGlobalIcon','Contacts'));
    }
});
After Save and publish go and refresh any page of the crm, a cloud icon will be added for the Global Actions hook, which on click will show the alert.
Example 2 :
Lets consider a stiuation where as soon as a Deals sales_stage is changed to "Closed Won" we want to update the related contacts status to "Cold". We can write a script which would do that.
Create a component lets say ContactStatus for Deals module through TAP Script of Module Designer. Now add the code.
var Potentials_Component_ContactStatus = VTAP.Component.Core.extend({
    data() {
        return {
            sales_stage : '',
            related_contactId : '',
            related_lastName : '',
            related_contactType : ''
         }
    },
    mounted() {
        VTAP.Event.Register('RECORD_UPDATED', (module, record) => {
            this.sales_stage = record.sales_stage;
            VTAP.Detail.RelatedRecords('Contacts', {}).then(
            (records) => {
                Object.values(records).forEach(({ id, lastname, contacttype }) => {
                this.related_contactId = id;
                this.related_lastName = lastname;
                this.related_contactType = contacttype;
                if(this.sales_stage == "Closed Won") {
                    this.updateContactStatus(this.related_contactId, this.related_lastName, this.related_contactType);
                }
                });
            });
        });
    },
    methods: {
        updateContactStatus(contact_id, lastname, contactType) {
            VTAP.Api.Post('records', {module : 'Contacts', id : contact_id, lastname : lastname, contacttype : contactType, contactstatus : 'Cold'}, (e,r) => {
                if(r) {
                VTAP.Utility.ShowSuccessNotification("Contacts status changed to Cold");
                } else {
                    VTAP.Utility.ShowErrorNotification(e);
                }
            })
        }
    }
});
Save and publish the TAP Script. Go to any Deals record which has related contacts and update its sales_stage to "Closed Won". After the sales stage is updated you will get a success notification telling "Contacts status changed to cold". You can go check those contacts records their status would be changed to "Cold".
You can also checkout this example on how to add a custom button in the List Page using TAP Script.
Pages
VTAP gives you the ability to build custom pages from scratch, where you can display forms, lists, charts, widgets etc for any existing modules or custom modules. To create a new page go to Platform > Module Designer > Select module > Pages
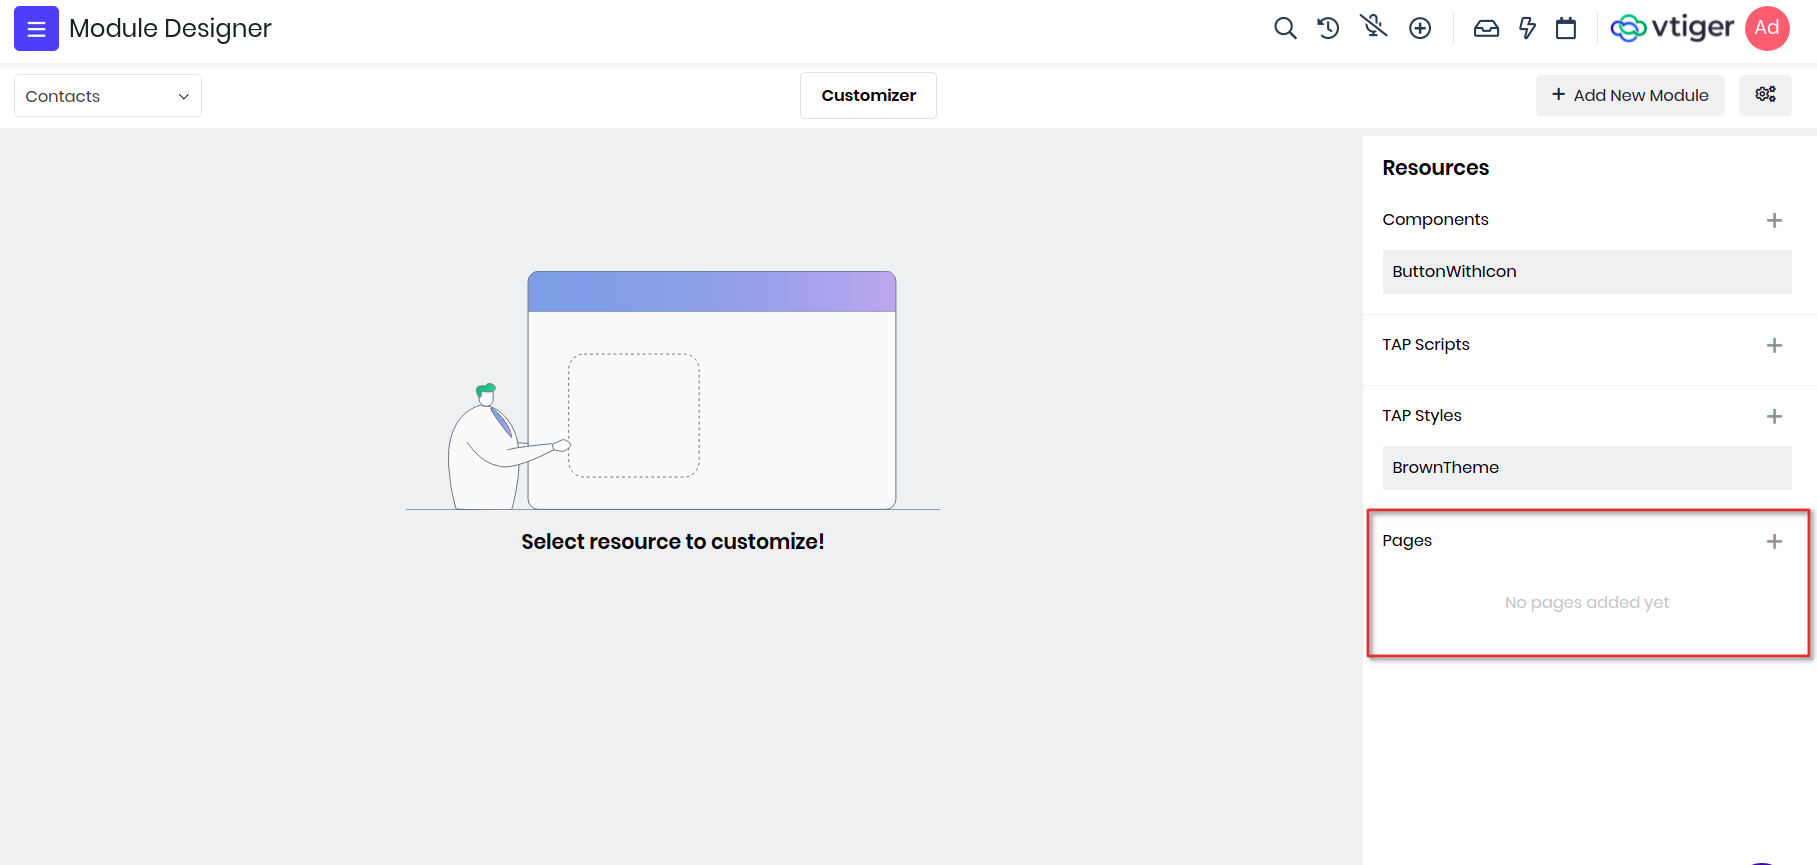
Example : We will create a custom page and include custom component ButtonWithIcon we added in the previous section.
In Vtiger, components are the building blocks for any pages, widgets, charts, lists etc. So when a new page is created, by default page component is added and shown in IDE.
Lets create one page with name "Custompage" and save it. You will see a checkbox "Is admin page?", tick this if you want to create page for admin users only, this is generally used when you want to admins to configure for a feature or store login credentials to connect to any external apps.
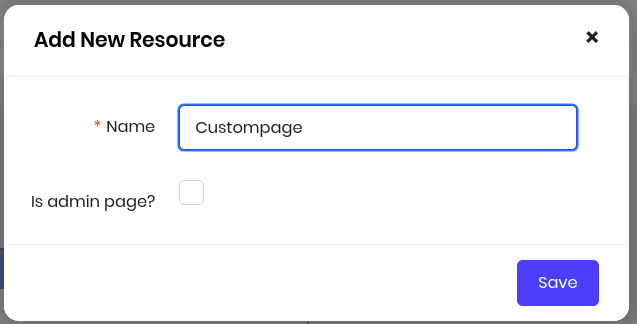
To add a custom component you will use components property of the vue instance and load it by passing the name and module of the component where its defined. Then use the component button_icon in the template and pass appropriate details like icon and label as attributes.
var Contacts_Component_CustompageView = VTAP.Component.Core.extend({

    components : {
        'button_icon' : VTAP.Component.Load('ButtonWithIcon','Contacts')
    },

    template :
        `<div class="vds-body">
                <div class="vds-bodyfixedheader container-fluid py-2 px-0 bg-grey-hue-8 px-4">
                    <h3>Example for custom components in Vtiger</h3>
                </div>
                <div class="vds-bodycontents px-4 m-5">
                    <div class='row'>
                        <div class='d-flex flex-column col-6 p-5'>
                            <div class='d-flex justify-content-center'>
                                <h3>Primary Button with Edit icon<h3>
                            </div>
                            <div class="d-flex justify-content-center">
                                <button_icon icon="fa fa-pencil" label="Edit" varient="primary"></button_icon>
                            </div>
                        </div>
                    </div>
                </div>
            </div>`
});
Lets add more buttons with different varient and icons.
var Contacts_Component_CustompageView = VTAP.Component.Core.extend({

    components : {
        'button_icon' : VTAP.Component.Load('ButtonWithIcon','Contacts')
    },

    template :
            `<div class="vds-body">
                    <div class="vds-bodyfixedheader container-fluid py-2 px-0 bg-grey-hue-8 px-4">
                        <h3>Example for custom components in Vtiger</h3>
                    </div>
                    <div class="vds-bodycontents px-4 m-5">
                        <div class='row'>
                            <div class='d-flex flex-column col-6 p-5'>
                                <div class='d-flex justify-content-center'>
                                    <h3>Primary Button with Edit icon</h3>
                                </div>
                                <div class='d-flex justify-content-center'>
                                    <button_icon icon="fa fa-pencil" label="Edit" varient="primary"></button_icon>
                                </div>
                            </div>

                            <div class='d-flex flex-column col-6 p-5'>
                                <div class='d-flex justify-content-center'>
                                    <h3>Success Button with Download icon</h3>
                                </div>
                                <div class='d-flex justify-content-center'>
                                    <button_icon icon="fa fa-thumbs-up" label="Download" varient="success"></button_icon>
                                </div>
                            </div>
                        </div>

                        <div class='row'>
                            <div class='d-flex flex-column col-6 p-5'>
                                <div class='d-flex justify-content-center'>
                                    <h3>Secondary Button with Edit icon</h3>
                                </div>
                                <div class='d-flex justify-content-center'>
                                    <button_icon icon="fa fa-download" label="Edit" varient="secondary"></button_icon>
                                </div>
                            </div>

                            <div class='d-flex flex-column col-6 p-5'>
                                <div class='d-flex justify-content-center'>
                                    <h3>Danger Button with Delete icon</h3>
                                </div>
                                <div class='d-flex justify-content-center'>
                                    <button_icon icon="fa fa-archive" label="Delete" varient="danger"></button_icon>
                                </div>
                            </div>
                        </div>
                    </div>
                </div>`
});
The final page would look like below screen shot.
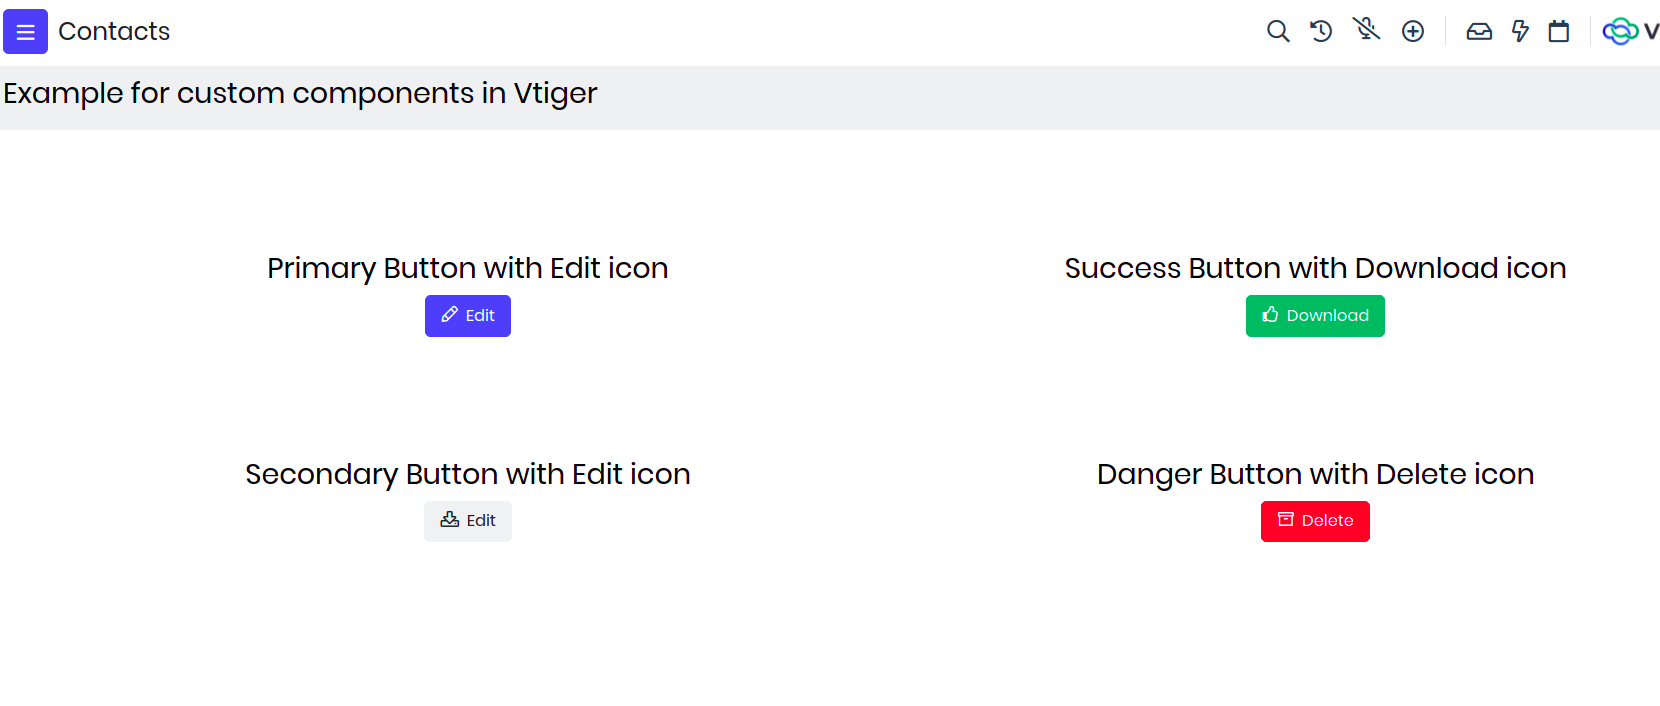
How to access Custom Page?
Any Custom page can be accessed with a URL. URL format is like below
$YOUR_INSTANCE_URL/view/$PAGE_NAME?module=$MODULE_NAME
$PAGE_NAME = Name of the page given while adding the page (all small letters) $MODULE_NAME = Name of the module in which page is added
Example : https://acme.odx.vtiger.com/view/Custompage?module=Contacts
If you are building admin page then the URL will change to https://acme.odx.vtiger.com/admin/view/Custompage?module=Contacts
UI Actions
The ui components feature enables us to modify or add custom buttons or icons. Which on click will perform actions.
Adding a component
- VTAP has enabled new low code platform where you can just perform actions by writing onclick functions.
- Click on the green box on top of the page. ref
- Now you can see a popup. By adding the following details we can get started on ui components.
- component name -> the name of the component which you want to use for this custom action.
- component type ->What type if component it is. (Where this icon will sart showing in the UI).
- module -> to whcih module it should show and work.
- on clcik -> what is the action to be performed when this button is clicked.
- button label -> name of the button to show
- component icon -> the icon can be selected from the pre defined drop down.
- color -> color of the button or the icon.
Different Component Types :
- Detail View Basic Button
- Detail View Action Icon
- Detail View More Action Item
- Detail More Action Activity Item
- Detail One View Widget
- Detail Header Widget
- Detail Summary Widget
- Detail Related Record Action
- List View Basic Button
- List Mass Action
- List Advance Settings (only for Admin users)
- List Custom Views (Kanban view, Calendar view, or List of records view)
- List Row Basic Action
- List Row Secondary Action
- Global Action
Note :
Component types are nothing but crm hooks i.e specific points in the UI. To understand more about them please refer CRM Hooks
And to understand what each component type describes and its examples please refer Component Types
Examples
Detail View Basic Button - Add a button to delete the current record from header view.
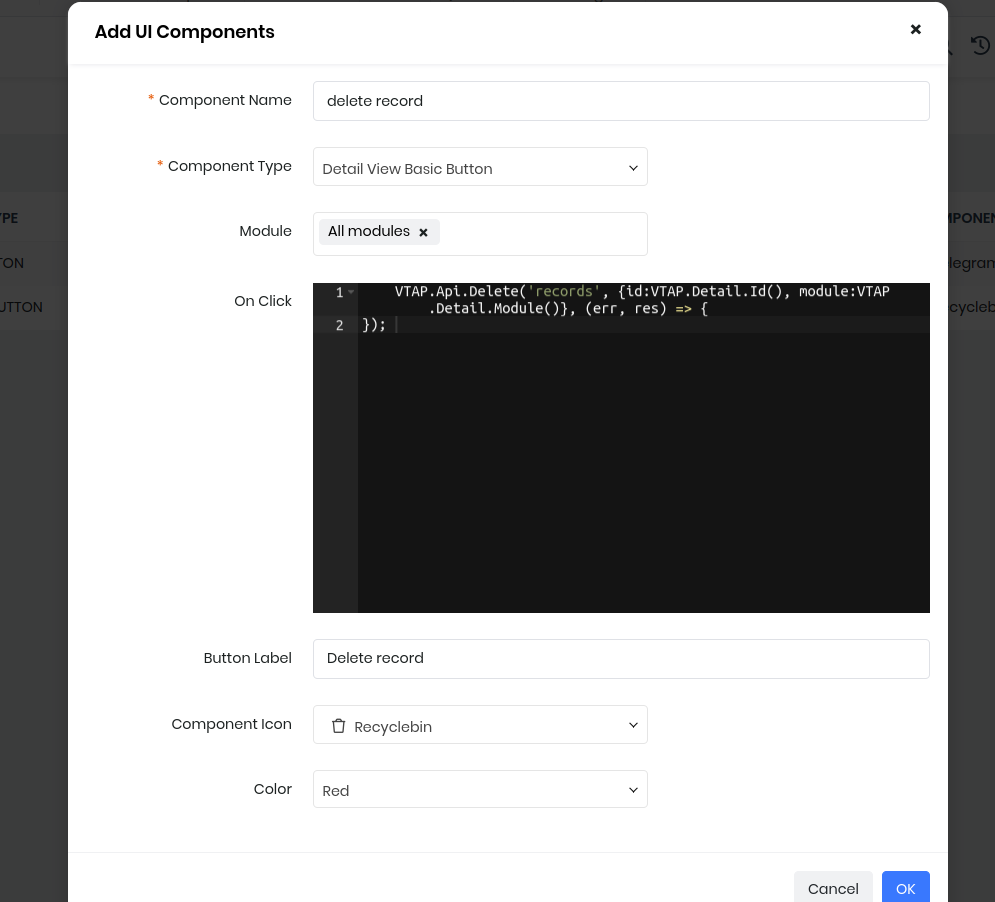

VTAP.Api.Delete('records', {id:VTAP.Detail.Id(), module:VTAP.Detail.Module()}, (err, res) => {
});
- First go to ui actions and create a new record.
- Add module as contacts.
- choose the name of the button and icon.
- now go to on click block.
- Add the above code. Here we will take the record id by using VTAP.Detail.Id() and similarliy for module.
- You can add a notification on sucess to show the record is deleted.
List View Basic Button - Add a button to redirect to custom page.
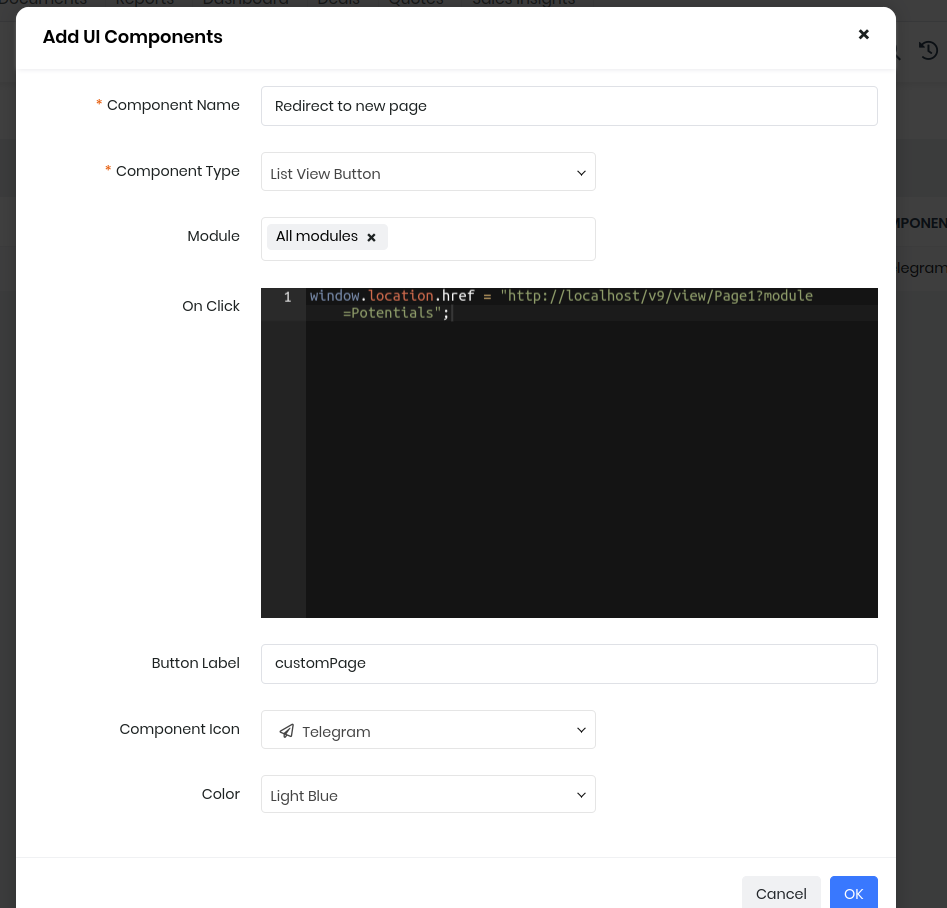
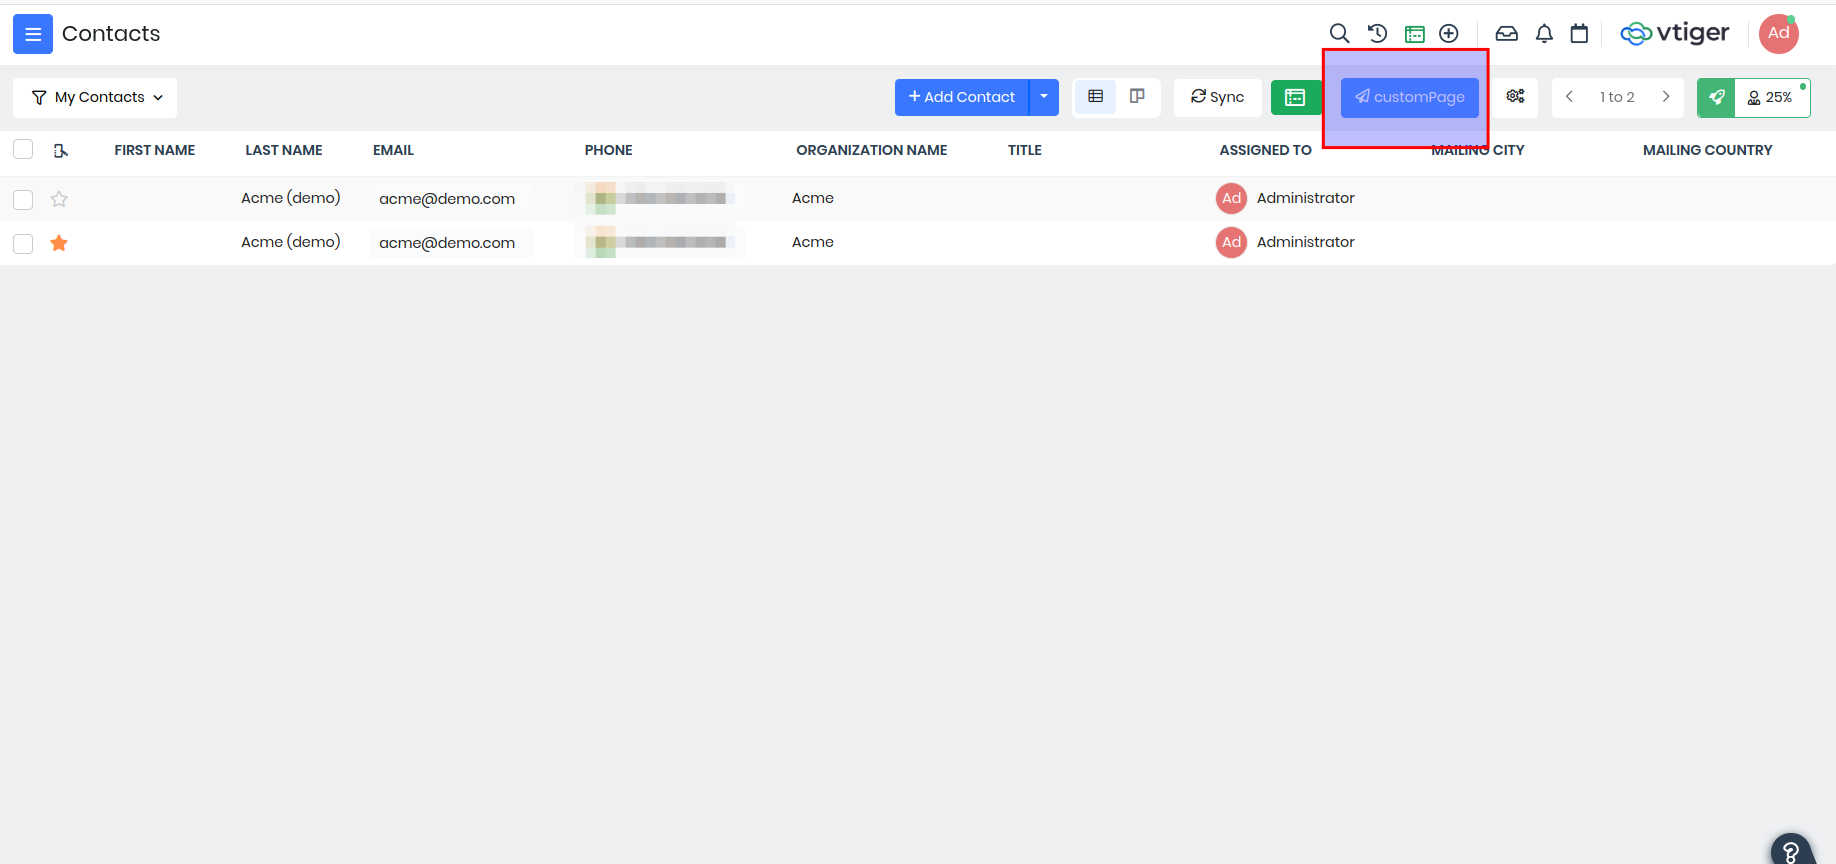
window.location.href = "https://xxxxx.od2.vtiger.com/view/Page1?module=Potentials";
- Go to Ui actions create a new actions.
- Add any component name which suits your action.
- Select the modules.
- Select the button label and the icon.
- Select color.
- Now add the above code in onclick block.
- On clciking that button from list view you will be redirected to the custom page or any website which is added.
Example 2 - Create a POPUP Modal using module designer and UI actions.
- First lets add the trigger which will open the popup, for example add a button in List page. You need to go to UI Actions inside Platforms > Module Designer.
- Add UI Component and select Component Type as "List View Button".
- Give a Label, icon, color if needed and then in On click you need to add below code.
// Popup is the name of the popup component defined in Contacts module
VTAP.Utility.ShowPopup({component:VTAP.Component.Load('Popup','Contacts')});
- Go to module designer select Contacts module to create a popup component.
- Click on components and create a component by selecting custom in the options with name. ex- Popup.
- Add the below code in the module designer.
- Here MYMODULE should be replaced by the current module name(eg:Contacts) where the tap script is created.
- Save and publish the script to see the popup in action.
    var MYMODULE_Component_Popup = VTAP.Component.Core.extend({
        data() {
        //store popup data to make use of them to display and to send it to server
        return {
            name:"",
            email:""
        }
    },
    methods: {
        onok(event) {
            //prevent popup to close
            event.preventDefault();

             //add post action on click on ok button
            VTAP.Api.Post("records", {module:'Contacts',"lastname":this.name,"email":this.email}, (error,response) => {
                    if(response) {
                        VTAP.Utility.ShowSuccessNotification("Saved successfully");
                        this.hidePopup();
                    } else {
                        VTAP.Utility.ShowErrorNotification(error);
                    }
             });
        },
        hidePopup() {
            //bv::hide::modal is the event, modal-1 is the modal popup id which needs to be closed.
            this.$root.$emit('bv::hide::modal', 'modal-1')
        }
    },
    //:no-close-on-backdrop="true" is to ensure the popup is not closed when clicked outside the modal
    template: `<b-modal  id="modal-1" title="Save Contact" @ok=onok  ok-title="Save" :no-close-on-backdrop="true">
                    <p class="my-4">
                        <div class="container" >
                             <input v-model="name" class="form-control w-50 m-2" placeholder="Enter the name">
                             <input v-model="email" class="form-control w-50 m-2" placeholder="Enter the email address">
                        </div>
                    </p>
                </b-modal>`
});
CRM Hooks
CRM hooks in Vtiger are customizable points in the user interface(UI) where you can add custom UI actions like buttons, icons, links, widgets in Vtiger list and detail pages. Using these you can make Vtiger UI more interactive, customizable and cater to specific user and business needs.
Following are the placeholder hooks available in Vtiger UI and the image shows where those placeholders are present in the UI.
List Page hooks
List View Basic Button
List Mass Action Button
List Advance Settings (only for Admin users)
List Custom Views (Kanban view, Calendar view, or List of records view)
List Row Basic Action
List Row Secondary Action
Global Action
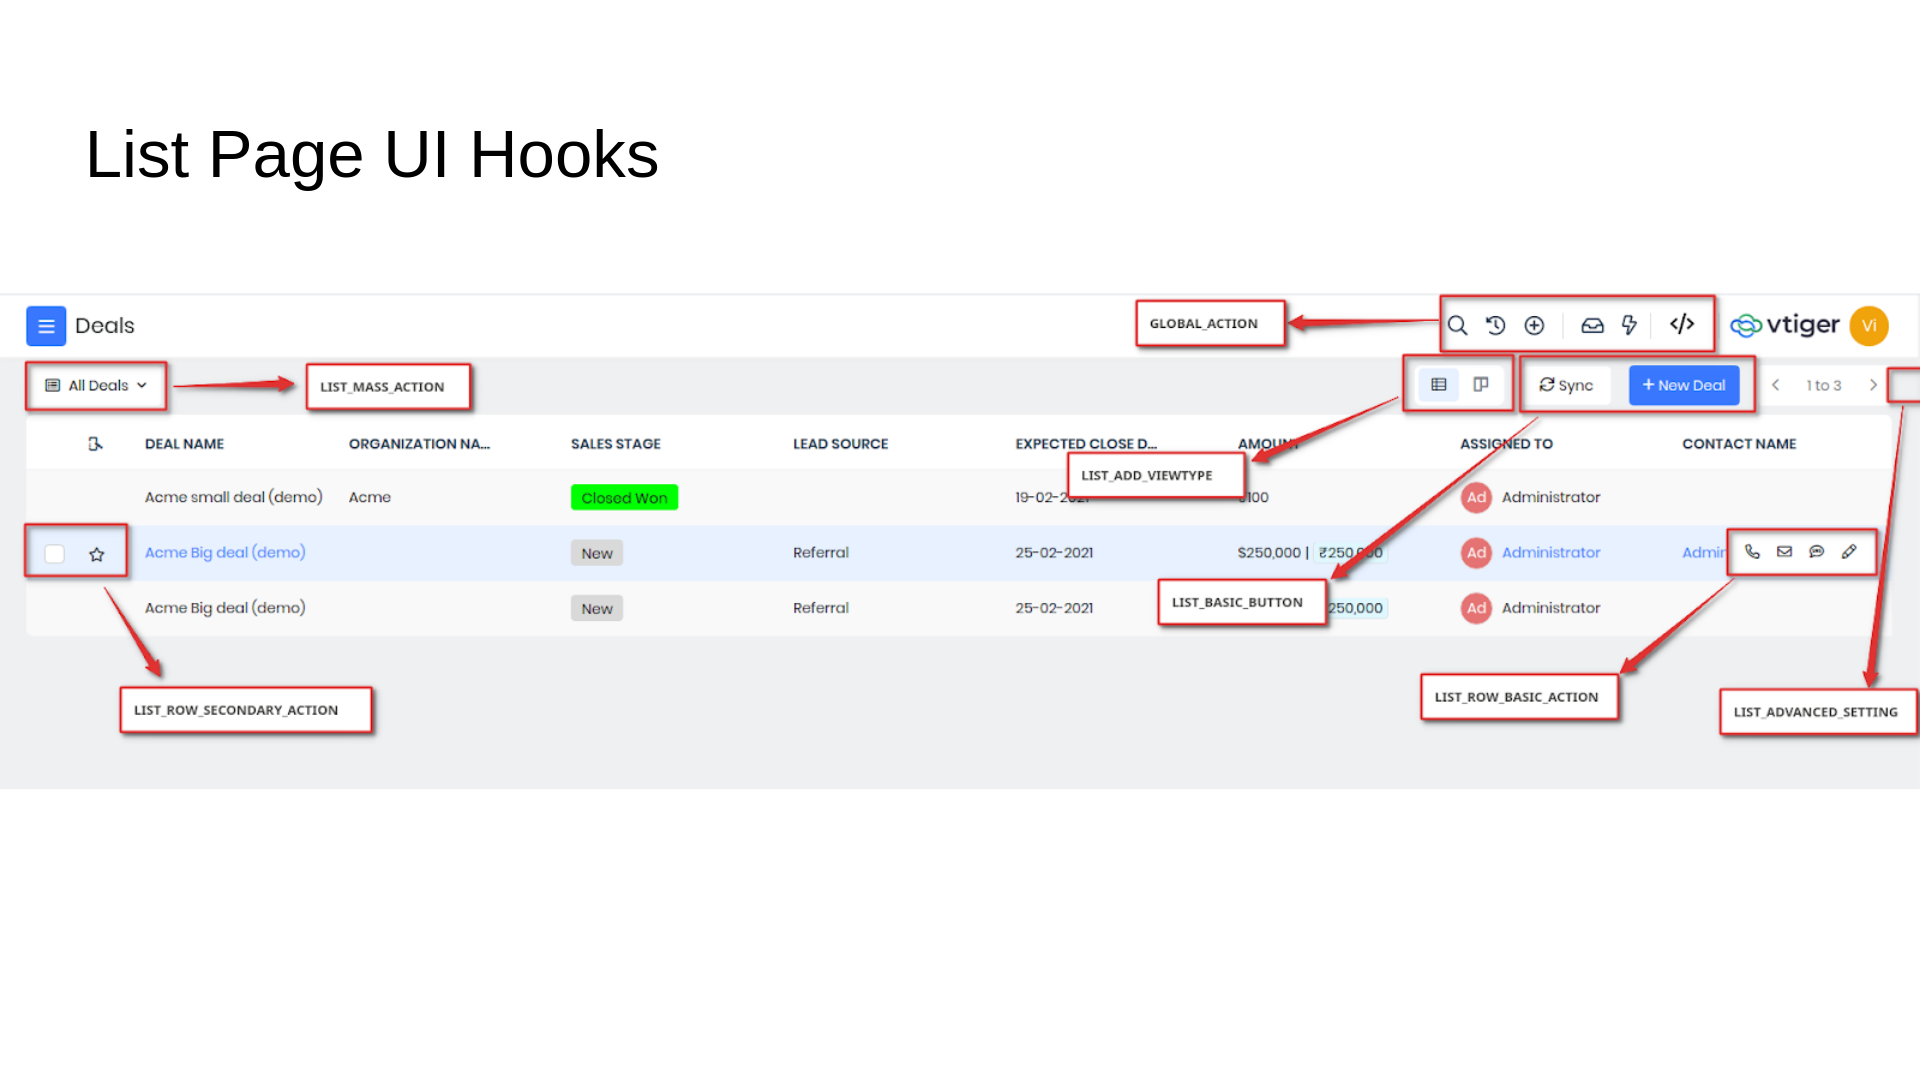
Detail Page hooks
Detail One View Widget
Detail View Basic Button
Detail Header Widget
Detail Summary Widget
Detail Action Icon
Detail More Action Icon
Detail More Action Activity Item
Detail Related Record Action
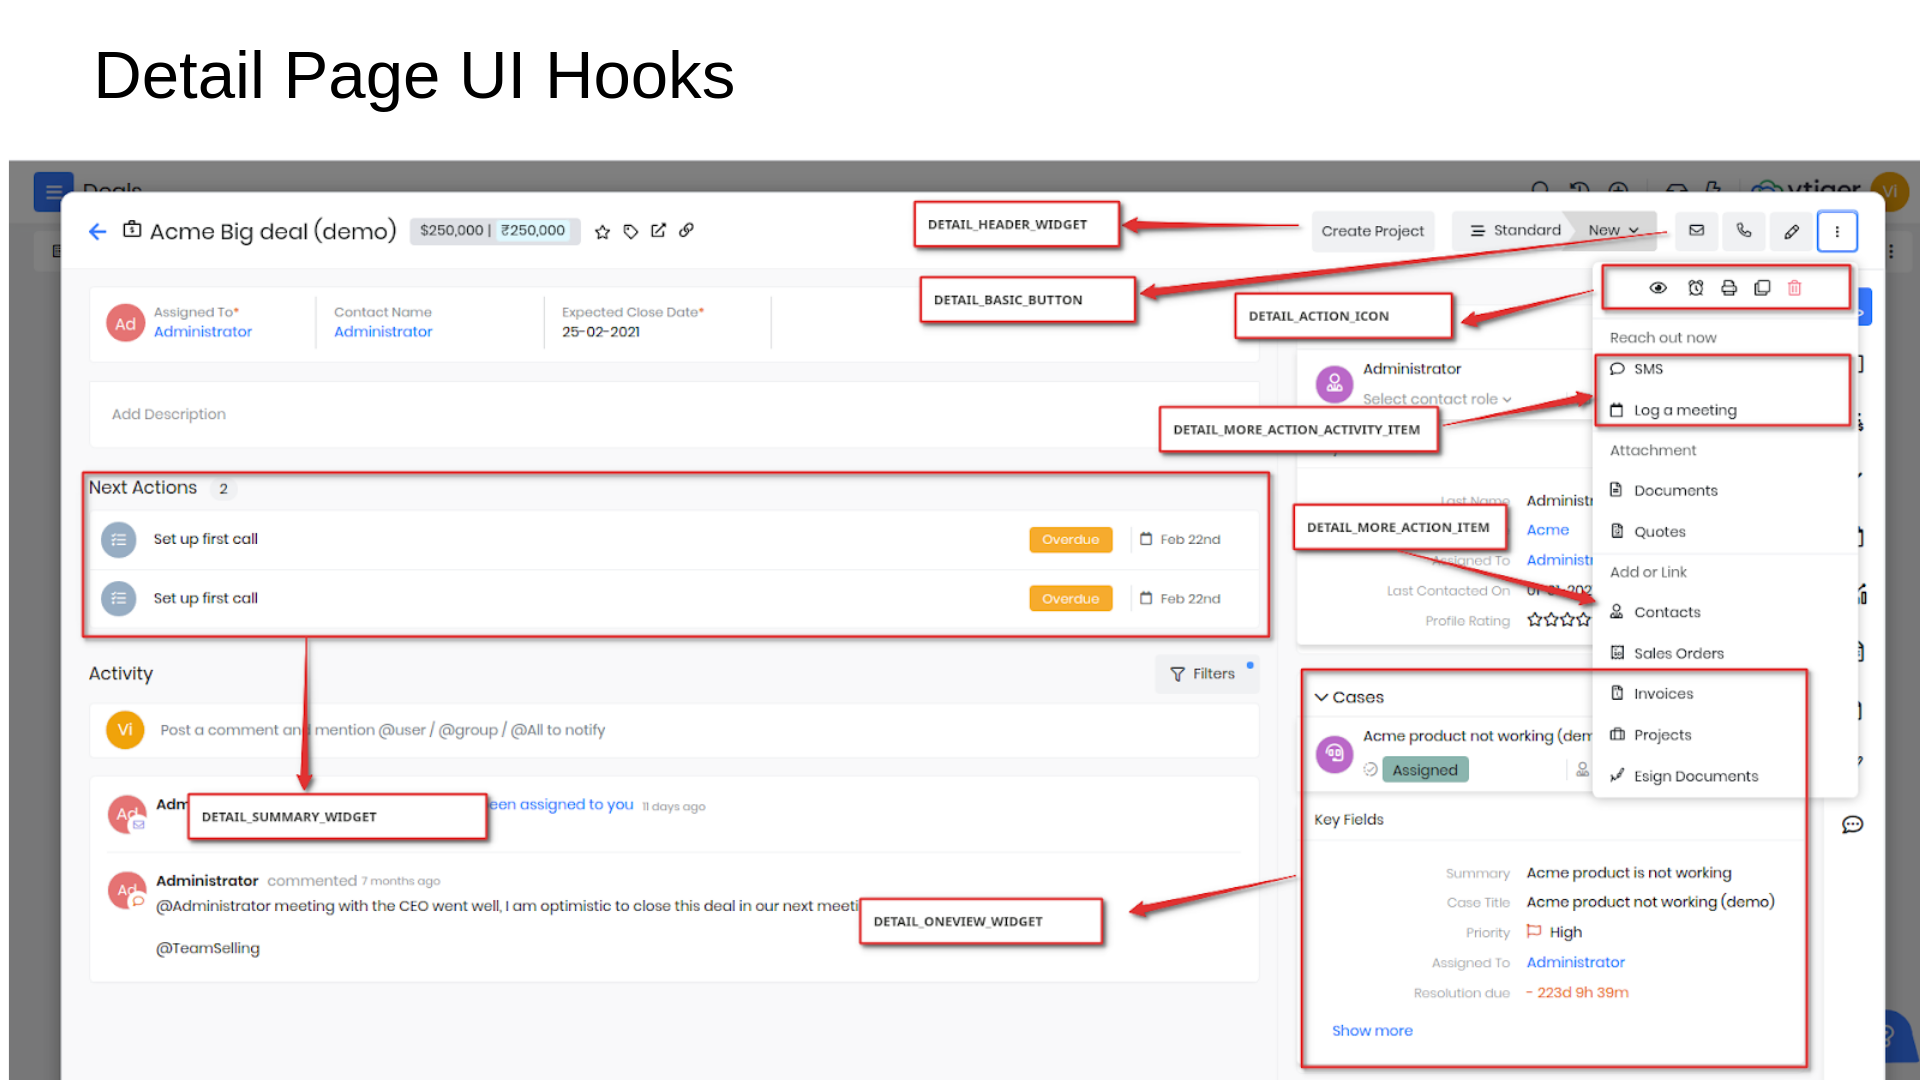
How to add custom button in List page?
Go to Menu, under Platform App select Module Designer. You will see the below page. Once there, you will want to select the module you wish to add the button to from the dropdown menu in the top left-hand corner.
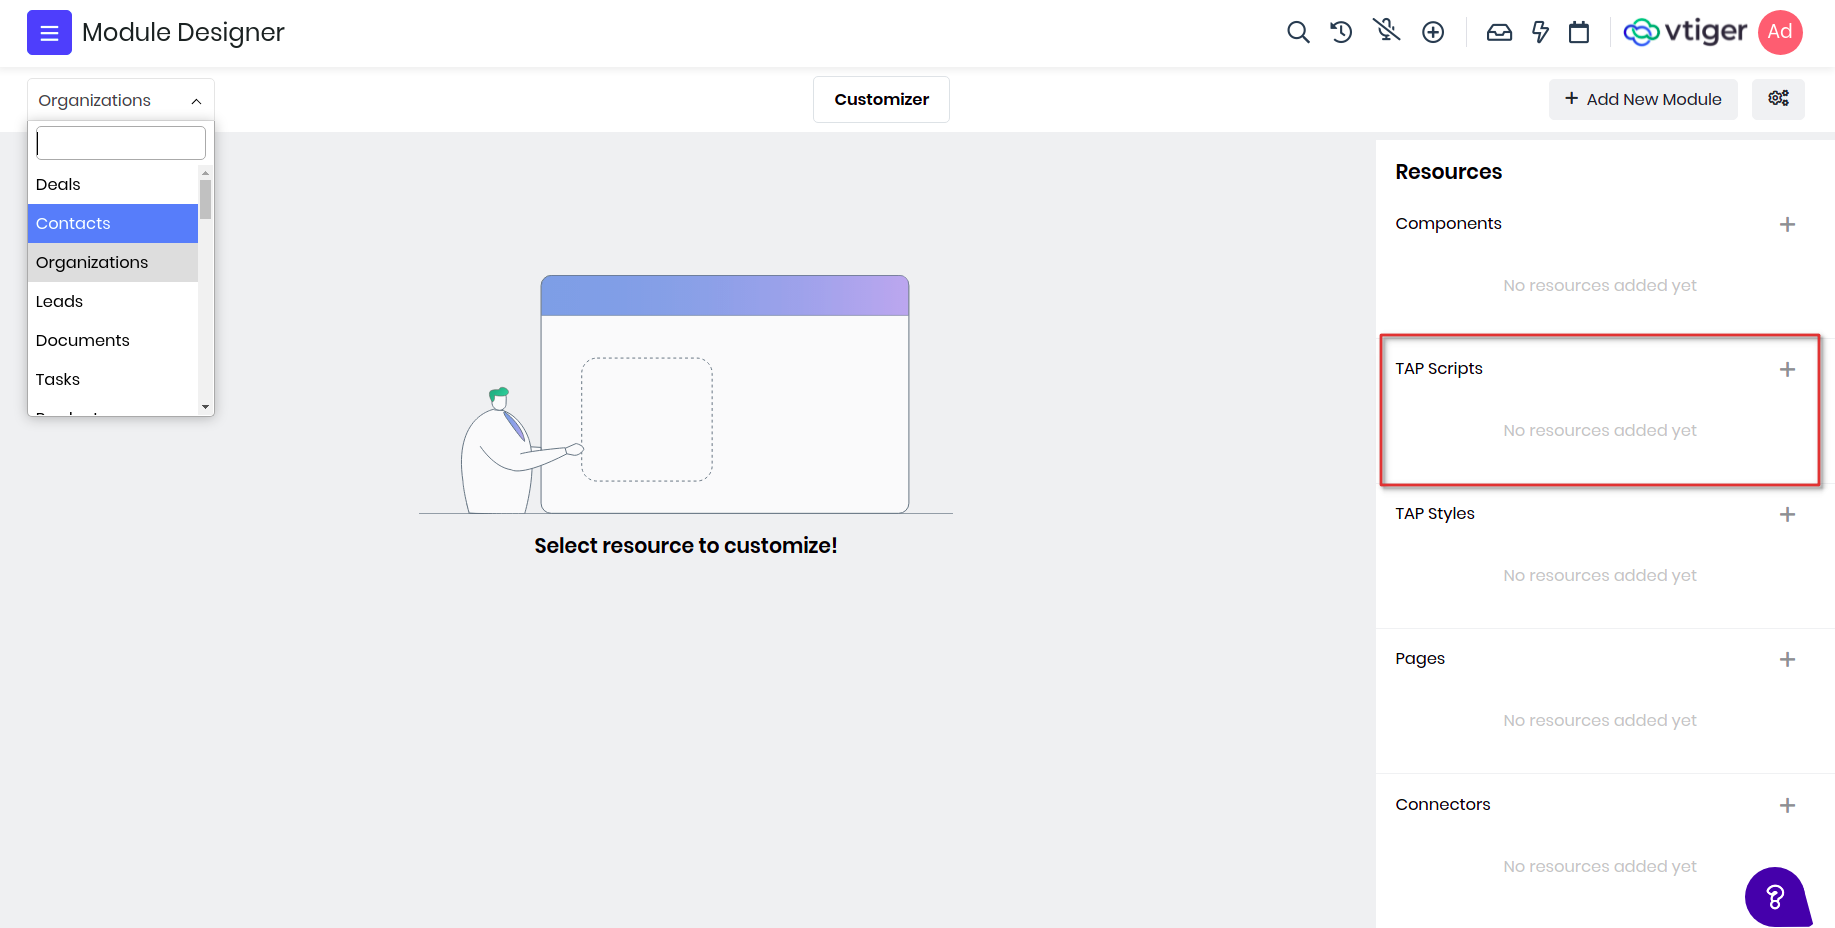
Next, a pop-up window will appear. Add a name for the Tap Script, example "ListExample" and, once again, select the module. Here you can also select module where you want the button to appear,or leave the target module blank to let button appear in all modules.
Click ‘Save’ and you should now see a screen where you can begin coding.
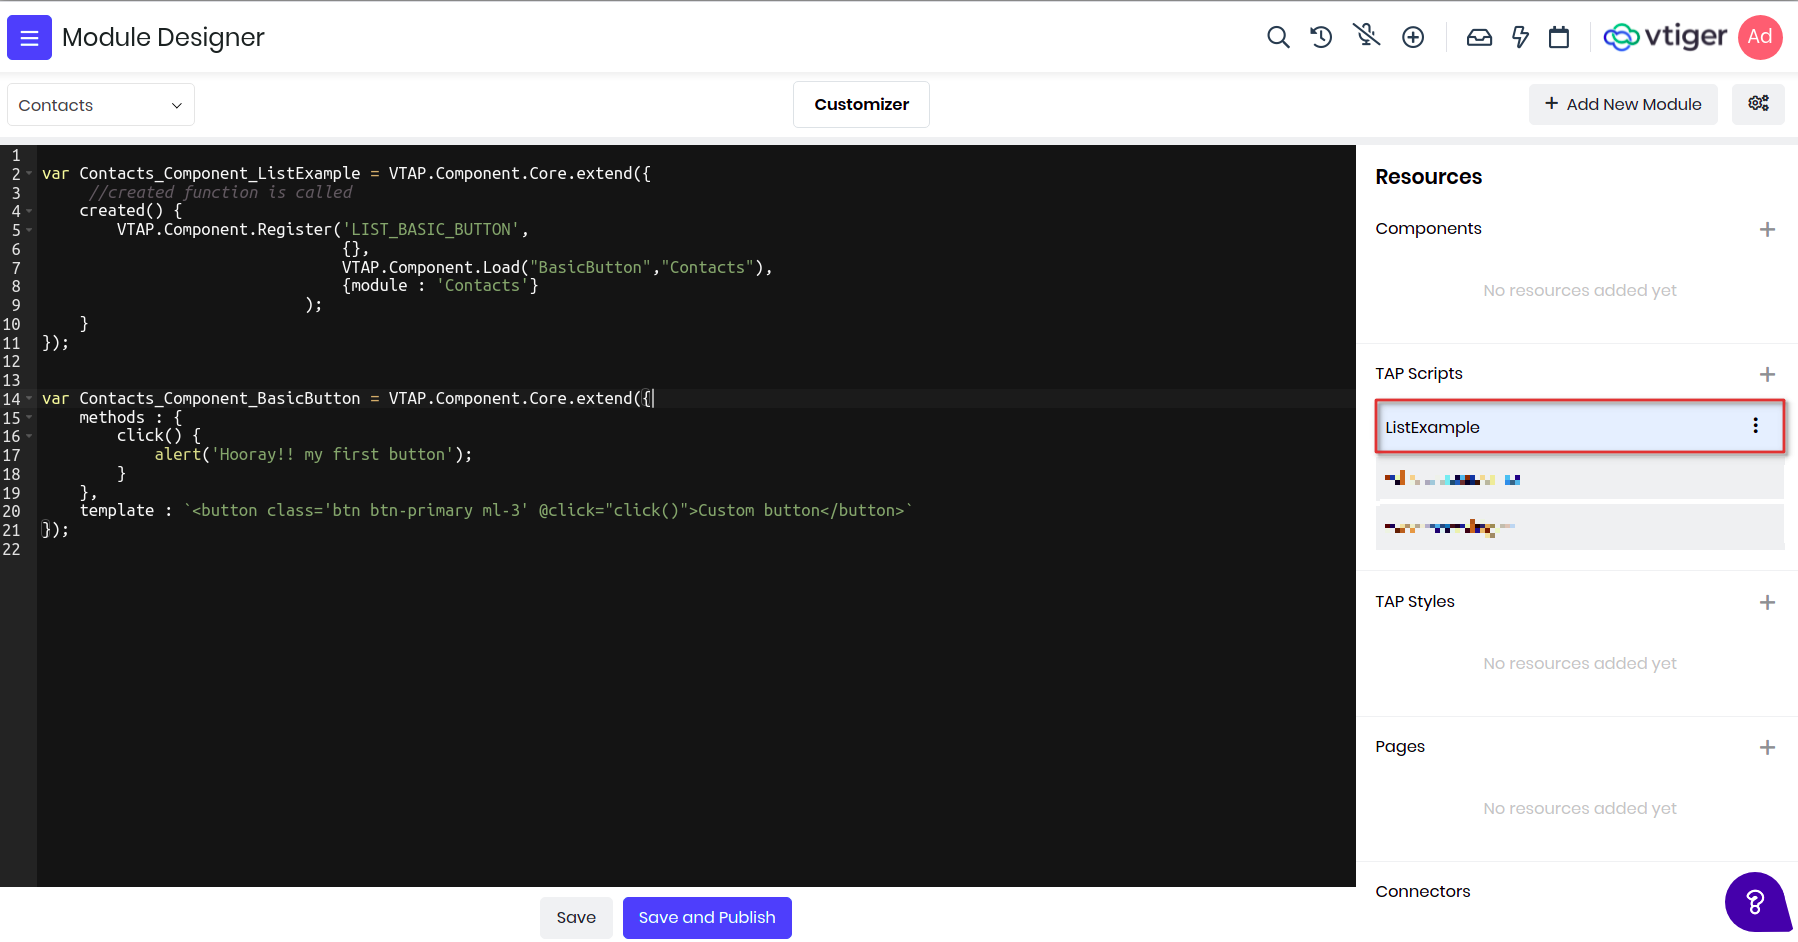
var Contacts_Component_ListExample = VTAP.Component.Core.extend({
    //created function is called
    created() {
        VTAP.Component.Register('LIST_BASIC_BUTTON',
                                {},
                                VTAP.Component.Load("BasicButton","Contacts"),
                                {module : 'Contacts'}
                        );
    }
});

var Contacts_Component_BasicButton = VTAP.Component.Core.extend({
    methods : {
        click() {
            alert('Hooray!! my first button');
        }
    },
    template : `Custom button`
});
Please note that the name of script given and the name of the component should match, which in this example is "ListExample". Every button is wrapped in a Vtiger Component, to understand more about component and its life cycle click here.
To understand what each component type describes and its examples please refer Component Types
Please check here for more examples on other hooks.
Custom API
API Designer allows application developers to build custom web service APIs. You can define your own custom service endpoints and query parameters. These APIs can be used to interact with CRM data, integrate with external apps and also expose these data to VTAP Javascript APIs to be used within custom pages or widgets in Vtiger UI.
API Designer lets you add two types of APIs.
- REST APIs
- Incoming Webhook
REST APIs provides you the ability to access CRM data through HTTP/HTTPS protocol. You can perform create, update, retrieve or delete operations on any CRM record information. Apart from this it will also allows you to store extension specific data, user specific configuration data, or connect to external applications using the stored extension specific data. All these data can be accessed using basic authorization passing username and accesskey.
Incoming Webhook allows any external applications to post data to CRM, these are subsets of REST APIs but they do come with additional security. Each incoming webhook needs to be accessed using unique security token which can be configured when create webhook api. It also provides you to control accesses to webhook coming from specific IP addresses.
APIs can be created using VADL, this is loosely based on XML syntax to enable administrators or developers to be able to define API without needing deep programming skills. This is essential to create any custom APIs, good understanding on it will help in creating APIs quickly.
REST URI format
REST APIs follows standard REST API protocol, and each customer can define their endpoints.
For REST API endpoints, it follows the below format: https://instance.odx.vtiger.com/restapi/vtap/api/YOUR_CUSTOM_API_PATH
For Incoming webhook end point, the format is: https://instance.odx.vtiger.com/restapi/vtap/webhook/YOUR_CUSTOM_WEBHOOK_PATH
Supported HTTP request method
For REST API end points, below HTTP request methods are supported:
- GET
- POST
- PUT
- DELETE
For Incoming Webhook, below HTTP request methods are supported:
- GET
- POST
How to create REST APIs?
From the main menu, access Platform > API Designer module, you will see Add API button, clicking on gives two options.
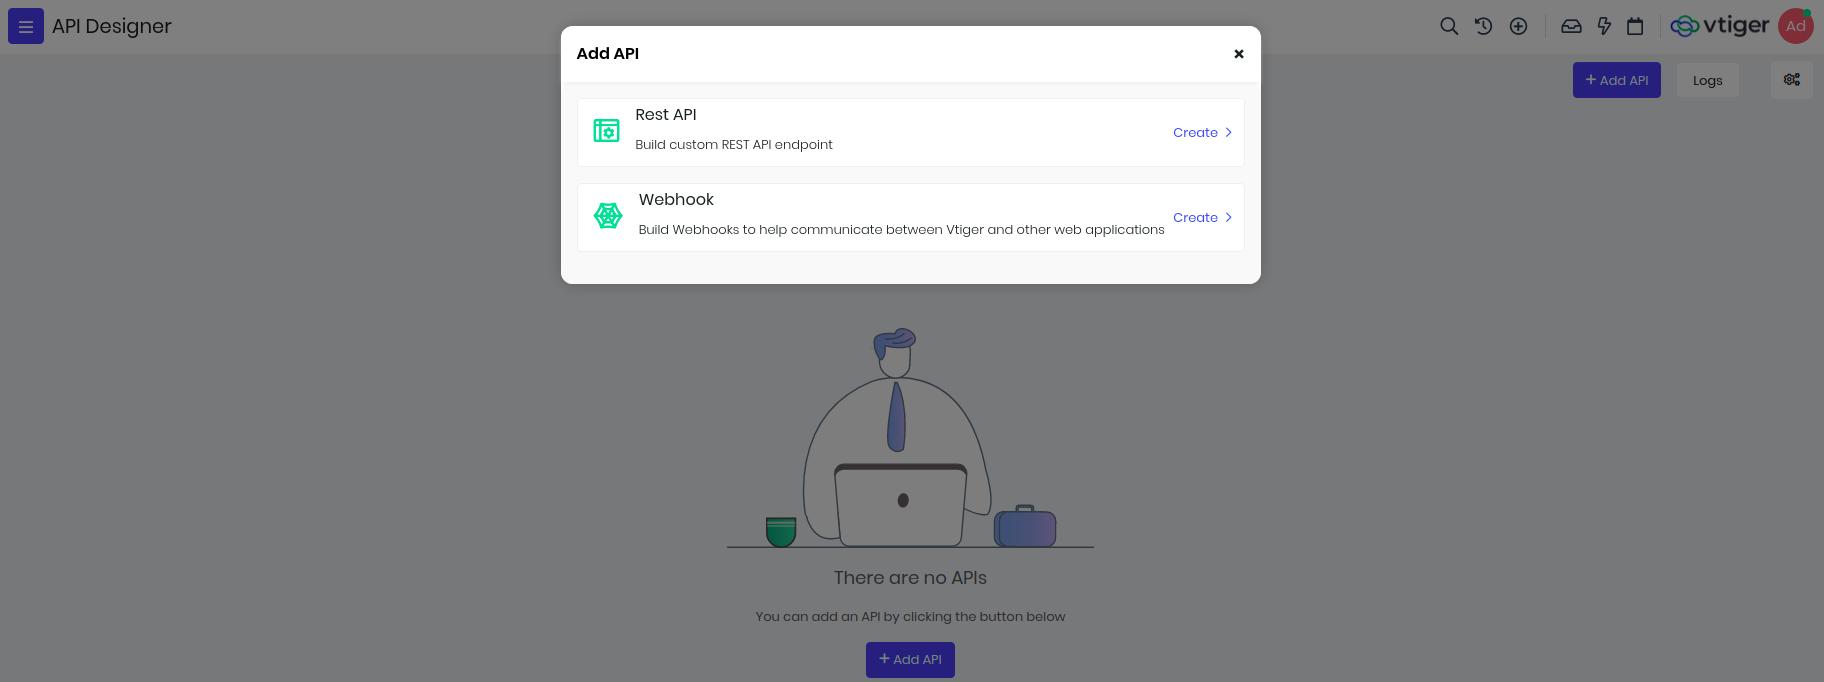
##Build REST APIs to access CRM data
To access CRM data we have enabled read, write, update and delete operations to CRM records. Every API is identified with its name and it has to be unique since it is used in the endpoints.
In the below screen, to create API you need to select module, unique name(only characters and numbers) and checkmark it to enable.
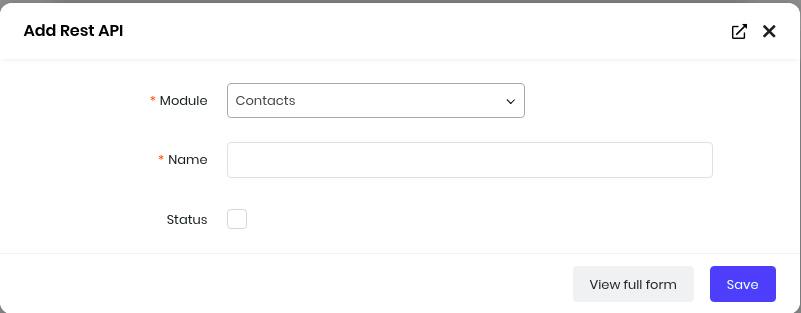
Read data from CRM
After you add API, you will see in-built IDE where you need to use VADL to define APIs. For retrieving CRM data we will use select xml node, below is an example with api name "top_organizations" to show top 5 Organizations(internally called as "Accounts") with highest annual revenue. You will see select node used here with module attribute
<?xml version="1.0"?>
<api method="get">
    <select module="Accounts">
        <record>
            <field name="accountname"></field>
            <field name="annual_revenue"></field>
        </record>
        <sort>
            <field name="annual_revenue" order="descending"></field>
        </sort>
        <limit max="5" page="@page"></limit>
    </select>
</api>
Below is the list of VADL nodes that can be used for select.
| Name | Description | Example |
|---|---|---|
| select | This will retrieve data from the crm identified with module attribute. This will define other how the data will be read, conditions, sorting and number of records. | <select module='Contacts'></select> |
| record | This will have all the fields which needs to be retrieved and is placed inside select node. | <record><field name="firstname"></field><field name="lastname"></field></record> |
| where | Use this when you want to filer the records, you can pass multiple fields. Use glue attribute(OR, AND) to decide if all or any fields should match the conditions. | <where glue="OR"><field name="firstname" value="@first"></field><field name="lastname" value="@last" condition="like"></field></record> |
| sort | This will have fields that will sort the data, with order attribute defining descending or ascending. | <sort><field name="annual_revenue" order="descending"></field></sort> |
| limit | By default we return 100 records, but you can pass max attribute to limit records. If there are more records, you can pass page parameter in the request get specific page records. | <limit max="5" page="@page"></limit> |
Conditions
Where clause supports different type of conditions and their details are:
| Condition | Description |
|---|---|
| eq | Equals (=), defaults if not passed |
| neq | Not Equals (!=) |
| gt | Greater Than (>) |
| lt | Less Than (<) |
| gte | Greater Than OR Equal To (>=) |
| lte | Less Than OR Equal To (>=) |
| in | Select in Multiple VALUES (IN) |
| like | Like (%VALUE%) |
You can access this API from external applications through exposed endpoints, in the above example you can access it below endpoint. https://instance.odx.vtiger.com/restapi/vtap/api/top_organizations.
Each of these endpoints expects username and accesskey to be passed in the request headers as basic authorization. Postman screenshot of the above API is shown below.
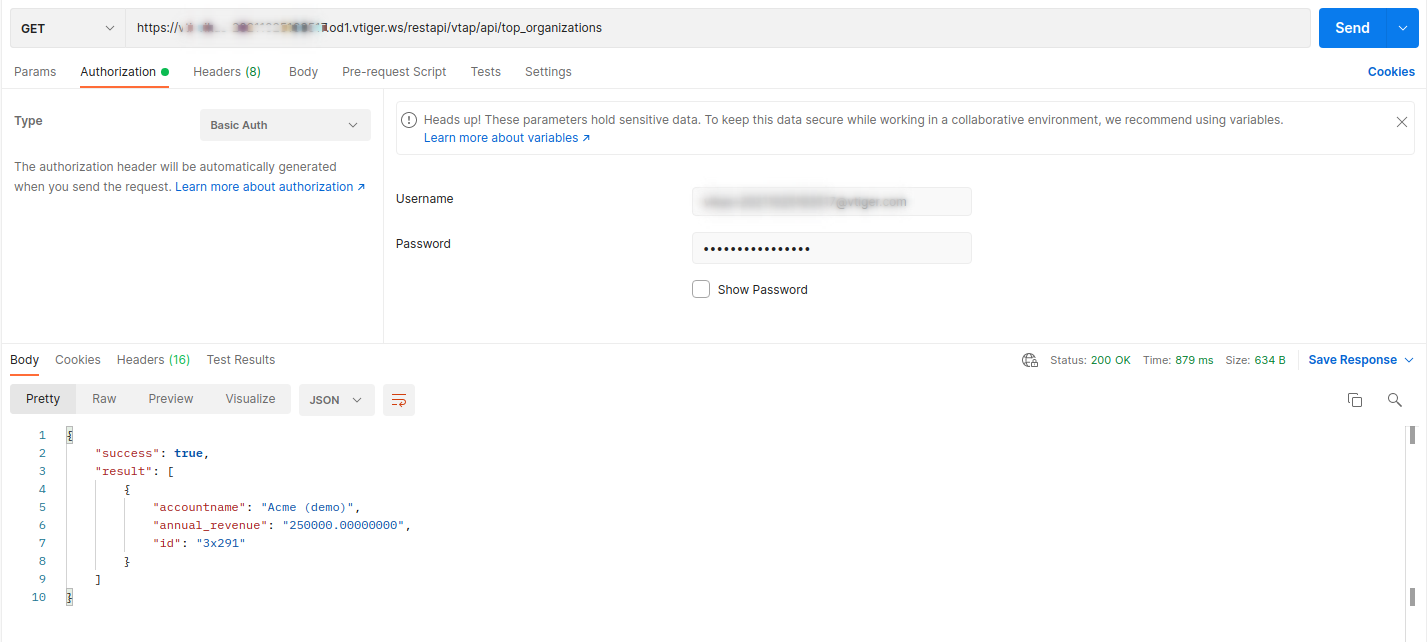
All custom REST API's built in API Designer can also be accessed using VTAP Javascript APIs, these data can be used to show as a list in custom page or use it for a bar chart etc.
VTAP.CustomAPI.Get("get_organization", {}, (error, response) => {
    if(response) {
        //use response to show in the list or in the widget.
    }
});
Read data using value-binding
Consider a case when you want to expose an API which wants to know Contact's first name and last name based on email address. Here email address is dynamic value, identified with '@' in the value attribute which will be passed as part of request parameter. To achieve I have created an API with name "search_contacts_with_email" this we will write xml as below.
<?xml version="1.0"?>
<api method="get">
    <select module="Contacts">
        <record>
            <field name="firstname"> </field>
            <field name="lastname"> </field>
            <field name="id"> </field>
            <field name="department"> </field>
        </record>
        <where glue="OR">
            <field name="email" condition="eq" value="@emailaddress"> </field>
            <field name="phone" condition="eq" value="@phone"> </field>
        </where>
    </select>
</api>
Note : notice the glue attribute in where node, it is used to check if one of the condition in the where clause will match.
Accessing the same API via postman by passing emailaddress in the request parameter.

Create records in CRM
To create record you need to use create node, with method attribute as "post" in api node. Lets create a Contact record and link it to an existing organization record. For account_id field you can see it will first search company and if not found then it will create it.
<?xml version="1.0" ?>
<api method="post">
    <create module="Contacts">
        <record>
            <field name="firstname" value="@firstname"> </field>
            <field name="lastname" value="@lastname"> </field>
            <field name="email" value="@email"> </field>
            <field name="contacttype" value="@type" default="Lead" presence="optional"> </field>
            <field name="account_id" module="Accounts">
                <select>
                    <where>
                        <field name="accountname" value="@company"></field>
                    </where>
                </select>
                <create>
                    <record>
                        <field name="accountname" value="@company"></field>
                    </record>
                </create>
            </field>
        </record>
        <return>
            <field name="id"> </field>
        </return>
    </create>
</api>
Get Deals or Multiple Field Conditions in the Where Clause
Retrieve all deals (Potentials) associated with a specific contact or account, based on either the contact's mobile number or the account's phone number, ensuring that records are returned if either condition is met.
<?xml version="1.0"?>
<api method="get">
    <select module="Potentials">
        <record>
            <field name="potentialname"></field>
            <field name="amount"></field>
            <field name="assigned_user_id"></field>
            <field name="createdtime"></field>
        </record>
        <where glue="OR">
               <field name="contact_id" module="Contacts">
                   <select>
                       <where>
                           <field name="mobile" condition="eq" value="@mobile" presence="optional"></field>
                       </where>
                    </select>
               </field>
               <field name="related_to" module="Accounts">
                    <select>
                         <where>
                             <field name="phone" condition="eq" value="@phone" presence="optional"></field>
                         </where>
                    </select>
                </field>
            </where>
    </select>
</api>
Get Cases With Related Contact And UserDetails using Select node
Fetches case records along with the contact's first name, last name, and mobile number, as well as the assigned user's full name and the group's name. This reduces the number of API calls needed to gather related information, streamlining your workflow.
<?xml version="1.0"?>
<api method="get">
    <select module="Cases">
        <record>
            <field name="title"></field>
            <field name="casestatus"></field>
            <field name="assigned_user_id"></field>
            <field name="createdtime"></field>
            <field name="case_no"></field>
            <field name="assigned_user_id" module="Users">
                <select>
                    <field name="first_name"></field>
                    <field name="last_name"></field>
                    <field name="userlabel"></field>
                </select>
            </field>
            <field name="contact_id" module="Contacts">
                <select>
                    <field name="firstname"></field>
                    <field name="lastname"></field>
                    <field name="mobile"></field>
                </select>
            </field>
            <field name="group_id" module="Groups">
                <select>
                    <field name="groupname"></field>
                </select>
            </field>
        </record>
        <where>
            <field name="contact_id" module="Contacts">
                <select>
                    <where>
                        <field name="lastname" value="@name"></field>
                    </where>
                </select>
            </field>
        </where>
    </select>
</api>
Bulk Create
Bulk create can be done using the key bulk.
<?xml version="1.0"?>
<api method="post">
    <create module="Potentials" bulk="true" data='@data'>
        <record>
            <field name="potentialname" value="@dealName"></field>
            <field name="closingdate" value="22-06-2024"></field>
        </record>
    </create>
</api>
Create record and related/link to a parent record
You can create a record and also link it parent record using link node. In the below example you will see label in link node, this is the relationship name(label you see in related list in summary page) between newly created and parent record. If you are not sure then you can leave it skip mentioning it.
Here we are creating Documents record and relating to a Contact with an email address.
<?xml version="1.0"?>
<api method="post">
    <create module="Documents">
        <record>
            <field name="notes_title" value="@notes_title"></field>
            <field name="notecontent" value="@notecontent" presence="optional"></field>
            <field name="filelocationtype" value="I"></field>
            <field name="fileversion" value="@fileversion" presence="optional"></field>
            <field name="filestatus" value="1"></field>
            <field name="folderid" value="22x1"></field>
            <field name="document_source" value="Vtiger"></field>
            <field name="document_type" value="Public"></field>
        </record>

        <link label="Documents">
            <select module="Contacts">
                <where>
                    <field name="email" value="@emailaddress"></field>
                </where>
            </select>
        </link>

        <return>
            <field name="id"></field>
        </return>
    </create>
</api>
Relate/Link Existing Records
This custom API will help you relate/link existing records. Below is an example for linking cases record to contacts record.
<?xml version="1.0" ?>
<api method="put">
    <update module="Cases">
        <record>
            <field name="id" value="@id"></field>
        </record>
        <where>
            <field name="title" value="@casetitle"></field>
        </where>
        <link label="Cases">
            <select module="Contacts">
                 <where>
                     <field name="email" value="@emailaddress"></field>
                 </where>
            </select>
        </link>
        <return>
            <field name="id"></field>
        </return>
    </update>
</api>
Update Record
To replace email field value with incoming parameter (new_email) on all Contacts record matching incoming parameter (old_email) and respond back with record ID of changed records.
<?xml version="1.0" ?>
<api method="put">
    <update module="Contacts">
        <record>
            <field name="email" value="@new_email"></field>
        </record>
        <where>
            <field name="email" condition="eq" value="@old_email"></field>
        </where>
        <return>
            <field name="id"></field>
        </return>
    </update>
</api>
Bulk Update
Bulk update can be done using the key bulk.
<?xml version="1.0" ?>
<api method="put">
    <update module="Contacts" bulk="true" data="@data">
        <record>
            <field name="firstname" value="@firstname"></field>
        </record>
        <where>
            <field name="lastname" condition="eq" value="@lastname"></field>
        </where>
        <return>
            <field name="url"></field>
        </return>
    </update>
</api>
Update if exists else create a record, upsert
You can update and create in one single api call using upsert node. It has 2 parts one is update and other create node inside upsert node. They follow the same conventions to create and update record, just like in the previous examples.
<?xml version="1.0"?>
<api method="post" module="Contacts">
    <upsert>
        <where>
            <field name="id" condition="eq" value="@CRMID"></field>
        </where>
        <sort>
            <field name="id" order="desc"></field>
        </sort>
        <limit max="1"></limit>
        <update>
            <record>
                <field name="email" value="@email" presence="optional"></field>
                <field name="cardnumber" value="@card" presence="optional"></field>
            </record>
        </update>
        <create>
            <record>
                <field name="firstname" value="@firstname" presence="optional"></field>
                <field name="lastname" value="@lastname" presence="optional"></field>
            <field name="email" value="@email" presence="optional"></field>
                <field name="account_id" module="Accounts" presence="optional">
                    <select>
                        <where>
                            <field name="website" value="@website"></field>
                        </where>
                        <sort>
                            <field name="domain" order="descending"></field>
                        </sort>
                    </select>
                </field>
            </record>
        </create>
        <return>
            <field name="id"></field>
            <field name="lastname"></field>
            <field name="account_id"></field>
        </return>
    </upsert>
</api>
Bulk Upsert
Bulk is supported in upsert. It can be used by key word bulk="true" and data="@data"
<?xml version="1.0"?>
   <api method="post" module="Contacts">
        <upsert bulk="true">
             <where>
                <field name="mobile" condition="eq" value="@mobile"></field>
            </where>
            <update>
               <record>
                   <field name="mobile" value="@mobile"></field>
                   <field name="email" value="@email" presence="optional"></field>
                   <field name="lastname" value="@lastname" presence="optional"></field>
               </record>
            </update>
            <create module="Contacts" bulk="true">
                <record>
                   <field name="mobile" value="@mobile"></field>
                   <field name="email" value="@email" presence="optional"></field>
                   <field name="lastname" value="@lastname" presence="optional"></field>
               </record>
            </create>
            <return>
                <field name="mobile"></field>
                <field name="email"></field>
                <field name="lastname"></field>
            </return>
        </upsert>
    </api>
Update a record and add a comment/mention
You can add a mention when you perform create, update and upsert operations. Lets see an example to add comment/mention to Contacts Module.
<?xml version="1.0" ?>
<api method="POST">
    <update>
        <record>
            <field name="firstname" value="@firstname" presence="optional"></field>
        </record>
        <where>
            <field name="email" value="@email"></field>
        </where>

        <mention>
            <template>
                <![CDATA[
                    <br>
                    <table>
                        <tr>
                            <td>Last name: %s</td></tr>
                        <tr>
                            <td>Email ID: %s</td>
                            </tr>
                    </table>
                ]]>
            </template>
            <values>
                <value name="lastname"></value>
                <value name="email"></value>
            </values>
            <!--<text>-->
            <!--    //either use template or text, one of them -->
            <!--</text> -->
        </mention>
         <return>
            <field name="id"></field>
            <field name="assigned_user_id"></field>
            <field name="lastname"></field>
        </return>
        </update>
</api>
List below different mention node definitions:
| Name | Description | Example |
|---|---|---|
| mention | wrapper node to define the syntax for mentions/comments | <mention></mention> |
| text | this contains text message | <mention><text>testing comments</text></mention> |
| template | this contains template message where placeholder %s is to be used to merge values | <mention><template>A Lead is created with email address: %s</template></mention> |
| values | if template is used then %s are replaced with names present in values node | <values><value name="email"></value></values> |
Delete records
You can delete multiple records at once, by defining the filter conditions.
<?xml version="1.0"?>
<api method="delete">
    <delete module="Contacts">
        <where>
                <field name="contacttype" value="@type"></field>
        </where>
    </delete>
</api>
Create multiple records in one API call
You can combine and create mulitple records in one API call, for example you can create a Deal(Potential) record along with Contact and Organization(Accounts). If Contact and Organization record exists then link it to Deal record. Below is an example
<?xml version="1.0" ?>
<api method="post">
    <create module="Potentials">
        <record>
            <field name="potentialname" value="@potentialname"></field>
            <field name="closingdate" value="@closingdate"></field>
            <field name="pipeline" value="@pipeline"></field>
            <field name="sales_stage" value="@sales_stage"></field>
            <field name="amount" value="@amount"></field>
            <field name="assigned_user_id" value="19x1"></field>
            <field name="related_to" module="Accounts">
                <select>
                    <where>
                        <field name="accountname" value="@company"></field>
                    </where>
                </select>
                <create>
                    <record>
                        <field name="accountname" value="@company"></field>
                        <field name="assigned_user_id" value="19x1"></field>
                    </record>
                </create>
            </field>
            <field name="contact_id" module="Contacts">
                <select>
                    <where>
                        <field name="email" value="@email"></field>
                    </where>
                </select>
                <create>
                    <record>
                        <field name="firstname" value="@firstname"></field>
                        <field name="lastname" value="@lastname"></field>
                        <field name="email" value="@email"></field>
                        <field name="contacttype" value="@contacttype"></field>
                        <field name="assigned_user_id" value="19x1"></field>
                        <field name="related_to" module="Accounts">
                            <select>
                                <where>
                                    <field name="accountname" value="@company"></field>
                                </where>
                            </select>
                            <create>
                                <record>
                                    <field name="accountname" value="@company"></field>
                                    <field name="assigned_user_id" value="19x1"></field>
                                </record>
                            </create>
                        </field>
                    </record>
                </create>
            </field>
        </record>
        <return>
            <field name="id"> </field>
        </return>
    </create>
</api>
Create_Potentials_With_Account_And_Contacts
<?xml version="1.0"?>
<api method="post">
    <create module="Potentials">
        <record>
            <field name="potentialname" value="@potentialname"></field>
            <field name="closingdate" value="@closingdate"></field>
            <field name="pipeline" value="Standard"></field>
            <field name="related_to" module="Accounts">
                <select>
                    <where>
                        <field name="accountname" value="@company"></field>
                    </where>
                </select>
                <create>
                    <record>
                        <field name="accountname" value="@company"></field>
                    </record>
                </create>
            </field>
            <field name="contact_id" module="Contacts">
                <select>
                    <where>
                        <field name="email" value="@email"></field>
                    </where>
                </select>
                <create>
                    <record>
                        <field name="lastname" value="@lastname"></field>
                        <field name="contacttype" value="Lead"></field>
                        <field name="account_id" module="Accounts">
                            <select>
                                <where>
                                    <field name="accountname" value="@company"></field>
                                </where>
                            </select>
                        </field>
                    </record>
                </create>
            </field>
        </record>
    </create>
</api>
You can create a deal record with related records to accounts and conatcts in the same api. Using select and where nodes.
- select will help in selecting the record where the given condition is satisfied.
- if the record is not found a record is created using create node and then linked to the deal or potential
NOTE - All bulk operations have a limit of 50 records. Each record will be considered as a single request and seperate api call when calculating minute and daily limit.
Integration
In the REST API topic you saw how to build APIs to access CRM data, but in the real world an organization uses hundreds of applications for their employees and data is spread across them. Very often there is need to either sync the data with other applications or bring/send some parts of data to/from CRM.
Connect applications having REST APIs
Connecting to other applications that has REST APIs exposed has become easy with VTAP platform now, you can use API Designer, build an API, connect to them using Javascript APIs and display them on a widget inside Vtiger or post data to the other application. These outbound REST APIs allow you to create, update, read or delete data on an application that supports REST architecture. To build any REST APIs you need to use VADL which provides xml nodes, we have used them to build custom CRM data APIs.
Use cases for REST APIs
- Connect to Slack and post a message to channels from CRM.
- Perform email or phone validation when the entering the data in CRM.
- Get latest exchange currency rates and apply them when creating Invoice or Quotes etc.
- Show weather details of a Contact or Lead real time.
- Enrich customer data using email address or company domain and many more.
Parts of REST API
Rest API compromises of below parts:
| Name | Description | VADL equivalent | Example |
|---|---|---|---|
| Endpoint | This is used to connect the application where the data resides. For dynamic parts of the url pass them as attributes in the url xml as shown in example 2. | url | 1. <url>https://example.com/api/v1/get_contacts</url>2.<url SHEETID="@sheetid" OPTIONS="values/Sheet1!A1:append?valueInputOption=RAW">https://sheets.googleapis.com/v4/spreadsheets/$SHEETID/$OPTIONS</url> |
| Method | This tells what is the type of request, like get, post, put or delete. | Default is get type. | method |
| Header parameters | There can be many headers which notifies the target app about the details of the request. | headers | <headers><header name="content-type" value="application/json"></header></headers> |
| Authentication parameters | This will tell which type of authentication are used, like basic auth or bearer token, or oauth. | auth | <auth><basic username="" password=""></basic></auth> |
| Query parameters | Additional data needed for the request endpoint to perform required action. | parameters | <parameters><parameter name="id" value="@id"></parameter></parameters> |
| Raw json | send parameters as json | raw-post-data | <parameters raw-post-data="true"><parameter name="id" value="@id"></parameter></parameters> |
How to add REST API?
- Go to main menu, under Platform you need to select API Designer.
- Click on Add Api button, you will given two option to select, one is Rest Api and other Webhook.
- Select Rest api, provide the name of the api which will be used later to make calls, link to the module and enable the status to active.
General structure of REST API
To use a REST API with an external domain (e.g. https://something.com), you first need to allow the domain in your platform settings. To do that follow these steps:
Navigate to Apps > Platform > API Designer
Click the Settings icon in the top-right corner.
In the API Settings menu:
- Select the module for which you are building the API.
- Add the external domain (https://something.com) to the list of allowed domains.
This will enable the external domain for use in API requests.
Additionally, you can dynamically bind URL parameters using placeholders like $id. For example, in the URL https://something.com?params=$id, $id is a dynamic value.
<?xml version="1.0"?>
<api method="post">
    <rest method="post">
        <url id="@id">https://something.com?params=$id</url>
        <headers>
            <header name="" value=""></header>
        </headers>
        <auth>
            <basic username="" password=""></basic>
        </auth>
        <parameters>
            <parameter name="id" value="@id"></parameter>
        </parameters>
    </rest>
</api>
Examples of REST APIs
Send json POST request
<?xml version="1.0"?>
<api method="post">

    <rest method="post">
        <url>https://httpbin.org/anything</url>

        <headers>
            <header name="Content-Type" value="application/json"></header>
        </headers>

        <parameters raw-post-data="true">
            <parameter name='identifier' value='@identifier'></parameter>
            <parameter name='managerId' value='@managerId'></parameter>
            <parameter name='managerName' value='@managerName'></parameter>
        </parameters>
    </rest>
</api>
Build a weather app api to get the weather data.
<?xml version="1.0"?>
<api method="get">
    <rest method="get">
        <url>https://api.openweathermap.org/data/2.5/weather</url>
        <parameters>
            <parameter name="appid" value="@apiKey"></parameter>
            <parameter name="q" value="@city"></parameter>
            <parameter name="units" value="@unit"></parameter>
            <parameter name="lang" value="@lang"></parameter>
        </parameters>
    </rest>
</api>
Connect applications having OAuth support
We will add documentation on this soon, in the mean while you can watch this webinar video on our youtube channel.
Connect application having SOAP APIs
TBD
FAQs
I am getting error "unauthorized domain! Please whitelist https://xxx.xxx.xxx
To connect to any external application the adminstrator has to whitelist the domain, before you can start calling the API. For this you need to go to Apps > Platform > Api Designer, on the top right side we have provided Settings icon. Click on it to see Api Settings, here you can select the module for which you are building the API and add the external domain which can be used in building API.
Is it possible to make get/post type of request?
Yes, you can build GET, POST, PUT or DELETE type of request. When building api using VADL, inside api xml node you need to pass type attribute with one of the above values.
Webhooks
Incoming webhooks allows other applications to post the data into CRM when any event takes place in their system. These are special urls or endpoints created to allow easy integration with externals application. Each webhook consists of a unique endpoint, to which external applications can post parameters to create/update/delete data in the CRM.
Note : Having knowledge on how to build REST APIs and VADL is important.
When to use Incoming Webhooks?
- You want to inform CRM about an event occurred in your application and want to log them in CRM.
- For example, when a customer submits his contact data to Google forms. Instead of accessing the excel file to see the list you want to be available in CRM so your sales team can start following up with them.
- You can let CRM know if the customer's bank confirms the payment or customer has raised a charge dispute in your stripe account.
- You want to capture the survey details when the customer submits from Survey to your CRM.
Are these Incoming Webhooks safe?
The data posted using this mechanism follows secure and safe means to connect using a secret token that is provided during the webhook creation. These tokens are unique for each webhook that you create, and can be regenerated at any time to keep them more secure.
To increase the security we have also provided ways to restrict these webhooks from particular IP Addresses only. You can pass one or more IP Addresses to control the access to these webhooks.
How to create Incoming Webhooks?
Webhooks are created using VADL xml nodes, same format is used to create REST APIs as well.
Go to menu, under Platform app select the API Designer tool. Click on Add API button to see 2 options, one to create REST API and other to create Webhooks.
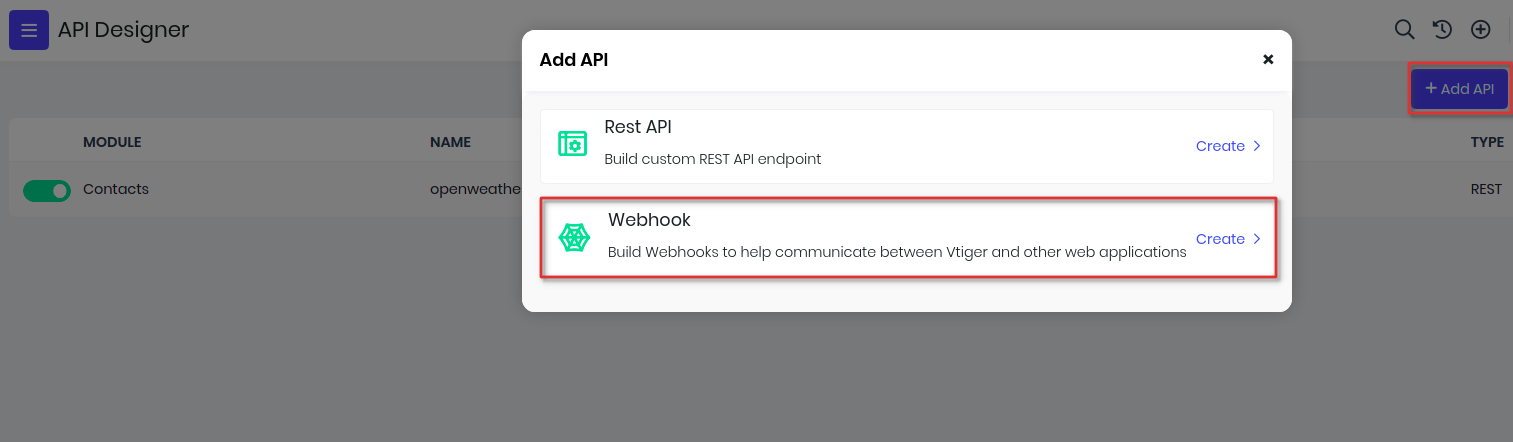
Here are steps to create webhooks.
- Provide a name for the webhook, which will be used to idenfity and access them.
- Select module for which you want to associate this webhook, and enable the status.

- You will see a editor where you need to add VADL definition to define the webhook.
- After defining the webhook, save and publish to make it available for external applications.
- Before publishing, you will need to create secure token. This token can be created from the Security section.
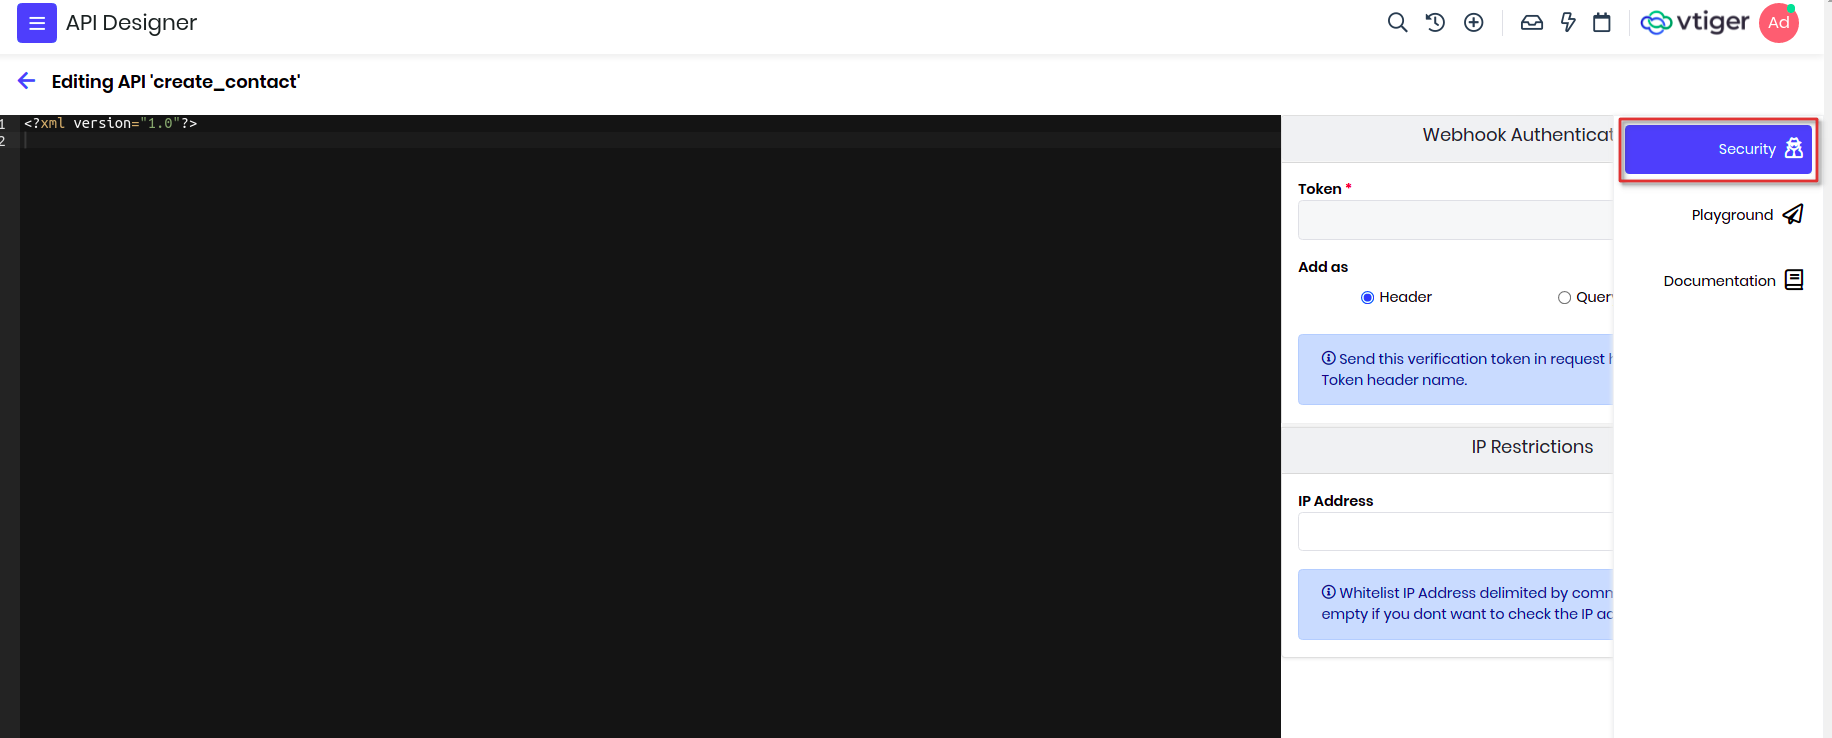
- You can enable this token either to be passed in header or part of the url.
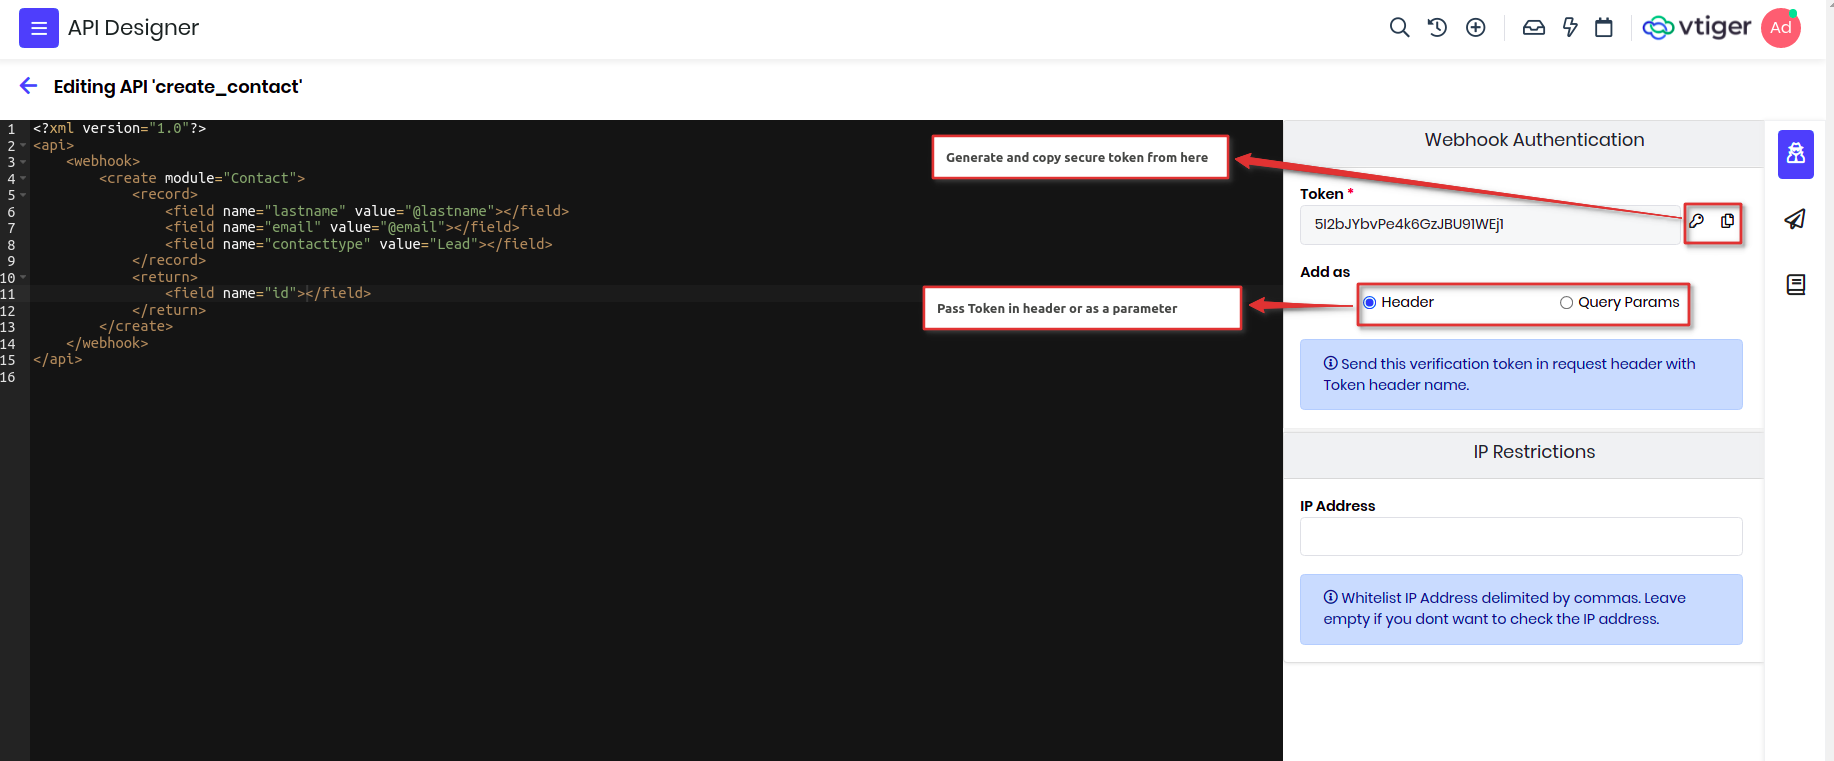
- If needed you can restrict access to the webhook from particular IP Addresses.
Structure of Incoming Webhook
<?xml version="1.0"?>
<api>
    <webhook>
        create or update or upsert records
    </webhook>
</api>
Examples
Integrate with Google forms
Assume you want to capture the google form data, where customer submits his contact details like phone number, email address and of course his name. We will create each submission as a Lead Contact record in CRM. Lets go through the steps that will help us achieve this integration with CRM.
- Create a Google form to capture Contact details, name, phone and other required information.
- Create a Incoming Webhook request in Vtiger using API Designer.
- Add webhook definition using VADL to create Contact.
- Generate secure token as header or parameter.
- Save and publish the Webhook.
- Enable Google forms to notify Vtiger when form is submitted using app script.
- Copy the webhook endpoint generated in Vtiger to Google forms script to post the data.
Lets go through each of these steps in detail:
First lets create a simple Google form having name, email address and phone number.
Now lets create webhook from API Designer and add the below definition. We will create a Contact record, map Vtiger fields with google form fields under record.
<?xml version="1.0"?>
<api>
    <webhook>
        <create module="Contacts">
            <record>
                <field name="lastname" value="@lastname"></field>
                <field name="firstname" value="@firstname"></field>
                <field name="email" value="@address"></field>
                <field name="phone" value="@phone"></field>
            </record>
            <return>
                <field name="id"></field>
            </return>
        </create>
    </webhook>
</api>
Let me explain the content of the API below.
| Name | Description |
|---|---|
| api | All the definition are wrapped under this node. |
| webhook | This start the definition of the webhook. |
| Create | This will create a record in vtiger, we need to pass module attribute with the name of the module which needs to be created. |
| record | This is placeholder to define all the fields. |
| field | This defines the field with name attribute and with set the value of the field. If the value starts with @ means the value will be part of request parameters. You can define multiple fields under record. |
| return | This defines what data has to be returned back to the webhook, this is optional and generally not needed for webhook as they are one direction only. |
Before saving and publishing, we need to generate a secure token and decide where to pass it, for now I will select as parameter. It means the token has to be sent as part of webhook endpoint. Once done, it will generate endpoint which you can see under Documentation section on the right panel.
Now lets go back to Google form and configure app script which will be responsible to send the data to this webhook endpoint we generated.
Google form has to now submit data to our end point, this is done by adding a script that will invovke webhook endpoint. You can refer this article for more details on how to deploy and enable form submit triggerer.
That's it!! you are good to go and test it. Submit one Google form and enable listening in Playground section of the API on the right side panel. We have provided option to see the response of the form submission, IP address of the request, and other details.
You can click on start listening to see the sample response in the logs when form is submitted.

Here is a sample where you can see the response from the google form is captured below. And Vtiger is creating the record, and displaying the response if the api definition.
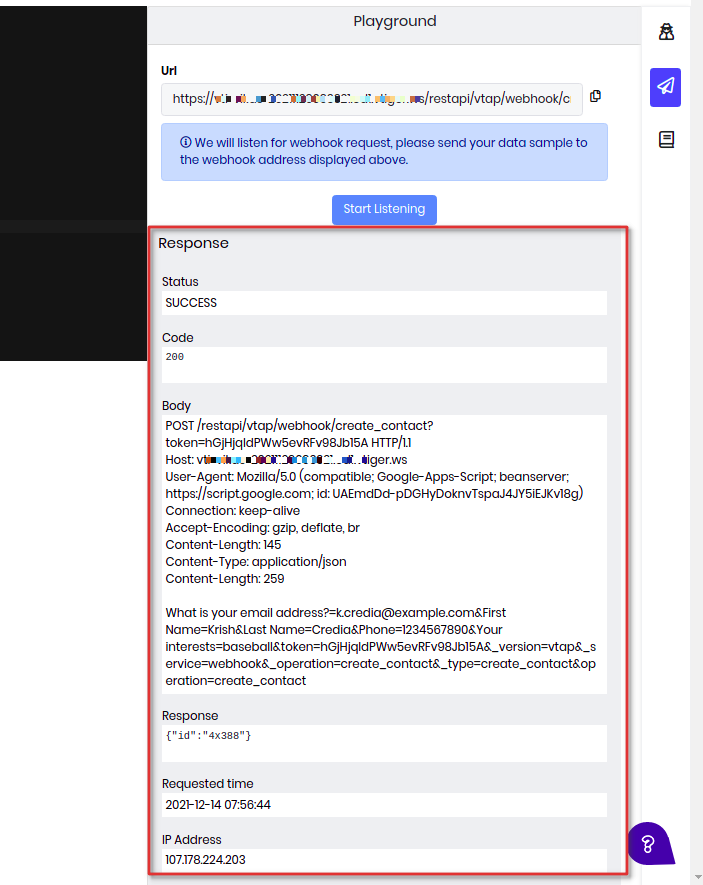
More webhook examples
Suppose you want to change the stage of a Deal based on some external trigger, like customer paid Invoice which is tracked in other system. In such case you can emit a webhook from that external system using the below api definition.
<?xml version="1.0"?>
<api method="post">
    <webhook>
        <update module="Potentials">
            <record>
                <field name="sales_stage" value="@stage"></field>
            </record>
            <where>
                <field name="contact_id" module="Contacts">
                    <select>
                        <where>
                            <field name="email" value="@email"></field>
                        </where>
                    </select>
                </field>
            </where>
            <return>
                <field name="id"></field>
            </return>
        </update>
    </webhook>
</api>
You have an external system that takes care of electronic signatures, once the customer signs it you want to keep a log of the signed document in the crm. In such case we can create a custom webhook and let external system call it with required details. In the below definition we will create a Document record with the signed document and link to a Contact record using the email address.
Note : You have to send a multipart/form-data request with signed document passed in the filename parameter.
<?xml version="1.0"?>
<api method="post">
    <webhook>
    <create module="Documents">
        <record>
            <field name="notes_title" value="@notes_title"></field>
            <field name="notecontent" value="@notecontent" presence="optional"></field>
            <field name="filelocationtype" value="I"></field>
            <field name="fileversion" value="@fileversion" presence="optional"></field>
            <field name="filestatus" value="1"></field>
            <field name="folderid" value="22x1"></field>
            <field name="document_source" value="Vtiger"></field>
            <field name="document_type" value="Public"></field>
        </record>

        <link label="Documents">
            <select module="Contacts">
                <where>
                    <field name="email" value="@email"></field>
                </where>
            </select>
        </link>

        <return>
            <field name="id"></field>
        </return>
    </create>
    </webhook>
</api>
Details about some of the VADL xml nodes are defined below:
| Name | Description |
|---|---|
| link | This will related the record created with the parent record. Here label attribute is important to identify to which relation will be used. |
Custom Apps
Platform provides App Creator tool which allows you to quickly build niche web application.
VCAP JS provides helper APIs to exchange data with CRM.
Published apps will be on Web and Mobile Apps for allowed users.
Read further to know way you can build such apps and publish it.
Flipbook
Lets us build a simple flipbook using App Creator, where you can flip the pages.
Create App
Navigate Main Menu > Platform > App Creator > Add App
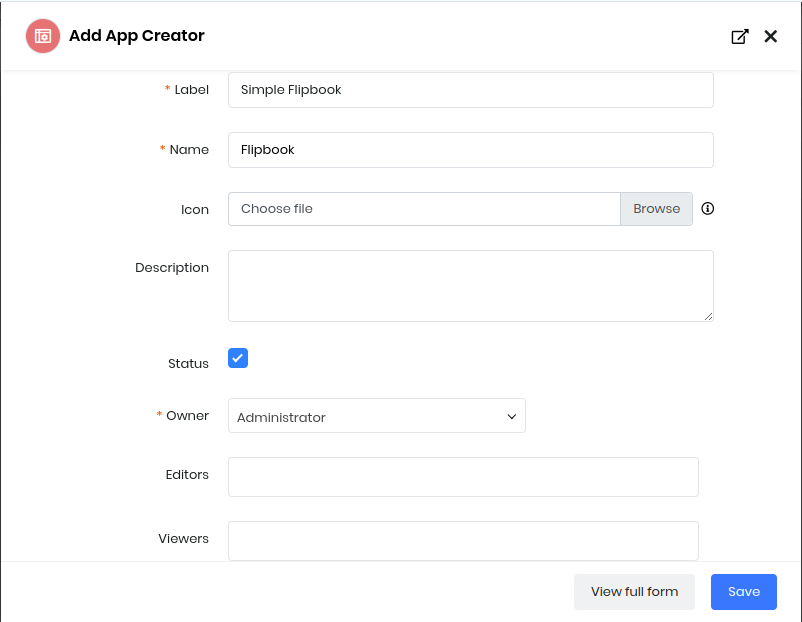
Fill the Form And Save

Clicking on Flipbook App will open an editor where you can customise your App
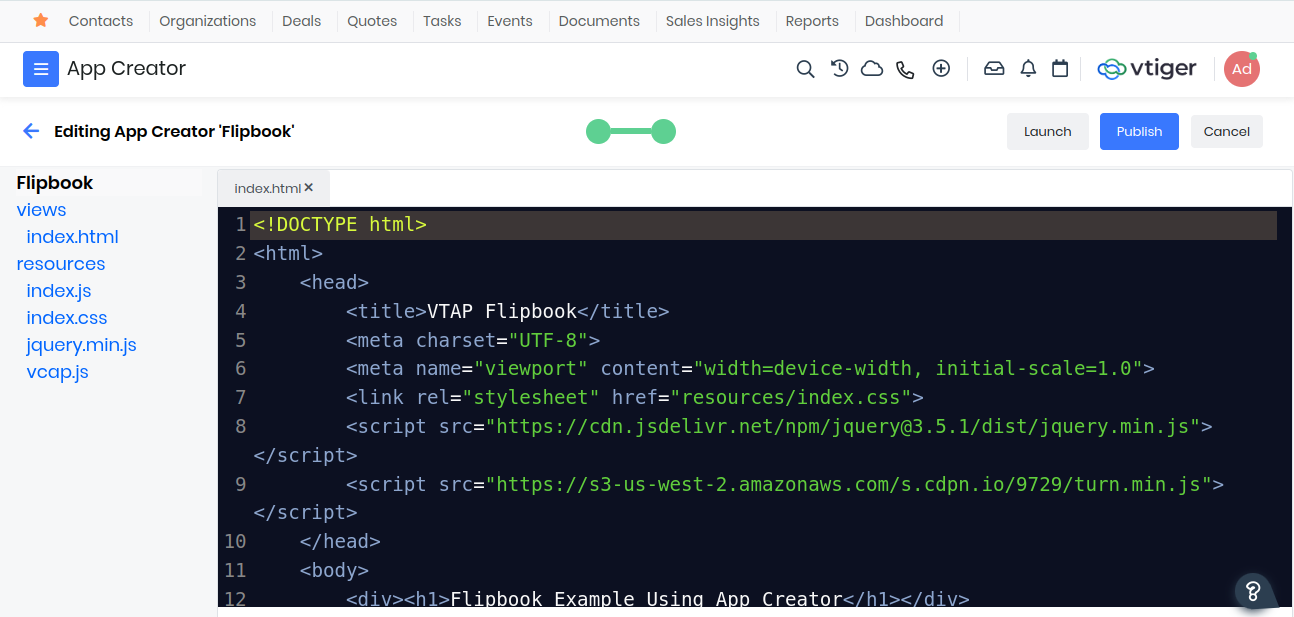
views/index.html
Copy-and-paste the HTML code below which uses jQuery, turn.js library, which is used to create the flipping page effect, with VCAP and index.js runtime.
<!DOCTYPE html>
<html>
    <head>
        <title>VTAP Flipbook</title>
        <meta charset="UTF-8">
        <meta name="viewport" content="width=device-width, initial-scale=1.0">
    	<link rel="stylesheet" href="resources/index.css">
		<script src="https://cdn.jsdelivr.net/npm/jquery@3.5.1/dist/jquery.min.js"></script>
		<script src="https://s3-us-west-2.amazonaws.com/s.cdpn.io/9729/turn.min.js"></script>
    </head>
    <body>
		<div><h1>Flipbook Example Using App Creator</h1></div>
        <div id="flipbook" class="sample-flipbook">
			<div class="hard">Vtiger Platform</div>
			<div class="hard"></div>
			<div> Builds Creative Apps </div>
			<div> to business much easily </div>
			<div> than ever before. </div>
			<div> Thank you! </div>
			<div class="hard"></div>
			<div class="hard"></div>
		</div>

		<script src="resources/vcap.js"> </script>
        <script src="resources/index.js"> </script>

    </body>
</html>
Click Ctrl+S to Save the changes
resources/index.js
Copy-and-paste index.js handler code which initializes the flipbook once the VTAP platform has fully loaded.
VCAP.event.on('app.loaded', function(){
    $("#flipbook").turn({
        width: 400,
        height: 300,
        autoCenter: true
    });
});
Click Ctrl+S to Save the changes
resources/index.css
Copy-and-paste index.css code which provides the styles for the flipbook.
.sample-flipbook{
	width:400px;
	height:200px;
	-webkit-transition:margin-left 0.2s;
	-moz-transition:margin-left 0.2s;
	-ms-transition:margin-left 0.2s;
	-o-transition:margin-left 0.2s;
	transition:margin-left 0.2s;
}

.sample-flipbook .page{
	width:200px;
	height:200px;
	background-color:white;
	line-height:300px;
	font-size:20px;
	text-align:center;
}

.sample-flipbook .page-wrapper{
	-webkit-perspective:2000px;
	-moz-perspective:2000px;
	-ms-perspective:2000px;
	-o-perspective:2000px;
	perspective:2000px;
}

.sample-flipbook .hard{
	background:#ccc !important;
	color:#333;
	-webkit-box-shadow:inset 0 0 5px #666;
	-moz-box-shadow:inset 0 0 5px #666;
	-o-box-shadow:inset 0 0 5px #666;
	-ms-box-shadow:inset 0 0 5px #666;
	box-shadow:inset 0 0 5px #666;
	font-weight:bold;
}

.sample-flipbook .odd{
	background:-webkit-gradient(linear, right top, left top, color-stop(0.95, #FFF), color-stop(1, #DADADA));
	background-image:-webkit-linear-gradient(right, #FFF 95%, #C4C4C4 100%);
	background-image:-moz-linear-gradient(right, #FFF 95%, #C4C4C4 100%);
	background-image:-ms-linear-gradient(right, #FFF 95%, #C4C4C4 100%);
	background-image:-o-linear-gradient(right, #FFF 95%, #C4C4C4 100%);
	background-image:linear-gradient(right, #FFF 95%, #C4C4C4 100%);
	-webkit-box-shadow:inset 0 0 5px #666;
	-moz-box-shadow:inset 0 0 5px #666;
	-o-box-shadow:inset 0 0 5px #666;
	-ms-box-shadow:inset 0 0 5px #666;
	box-shadow:inset 0 0 5px #666;

}

.sample-flipbook .even{
	background:-webkit-gradient(linear, left top, right top, color-stop(0.95, #fff), color-stop(1, #dadada));
	background-image:-webkit-linear-gradient(left, #fff 95%, #dadada 100%);
	background-image:-moz-linear-gradient(left, #fff 95%, #dadada 100%);
	background-image:-ms-linear-gradient(left, #fff 95%, #dadada 100%);
	background-image:-o-linear-gradient(left, #fff 95%, #dadada 100%);
	background-image:linear-gradient(left, #fff 95%, #dadada 100%);
	-webkit-box-shadow:inset 0 0 5px #666;
	-moz-box-shadow:inset 0 0 5px #666;
	-o-box-shadow:inset 0 0 5px #666;
	-ms-box-shadow:inset 0 0 5px #666;
	box-shadow:inset 0 0 5px #666;
}
Click Ctrl+S to Save the changes
Publish & Launch App
After saving file changes you need to Publish app for reflecting them in the others.
You can Launch app (or reload app if launched previously)

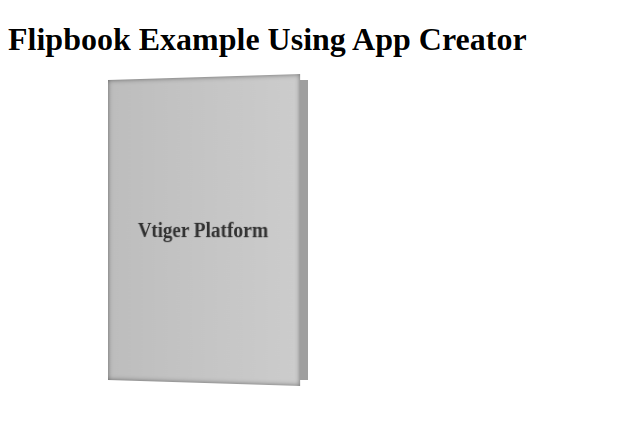
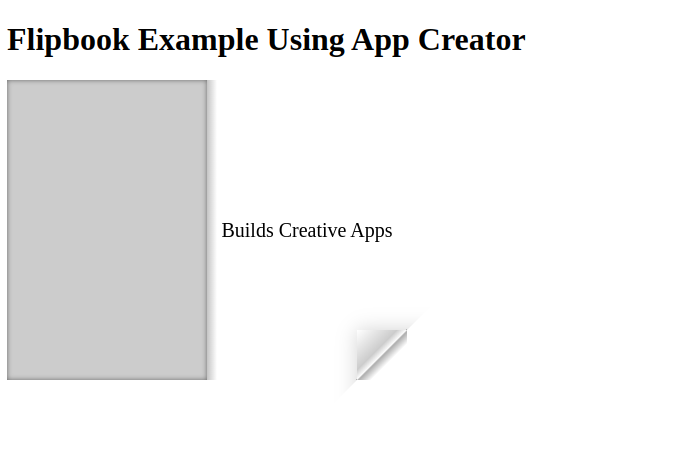
We have successfully created a Flipbook App and now you easily through the pages!
Traffic Clock
Here is a prototype to represent time in a traffic signal theme. We will implement this in VTAP using step-by-step to understand designing of components and re-use the same.
Before implementing the application, identifying the data and visual scope make its easy to structure the application. We have time (hour, minute, second) to be displayed as text (left-side) and boxes (right-side).
The boxes further should highlight the elapsed value and remaining value.

So our data structure would be like
elapsed: {
    hour: A,
    minute: B,
    second: C,
}
Box UI can be created using span element:
.box {
    display: inline-block; /* to make it work without content */
    width: 16px;
    height: 16px;
    margin: 2px;
    border: 1px solid black;
}
We will be using VueJS to enable binding the Visual and Data rendering.
Now lets create traffic_clock application in VTAP. Navigate Main Menu > Platform > App Creator > Add App
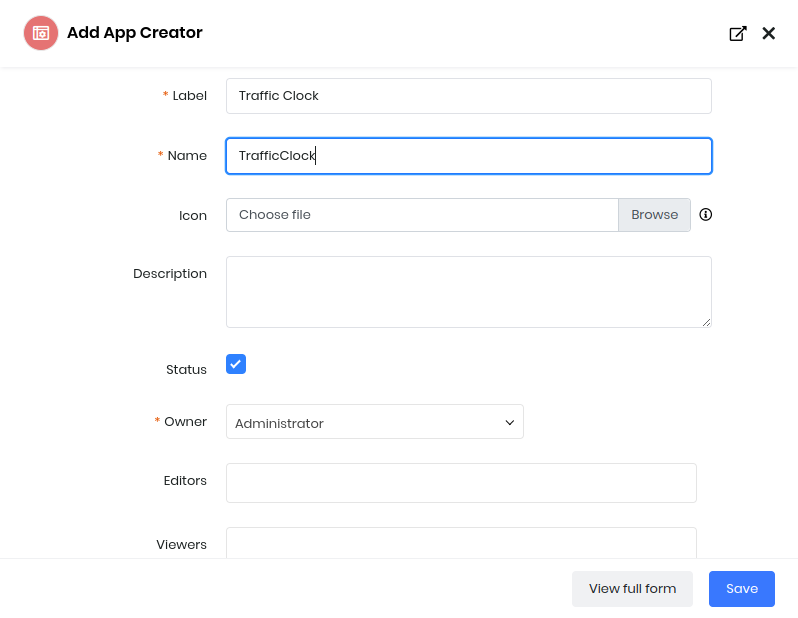
Fill the Form And Save

Clicking on TrafficClock App will open an editor where you can customise your App
Iteration - 1
Let us first get the timer display on HTML that changes every second.
views/index.html
<!DOCTYPE html>
<html>
    <head>
        <title>Traffic Clock</title>
        <meta charset="UTF-8">
        <meta name="viewport" content="width=device-width, initial-scale=1.0">
        <link rel="stylesheet" href="resources/index.css">
    </head>
    <body>
        <div id="app" v-cloak>
            <div class="hour">{{elapsed.hour}}</div>
            <div class="minute">{{elapsed.minute}}</div>
            <div class="second">{{elapsed.second}}</div>
        </div>
        <script src="https://cdnjs.cloudflare.com/ajax/libs/jquery/3.6.4/jquery.min.js"></script>
         <script src="https://cdnjs.cloudflare.com/ajax/libs/vue/2.7.14/vue.min.js"></script>
        <script src="resources/index.js"></script>
    </body>
</html>
Click Ctrl+S to Save the changes
resources/index.js
window.addEventListener('DOMContentLoaded', function() {
	new Vue({
		el: "#app",
		data: function() {
                                        /* Initialization */
			var d = new Date();
			return {
				elapsed: {
					hour: d.getHours(),
					minute: d.getMinutes(),
					second: d.getSeconds()
				}
			}
		},
		mounted: function() {
			setInterval( () => {
				var d = new Date();
				this.elapsed.hour = d.getHours();
				this.elapsed.minute = d.getMinutes();
				this.elapsed.second = d.getSeconds();
			}, 1000);
		}
	});
});
Click Ctrl+S to Save the changes
Publish the changes. Launch the application.
Iteration - 2
Let us now get the boxes displayed representing elapsed and remaining value of hour, minute, second.
views/index.html
<!DOCTYPE html>
<html>
    <head>
        <title>Traffic Clock</title>
        <meta charset="UTF-8">
        <meta name="viewport" content="width=device-width, initial-scale=1.0">
    	<link rel="stylesheet" href="resources/index.css">
    </head>
    <body>
        <div id="app" v-cloak>
            <div class="hour">
               {{elapsed.hour}}
               <span class="box hour elapsed" v-for="h in elapsed.hour"></span>
               <span class="box hour" v-for="h in (24 - elapsed.hour)"></span>
            </div>
            <div class="minute">
               {{elapsed.minute}}
               <span class="box minute elapsed" v-for="m in elapsed.minute"></span>
               <span class="box minute" v-for="m in (60 - elapsed.minute)"></span>
            </div>
            <div class="second">
               {{elapsed.second}}
               <span class="box second elapsed" v-for="s in elapsed.second"></span>
               <span class="box second" v-for="s in (60 - elapsed.second)"></span>
             </div>
        </div>
        <script src="https://cdnjs.cloudflare.com/ajax/libs/jquery/3.6.4/jquery.min.js"></script>
        <script src="https://cdnjs.cloudflare.com/ajax/libs/vue/2.7.14/vue.min.js"></script>
        <script src="resources/index.js"></script>
    </body>
</html>
Click Ctrl+S to Save the changes
resources/index.css
.box {
	display: inline-block;
	width: 16px;
	height: 16px;
	margin: 2px;
	border: 1px solid black;
}

.hour.elapsed {
	background: red;
}

.minute.elapsed {
	background: orange;
}

.second.elapsed {
	background: green;
}
Click Ctrl+S to Save the changes
Publish the changes. Launch the application.

Iteration - 3
Let us now build a custom VueJS boxes component which takes care of representing elapsed and remaining value. This will help us reduce HTML repetition as the component can be reused for hour, minute, second by varying the inputs to the component through attribute (type, value and max).
views/index.html
<!DOCTYPE html>
<html>
    <head>
        <title>Traffic Clock</title>
        <meta charset="UTF-8">
        <meta name="viewport" content="width=device-width, initial-scale=1.0">
    	<link rel="stylesheet" href="resources/index.css">
    </head>
    <body>
        <div id="app" v-cloak>
            <div class="hour">
               {{elapsed.hour}}
               <boxes type="hour" :value="elapsed.hour" :max="24"></boxes>
            </div>
            <div class="minute">
               {{elapsed.minute}}
               <boxes type="minute" :value="elapsed.minute" :max="60"></boxes>
            </div>
            <div class="second">
               {{elapsed.second}}
               <boxes type="second" :value="elapsed.second" :max="60"></boxes>
             </div>
        </div>
        <script src="https://cdnjs.cloudflare.com/ajax/libs/jquery/3.6.4/jquery.min.js"></script>
        <script src="https://cdnjs.cloudflare.com/ajax/libs/vue/2.7.14/vue.min.js"></script>
        <script src="resources/index.js"></script>
    </body>
</html>
Click Ctrl+S to Save the changes
resources/index.js
window.addEventListener('DOMContentLoaded', function() {

    Vue.component("boxes", {
        props: ["type", "value", "max"],
        template: `
            <div style="display:inline-block">
                <span :class="type" class="box elapsed" v-for="v in value"></span>
                <span :class="type" class="box" v-for="v in (max - value)"></span>
            </div>
        `
    });

    new Vue({
        el: "#app",
        data: function() {
            /* Initialization */
            var d = new Date();
            return {
                elapsed: {
                    hour: d.getHours(),
                    minute: d.getMinutes(),
                    second: d.getSeconds()
                }
            }
        },
        mounted: function() {
            setInterval( () => {
                var d = new Date();
                this.elapsed.hour = d.getHours();
                this.elapsed.minute = d.getMinutes();
                this.elapsed.second = d.getSeconds();
            }, 1000);
        }
    });
});
Click Ctrl+S to Save the changes
Publish the changes. Launch the application.
Iteration - 4
Continue the journey to match the expected representation.
Contacts Card
Let us now create an application that interacts with CRM data. It should fetch the Contacts records and represent them as cards.
Iteration - 1
Create application in VTAP (contact_cards). Navigate Main Menu > Platform > App Creator > Add App
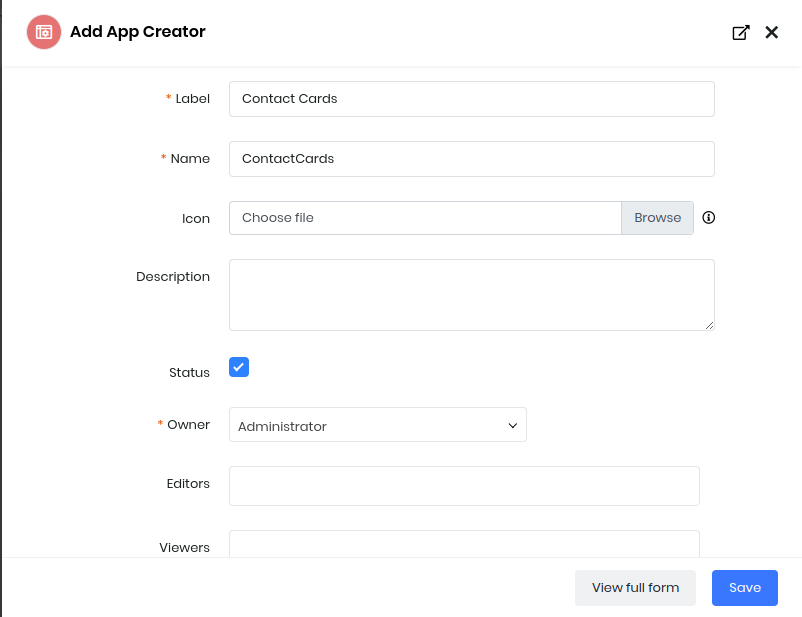
Fill the Form And Save

Clicking on ContactCards App will open an editor where you can customise your App
resources/index.js
We will be using VueJS library along with VCAP (Vtiger Custom Application) runtime that provides userapi that helps you work with CRM records easily.
window.addEventListener('DOMContentLoaded', function() {
    new Vue({
        el: "#app",
        data: {
            contacts: []
        },
        mounted: function() {
            VCAP.userapi.records.get({module: "Contacts"}, (e, contacts) => {
                this.contacts = contacts;
            });
        }
    });
});
Click Ctrl+S to Save the changes
views/index.html
<!DOCTYPE html>
<html>
    <head>
        <title>Contacts</title>
        <meta charset="UTF-8">
        <meta name="viewport" content="width=device-width, initial-scale=1.0">
        <link rel="stylesheet" href="https://cdn.jsdelivr.net/npm/bootstrap@4.6.2/dist/css/bootstrap.min.css">
        <link rel="stylesheet" href="https://cdnjs.cloudflare.com/ajax/libs/font-awesome/6.3.0/css/all.min.css">
        <link rel="stylesheet" href="resources/index.css">
    </head>
    <body>
        <div id="app" class="container-fluid bg-dark" style="height: 100%" v-cloak>
            <div v-if="contacts" class="row">
                <div class="card m-4" style="width: 350px" v-for="c in contacts">
                    <div class="card-body">
                        <h5 class="card-title">{{c.firstname}} {{c.lastname}}</h5>
                        <p class="card-text">{{c.title}}</p>
                    </div>
                    <ul class="list-group list-group-flush">
                        <li class="list-group-item"><i class="fa-solid fa-envelope"></i> {{c.email}}</li>
                        <li class="list-group-item"><i class="fa-solid fa-phone"></i> {{c.phone ? c.phone : '-'}}</li>
                    </ul>
                </div>
            </div>
        </div>

        <script src="https://cdnjs.cloudflare.com/ajax/libs/jquery/3.6.4/jquery.min.js"></script>
        <script src="https://cdnjs.cloudflare.com/ajax/libs/vue/2.7.14/vue.min.js"></script>
        <script src="resources/vcap.js"> </script>
        <script src="resources/index.js"> </script>
    </body>
</html>
Click Ctrl+S to Save the changes
Publish the changes. Launch the application.
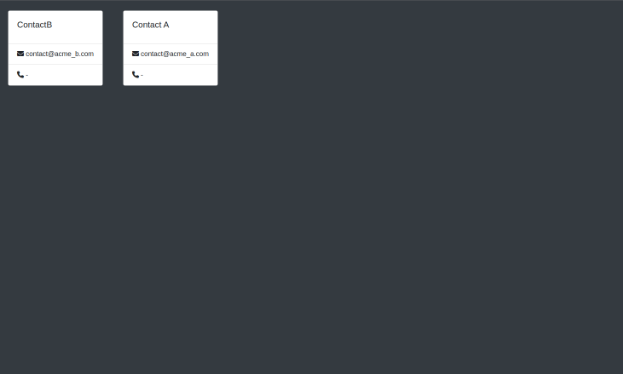
Iteration - 2
Lets try to refactor HTML to move the card representation as a VueJS component.
resources/index.js
Define a crm-contact component that renders information as a card.
window.addEventListener('DOMContentLoaded', function() {

    Vue.component('crm-contact', {
        props: ['info'],
        template: `
            <div class="card m-4" style="width: 350px">
                <div class="card-body">
                   <h5 class="card-title">{{info.firstname}} {{info.lastname}}</h5>
                   <p class="card-text">{{info.title}}</p>
                </div>
                <ul class="list-group list-group-flush">
                    <li class="list-group-item"><i class="fa-solid fa-envelope"></i> {{info.email}}</li>
                    <li class="list-group-item"><i class="fa-solid fa-phone"></i> {{info.phone ? info.phone : '-'}}</li>
                </ul>
            </div>
        `
    });

    new Vue({
        el: "#app",
        data: {
            contacts: []
        },
        mounted: function() {
            VCAP.userapi.records.get({module: "Contacts"}, (e, contacts) => {
                this.contacts = contacts;
            });
        }
    });
});
Click Ctrl+S to Save the changes
views/index.html
Use the crm-contact card tag in the HTML now.
<!DOCTYPE html>
<html>
    <head>
        <title>Contacts</title>
        <meta charset="UTF-8">
        <meta name="viewport" content="width=device-width, initial-scale=1.0">
        <link rel="stylesheet" href="https://cdn.jsdelivr.net/npm/bootstrap@4.6.2/dist/css/bootstrap.min.css">
        <link rel="stylesheet" href="https://cdnjs.cloudflare.com/ajax/libs/font-awesome/6.3.0/css/all.min.css">
        <link rel="stylesheet" href="resources/index.css">
    </head>
    <body>
        <div id="app" class="container-fluid bg-dark" style="height: 100%" v-cloak>
            <div v-if="contacts" class="row">
                <crm-contact v-for="c in contacts" :info="c"></crm-contact>
            </div>
        </div>

        <script src="https://cdnjs.cloudflare.com/ajax/libs/jquery/3.6.4/jquery.min.js"></script>
        <script src="https://cdnjs.cloudflare.com/ajax/libs/vue/2.7.14/vue.min.js"></script>
        <script src="resources/vcap.js"> </script>
        <script src="resources/index.js"> </script>
    </body>
</html>
Click Ctrl+S to Save the changes
Publish the changes. Launch the application.
Tasks Mind
We are now going to build an application that represents Tasks as Mindmap. In order to filter tasks we accept the project name from the URL. This enables us to trigger the app from a specific Project from CRM.
Create application in VTAP (tasks_mind). Navigate Main Menu > Platform > App Creator > Add App
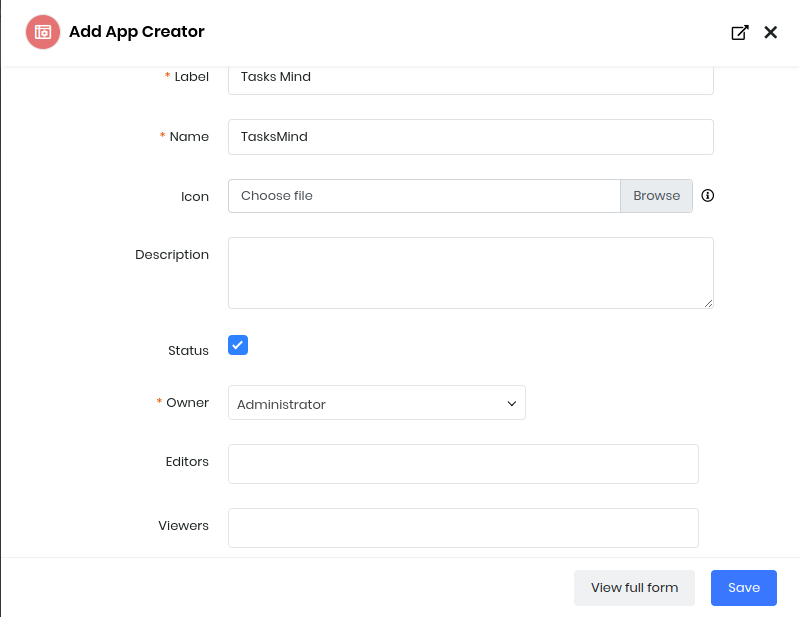
Fill the Form And Save

Clicking on TasksMind App will open an editor where you can customise your App.
views/index.html
To build the Tasks MindMap we shall use jsMind library which provides various options to control the visualization of data (refer).
<!DOCTYPE html>
<html>
   <head>
       <title>Tasks Map</title>
       <meta charset="UTF-8">
       <meta name="viewport" content="width=device-width, initial-scale=1.0">
       <link type="text/css" rel="stylesheet" href="https://cdn.jsdelivr.net/npm/jsmind@0.5/style/jsmind.css"/>
       <link rel="stylesheet" href="resources/index.css">
   </head>
   <body>
       <div id="app">
           <div id="progress"></div>
           <div id="jsmind_container"></div>
       </div>

       <script src="https://cdnjs.cloudflare.com/ajax/libs/jquery/3.6.4/jquery.min.js"></script>
       <script src="https://cdn.jsdelivr.net/npm/jsmind@0.5/es6/jsmind.js"></script>
       <script src="https://cdn.jsdelivr.net/npm/jsmind@0.5/es6/jsmind.draggable-node.js"></script>
       <script src="resources/vcap.js"> </script>
       <script src="resources/index.js"> </script>
   </body>
</html>
Click Ctrl+s to Save the changes
resources/index.js
window.addEventListener('DOMContentLoaded', function() {

      // Collect parameters that comes in through URL
	var req_params = {};
	location.hash.substr(1).split("&").forEach(
		function(item) {
                req_params[item.split("=")[0]] =
                   decodeURIComponent(item.split("=")[1])
            }
      );

	if (!req_params["name"]) {
		// No project selected.
		return;
	}

	var all_tasks_filterid = 19; /* "All Tasks" Filter ID   */
      var task_skip_closed = true; /* Turn off closed records */

      var project_name = req_params["name"];

	// Additional fields that are required if Filter is missing it.
      var extrafields = ["parent_task", "dependent_on"];

	// Filter custom condition
	var q = [];
	q.push(["related_project", "equal", project_name]);

	if (task_skip_closed) {
          q.push(["isclosed", "equal", 0]);
      }
      var record_options = {
          module: "Tasks",
          filterid: all_tasks_filterid,
          q: [q],
          extrafields: extrafields
      };

	// Helper functions
	function determine_task_color(task) {
		return task.isclosed == 1? "#5cb85c" : "#428bca";
	}

      var mind = {
		"meta": {
			"name": project_name
		},
		"format": "node_array",
		data: [
			{id: "project", isroot:true, topic: project_name }
		]
	};

	jQuery("#progress").html("Loading...");

	VCAP.userapi.records.get(record_options, (e, tasks) => {
		jQuery("#progress").hide();

		var taskids = {};

		// Main tasks
		for (var i = 0, len = tasks.length; i < len; i++) {
                  /* avoid duplicate parsing */
			if (taskids[tasks[i].id]) continue;

			if (tasks[i].parent_task && tasks[i].parent_task.id > 0)
                       continue;

			mind.data.push({
                     id: tasks[i]["id"],
                     parentid: "project",
                     topic: tasks[i]["label"],
                     "background-color":determine_task_color(tasks[i])
                  });

			taskids[tasks[i]["id"]] = true;
		}


		// Sub tasks
		for (var i = 0, len = tasks.length; i < len; i++) {
                  /* avoid duplicate parsing */
			if (taskids[tasks[i].id]) continue;

			if (tasks[i].parent_task && tasks[i].parent_task.id > 0){
				mind.data.push({
                          id: tasks[i]["id"],
                          parentid: tasks[i].parent_task["id"],
                          topic: tasks[i]["label"],
                          "background-color":determine_task_color(tasks[i])
                        });
			}
			taskids[tasks[i]["id"]] = true;
		}

		var options = {
			container: 'jsmind_container',
			theme: 'primary',
			editable: false
		};

		var jm = new jsMind(options);
		jm.show(mind);

            // Navigate to task on click of node
		jm.add_event_listener((type, data) => {
                if (data.evt == "select_node" && data.node != "project") {
                    var taskUrl = "/view/detai
l”;
                    taskUrl += "?module=Tasks&id="+ data.node;

                    window.open(taskUrl);
                }
		});
	});
});
Click Ctrl+s to Save the changes
resources/index.css
#jsmind_container {
	height: 100vh;
	width: 100%;
}
Click Ctrl+s to Save the changes
Publish the changes.
The application will be available at (/myapps/tasks_mind) but won't be of much use if the parameter (name) is not sent through the URL. We shall achieve this linking in the next step.
Linking app from CRM
Navigate VTAP > Module Designer > TAP Script provides us capability to build In-app custom components for the CRM. Using this we can add custom action on every Project Row of the List View.
Choose Projects and Create TAP Script - which can work across module.
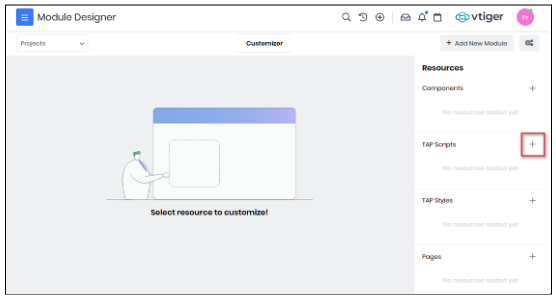
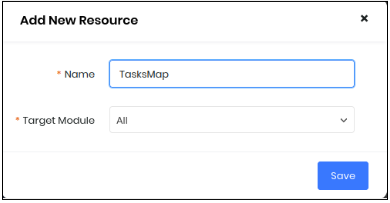
NOTE: Target Module can be selected as Project to make it available only for Projects ListView. For demonstration we will achieve this through code.
var Project_Component_TasksMap = VTAP.Component.Core.extend({
   created: function() {
       var viewModule = App.module();
       if (viewModule == "Project") {
           VTAP.Component.Register( 'LIST_ROW_BASIC_ACTION', {},
               VTAP.Component.Load('TasksMapAction', 'Project'));
       }
   }
});

var Project_Component_TasksMapAction = VTAP.Component.Core.extend({
   props: ['record'],
   methods: {
       navigateToTasksMap: function() {
           var url = "/myapps/tasksmind";
           if (this.record._moduleName == "Project") {
               url += "#name=" + this.record.label;
           }
           window.open(url);
       }
   },
   template: `
       <li title="Tasks Map" class="list-inline-item c-pointer px-2 m-0"
           @click="navigateToTasksMap()"><i class='fas fa-tasks'></i>
       </li>`
});
Save and Publish to make the component functional.
Open Projects ListView and hover on the record to see the new button added.
NOTE: If you don’t see it - try clearing your browser cache or use a private window.
Now clicking on the button would open /myapps/tasks_mind#name=project_name parameter which makes its work.
ReactJS App
VTAP supports deploying front-end apps built using ReactJS framework. We will cover the changes required to build scripts and deployment using the vtapit tool to make it seamless for your development.
Step 1: Create application (hello_react_vtap). Navigate Main Menu > Platform > App Creator > Add App
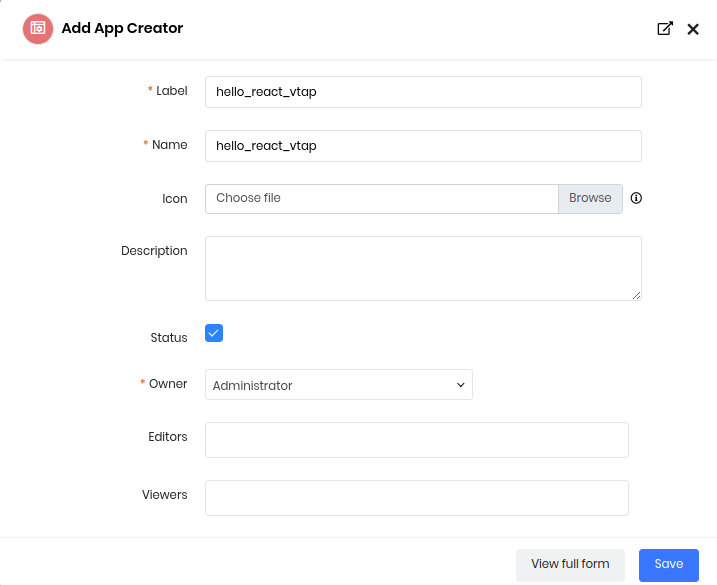
Fill the Form And Save
Step 2: Clone application to working directory using vtapit.
vtapit clone --crmapp hello_react_vtap hello_react_vtap_workdir
CRM URL: https://yourinstance.odx.vtiger.com
Username: me@name.here
Password: ********
Step 3: For this example, we will create a ReactJS app within the cloned VTAP working folder. This can be managed in other directory too as it would not be deployed.
cd hello_react_vtap_workdir
npx create-react-app react-src-local
Step 4: Edit react-src-local/package.json
We will customize the default build step to copy the compiled javascript to the VTAP resource folder which will be loaded by the HTML page.
"scripts": {
    "start": "react-scripts start",
    "build": "react-scripts build && cp build/static/js/main*.js ../resources/index.js",
    "test": "react-scripts test",
    "eject": "react-scripts eject"
  },
Step 5: Edit views/index.html
Define the react-app default mount point. Make sure the dependent resources and runtime libraries are loaded.
<!DOCTYPE html>
<html>
    <head>
        <title>React App - Contacts List</title>
        <meta charset="UTF-8">
        <meta name="viewport" content="width=device-width, initial-scale=1.0">
        <link rel="stylesheet" href="resources/index.css">
    </head>
    <body>
        <div id="root"></div>
        <script src="https://cdnjs.cloudflare.com/ajax/libs/jquery/3.7.0/jquery.min.js"></script>
        <script src="resources/vcap.js"> </script>
        <script src="resources/index.js"> </script>
    </body>
</html>
Step 6: You can continue building ReactJS app and build when ready.
Edit react-src-local/src/App.js
import './App.css';
import React, {Component} from 'react';

/* global VCAP */
/* This declaration will avoid eslint errors during build time */

class App extends Component {
  constructor(props) {
      super(props);
      this.state = {
          contacts: []
      }
  }

  componentDidMount() {
    /* We are loading the contacts records here… which gets rendered due to reactivity. */
    VCAP.userapi.records.get({module: "Contacts"}, (e, contacts) => {
        if (!e) this.setState({contacts: contacts});
    });
  }
  render() {
    return (
        <div className="App">
            <ul>
            {this.state.contacts.map((contact, index) => (
                <li>{contact.label}</li>
            ))}
            </ul>
        </div>
    );
  }
}

export default App;
Step 7:
Build ReactJS app - on success it copies the runtime javascript to VTAP app resource folder.
cd react-src-local
npm run build
cd ..
Step 8: You can do a dry-run check of the VTAP app.
vtapit run
http://localhost:8080/myapps/
Step 9:
Deploy final changes to CRM with vtapit push and publish the app to Go-live.
vtapit add views/index.html
vtapit add resources/index.js
vtapit push
vtapit publish
You can launch the app in browser now:
https://yourinstance.odx.vtiger.com/myapps/hello_react_vtap
Congratulations! The ReactJS app is now running on VTAP.
Example App – VTAP Custom Form with API Integration
This example demonstrates how to build a simple form using BootstrapVue and VTAP's component framework, including form submission, API interaction, and handling of success or error messages.
Setup Steps
- Create a script using the Module Designer.
- Register the script using the
DETAIL_BASIC_BUTTONhook. - When the button is clicked, a modal is displayed using
VTAP.Utility.ShowModal. - The modal contains a basic form to collect user inputs.
- On form submission, the data is saved using
VTAP.AppData.Save.
Technologies and Concepts Used
-
BootstrapVue is used to build responsive and styled form elements inside the modal.
-
VTAP.Component.Register is used to place the button on the module's detail view.
-
VTAP.Utility.ShowModal is used to display the modal containing the form.
-
VTAP.AppData.Save handles the data submission. This is suitable for saving data in a VTAP custom app.
- If you want to update or create records in standard modules (such as Deals or Contacts), you can use
VTAP.API.POSTinstead.
- If you want to update or create records in standard modules (such as Deals or Contacts), you can use
-
Notification Handling:
VTAP.Utility.ShowSuccessNotification("success")to display a success message.VTAP.Utility.ShowErrorNotification("error")to display an error message.
var Potentials_Component_CustomDetailButton = VTAP.Component.Core.extend({
 created() {
        VTAP.Component.Register('DETAIL_BASIC_BUTTON',
                                {},
                                VTAP.Component.Load('CustomButton','Potentials'));
    }

});

var Potentials_Component_CustomButton = VTAP.Component.Core.extend({
    methods : {
            click(){
                VTAP.Utility.ShowModal({
                    component: VTAP.Component.Load('ShowModal', 'Potentials'),
                    componentData: {},
                    modalOnModalMode: true

            });

            }
    },
    template:`<button class='btn btn-primary' @click=click()>Custom Button</button>`
});

var Potentials_Component_ShowModal = VTAP.Component.Core.extend({
      data() {
    return {
      form: {
        name: '',
        email: '',
        message: ''
      }
    };
  },
  methods: {
    onSubmit() {
      // handle form submission
      VTAP.AppData.Save('Potentials', { data_key: 'formSubmit',data_value:this.form}, (err, response) => {
            VTAP.Utility.ShowSuccessNotification("success")

      });
    }
  },
    template:`    <b-modal id="myModal" title="Contact Form" hide-footer>
    <b-container class="mt-3">
    <b-form @submit.prevent="onSubmit">
      <b-form-group label="Name" label-for="name">
        <b-form-input id="name" v-model="form.name" required></b-form-input>
      </b-form-group>

      <b-form-group label="Email" label-for="email">
        <b-form-input
          id="email"
          type="email"
          v-model="form.email"
          required
        ></b-form-input>
      </b-form-group>

      <b-form-group label="Message" label-for="message">
        <b-form-textarea
          id="message"
          v-model="form.message"
          rows="3"
        ></b-form-textarea>
      </b-form-group>

      <b-button type="submit" variant="primary">Submit</b-button>
    </b-form>
  </b-container>
  </b-modal>`
});
Key Highlights of the Example
- Shows how to launch a modal on button click.
- Demonstrates form field binding using
v-model. - Handles form submission using
@submit.prevent. - Includes feedback messages for both success and failure scenarios using VTAP utilities.
This example is intended as a minimal, working reference to help with building and submitting custom forms using VTAP.
Connectors
SMS Connector
Vtiger has an SMS Messages module that supports different SMS providers which will help in sending text messages from CRM. Right now, it is limited to some providers like Twilio, ClickATell, IndiaSms, Gupshup etc. But, we have a lot more SMS providers which are not yet available in Vtiger. SMS Connectors helps you enable any customer provider we want. With a simple xml code we can introduce a new SMS Provider in the SMS Messages module.
Build your own
Let's dig in to know how to enable the SMS Connector for the provider you like.
- Navigate to Menu > Platform > Module Designer
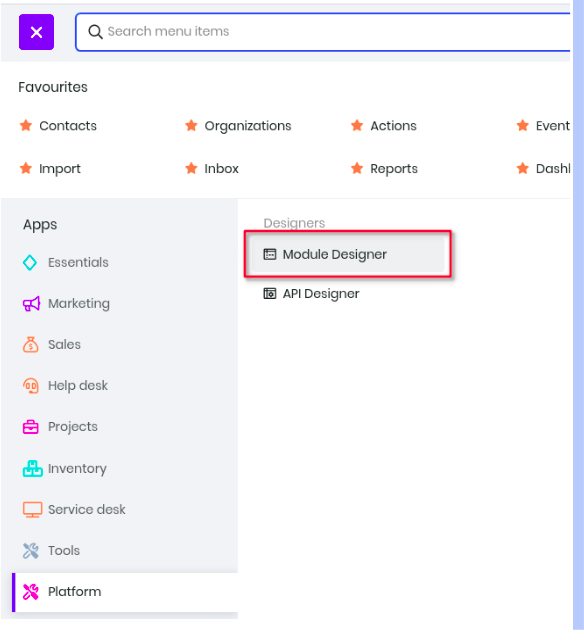
- Click Add New Module on the top right corner and create an Extension Module. Give a name to the module and ignore selecting an App Category.
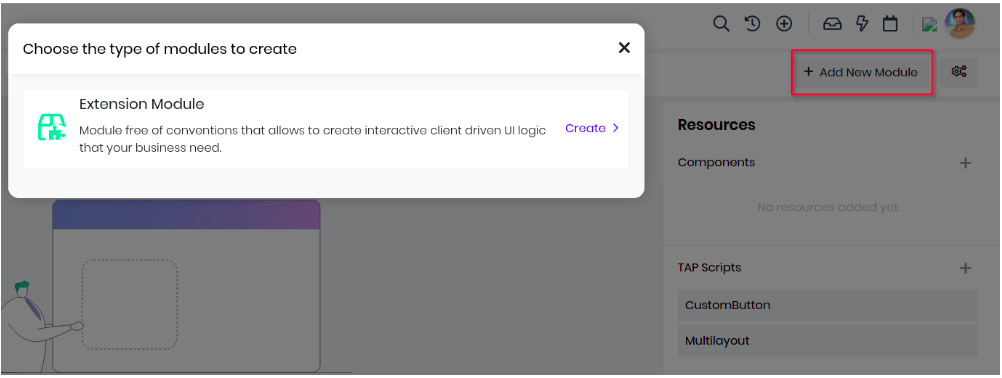
- VTAP has introduced a new Resource type in Module Designer called Connectors, select Connectors on the right side panel and select SMS in the drop down and giving a name to the connector. For example if you are integrating with Twilio.com service then use Twilio which will appear in the SMS Configuration page when setting it up.
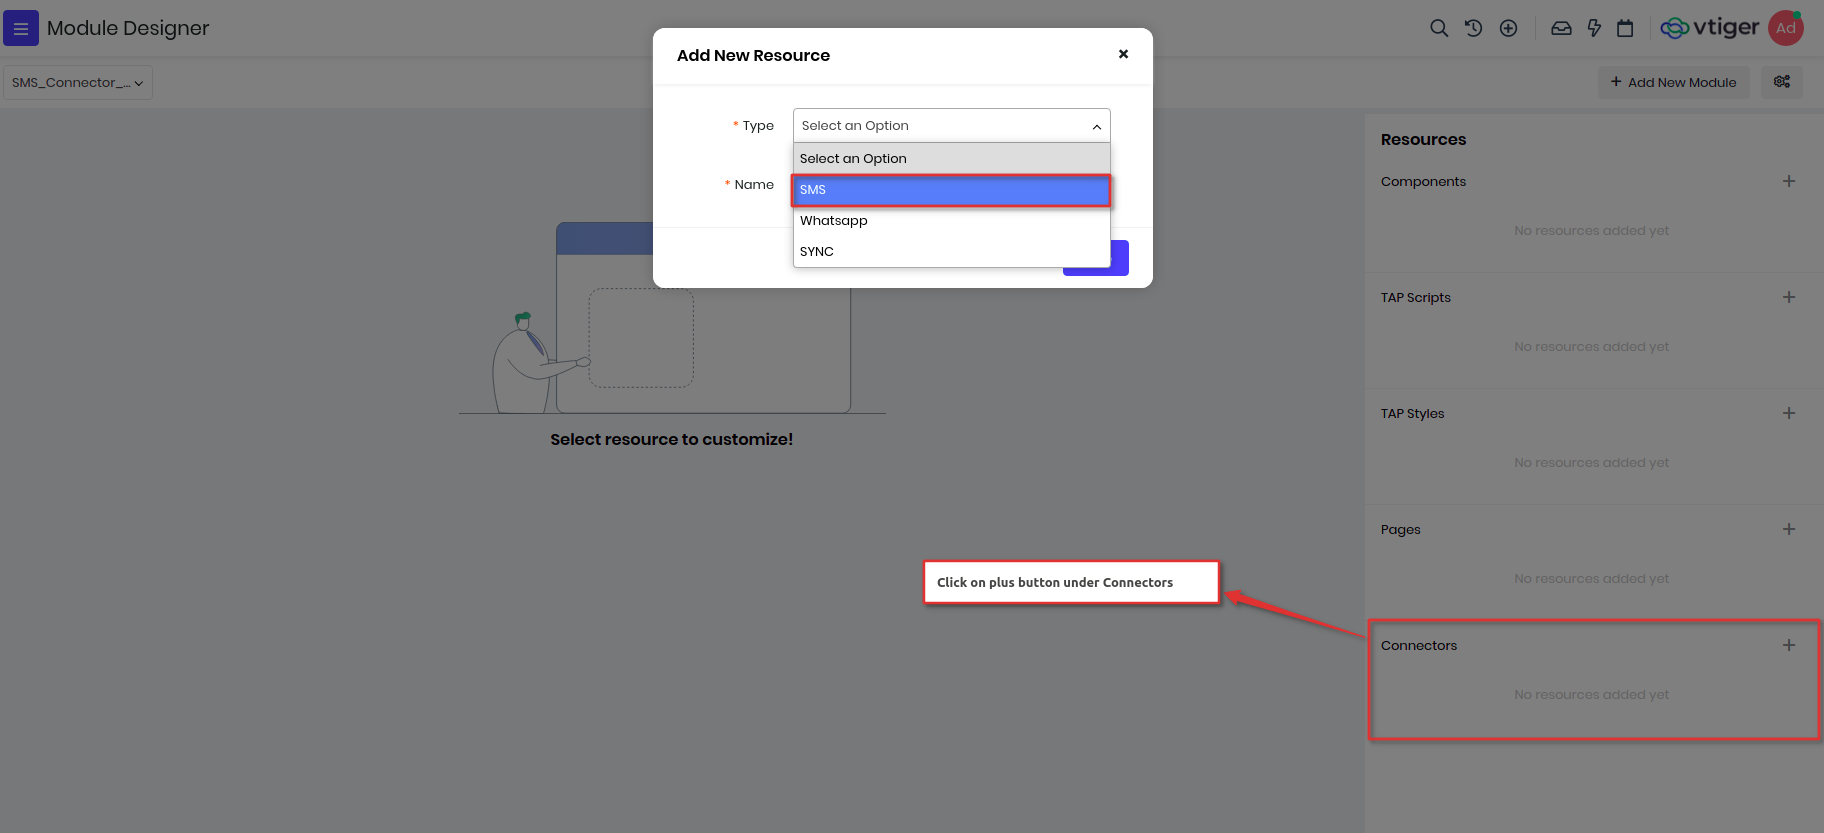
Now you will see an editor where you need to define the SMS connector parameters, headers, end points and configuration parameters. On adding the connector, a default XML template will be loaded which needs to be updated with the provider details which we want to enabled.
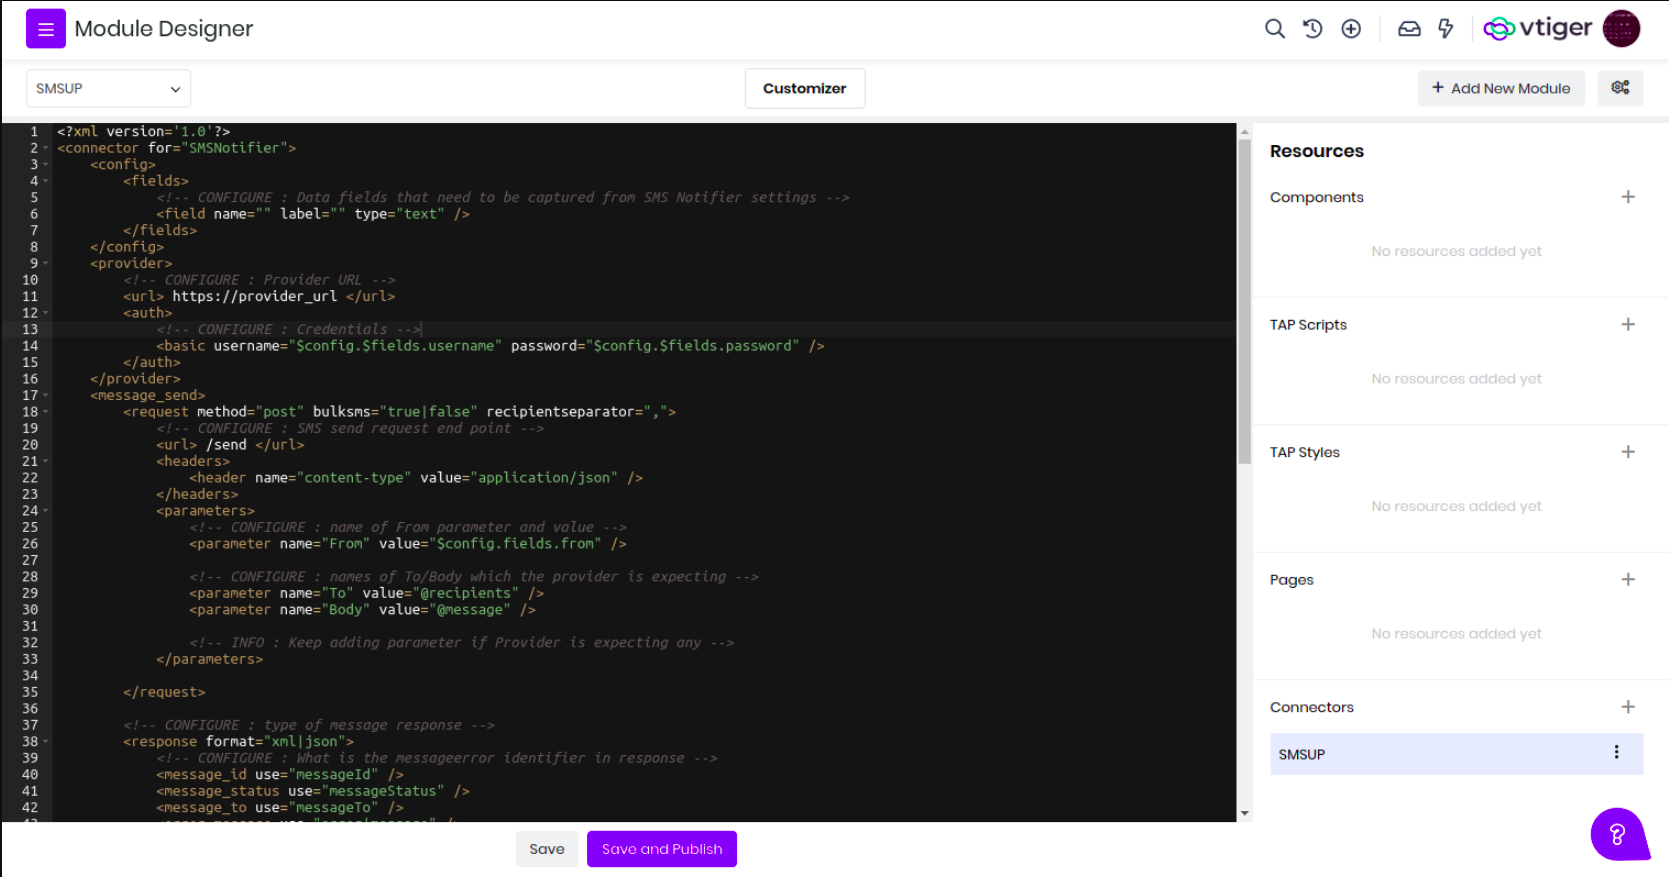
4 .Let’s go through each XML component that needs our attention.
Config
This is where we need to update the fields that will be shown in configuration page to connect. This is in Settings > SMS Messages > Provider configuration. We support text, password, url fields in here.
<config>
   <fields>
       <field name="username" label="User Name" type="text" />
       <field name="password" label="Password" type="password" />
       <field name="type" label="Connection Type" type="picklist" />
           <options>
               <option> Type1 </options>
               <option> Type2 </options>
           </options>
       </field>
    </fields>
</config>
Provider
We should configure SMS provider endpoint and authentication details here. This is what we use for connecting to the SMS provider service to do SMS actions.
Any XML component in the connector will accept values from config fields. We have supported tags to access config fields. For instance if we want to access the username field from config then we can use $config.$fields.username
<provider>
    <url>https://provider_url</url>
    <auth>
        <basic username="$config.$fields.username" password="$config.$fields.password"/>
    </auth>
</provider>
Message_Send
So far we enabled the fields needed and configured the Provider details. Now, it is time to do the action part, configuration that is needed for sending SMS. This has sub components
message_send.request
| request.url | sms provider endpoint for sending sms. We can leave this empty if provider url is good enough. |
| request.header | if provider is expecting any headers while sending sms we can enable those headers from here. |
| request.parameters | parameters that need to be sent while sending sms. We can use config fields if there are any provider account specific parameters. We will have some dynamic parameters that are controlled from Vtiger UI (message, recipients) for which we can use @message, @recipients. |
message_send.response
Response has a format attribute. This helps in identifying the format of response from the SMS provider after sending SMS. For now, we only support xml or json format
We need to configure the identifiers of response. What key should be considered as message id, status etc. We support nested values as well(for ex:- result.content.message_id)
| response.messages | If sent message is in any nested property of response then this should be configured. Ignore this, if returned response itself is the details. |
| response.message_id | this is used to identify message id from response |
| response.message_status | this is used to identity message status from response |
| response.error | this is used to identify error if sms is failed |
message_send.callback
We can remove this component if provider doesn’t support callback
Some providers support callback. When SMS is sent from the CRM, the provider will keep it in queue, once it is delivered then it hits the callback url
We auto generate callback urls for custom SMS providers. We can use runtime parameter @callback if we want to include in request parameters
Same as response we have format attribute and identifiers for callback.
- callback.message_id
- callback.message_status
message_send.statuses
Each provider can have their own status values for SMS. We need to configure what status from the response should be used as Processing or Delivered or Failed
This is how message_send going to look after configuring every thing
<message_send>
     <request method="post">
         <url> /send </url>
         <headers>
             <header name="content-type" value="application/json" />
         </headers>
         <parameters>
             <parameter name="From" value="$config.fields.from" />
             <parameter name="To" value="@recipients" />
             <parameter name="Body" value="@message" />
             <parameter name="Callback" value="@callback" />
         </parameters>
     </request>

     <response format="json">
         <message_id use="messageId" />
         <message_status use="messageStatus" />
         <message_to use="messageTo" />
         <error_message use="errorMessage" />
     </response>

     <callback format="json">
         <message_id use="messageId" />
         <message_status use="messageStatus" />
     </callback>

     <statuses>
         <status Processing="queued,sending" />
         <status Delivered="delivered" />
         <status Failed="failed" />
     </statuses>
</message_send>
Message_Status
In each SMS notifier record in the CRM we have the option to get status of the message, this part is going to be used for that request. Like, message_send we have request, response, statuses as sub components in this component as well. This is how it is going to look
<message_status>
        <request method="get">
            <url> /@messageid</url>
                   <parameters>
                              <parameter name=”name” value=”value”> </parameter>
                        </parameters>
        </request>

        <response format="json">
            <message_status use="message_state" />
            <message_to use="to_number" />
        </response>

        <statuses>
            <status Processing="queued,sent" />
            <status Delivered="delivered" />
            <status Failed="failed,rejected,undelivered" />
        </statuses>
</message_status>
- Once we update the XML with all required details. We are good to go with publishing the connector. Once we Save and Publish the Connector. We can see a new Provider added in SMS Notifier settings (Settings > Extensions > SMS Provider Configuration)
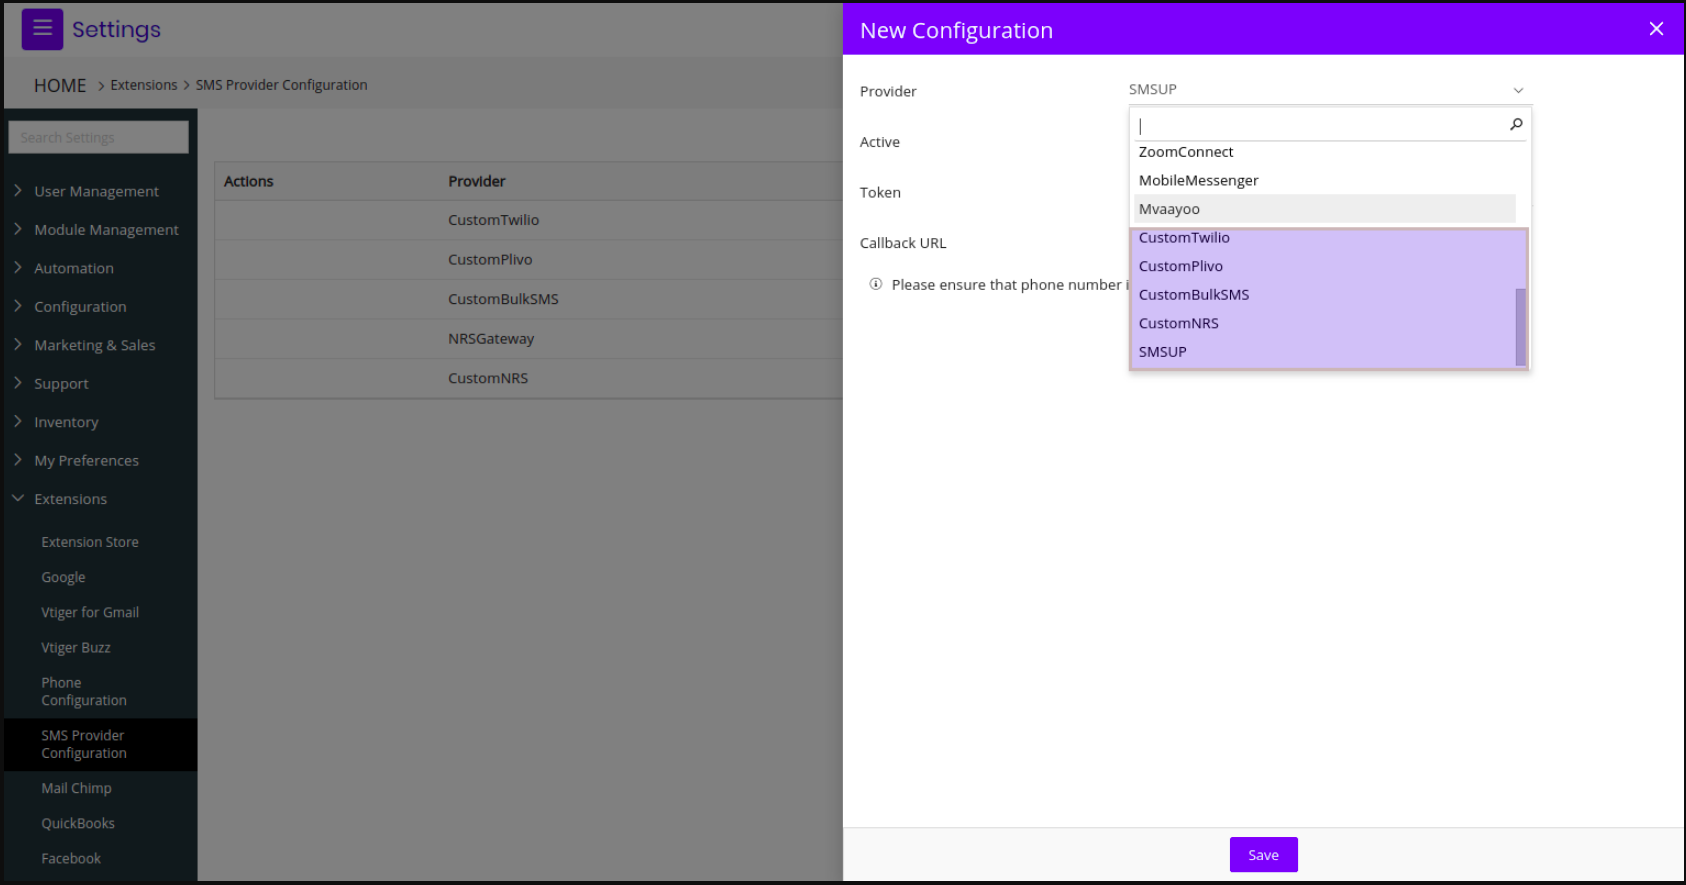
Configure the Provider specific details and activate it.
To test if it's working properly, try sending sms to a Contact. Go to the Contacts module, and select the SMS option. Select the phone number and send sms and see if it works.
Examples
Twilio
<?xml version='1.0'?>
<connector for="SMSNotifier">

   <config>
     <fields>
        <field name="AccountSID" label="Account SID" type="text" required="true">
              </field>
        <field name="AuthToken" label="Auth Token" type="text" required="true">
              </field>
        <field name="From" label="From" type="text" required="true">
              </field>
     </fields>
   </config>

   <provider>
      <url>
        https://api.twilio.com/2010-04-01/Accounts/$config.$fields.AccountSID/Messages
      </url>
      <auth>
         <basic username="$config.$fields.AccountSID"
                  password="$config.$fields.AuthToken" />
      </auth>
    </provider>

    <message_send>
        <request method="post">
            <headers>
                <header name="content-type" value="application/json" />
            </headers>
            <parameters>
                <parameter name="From" value="$config.$fields.From" />
                <parameter name="To" value="@recipients" />
                <parameter name="Body" value="@message" />
                <parameter name="StatusCallback" value="@callback" />
            </parameters>
        </request>

        <response format="xml">
            <message_id use="Message.Sid" />
            <message_status use="Message.Status" />
            <message_to use="Message.To" />
            <error_message use="RestException.Message" />
        </response>

        <callback>
            <message_id use="MessageSid" />
            <message_status use="MessageStatus" />
        </callback>

        <statuses>
            <!-- CONFIGURE : What is the Processing/Delivered/Failed status value -->
            <status Processing="queued,sending" />
            <status Delivered="delivered" />
            <status Failed="failed" />
        </statuses>
    </message_send>

    <message_status>
        <request method="get">
            <url> /@messageid </url>
        </request>

        <response format="xml">
            <message_id use="Message.Sid" />
            <message_status use="Message.Status" />
        </response>

        <statuses>
            <status Processing="queued,sending" />
            <status Delivered="delivered" />
            <status Failed="failed" />
        </statuses>
    </message_status>

</connector>
BulkSMS
<?xml version='1.0'?>
<connector for="SMSNotifier">

    <config>
        <fields>
            <field name="username" label="User Name" type="text" required="true" />
            <field name="password" label="Password" type="password" required="true" />
        </fields>
    </config>

    <provider>
        <url> https://api.bulksms.com/v1 </url>
        <auth>
            <basic username="$config.$fields.username"
                  password="$config.$fields.password" />
        </auth>
    </provider>

    <message_send>
        <request method="post">
            <url> /messages </url>

            <headers>
                <header name="content-type" value="application/json" />
            </headers>

            <parameters>
                <parameter name="to" value="@recipients" />
                <parameter name="body" value="@message" />
            </parameters>

        </request>

        <response format="json">
            <message_id use="id" />
            <message_status use="status.type" />
            <message_to use="to" />
            <error_message use="title" />
        </response>

        <statuses>
            <status Processing="ACCEPTED,SCHEDULED" />
            <status Delivered="DELIVERED" />
            <status Failed="FAILED" />
        </statuses>

    </message_send>

    <message_status>

        <request method="get">
            <url> /messages/@messageid</url>
            <headers>
                <header name="content-type" value="application/json" />
            </headers>
        </request>

        <response format="json">
            <message_status use="status.type" />
        </response>

        <statuses>
            <status Processing="ACCEPTED,SCHEDULED" />
            <status Delivered="DELIVERED" />
            <status Failed="FAILED" />
        </statuses>

    </message_status>

</connector>
Plivo
<?xml version='1.0'?>
<connector for="SMSNotifier">

    <config>
        <fields>
            <field name="AuthID" label="Auth ID" type="text" required="true"> </field>
            <field name="AuthToken" label="Auth Token" type="text" required="true">
                  </field>
            <field name="From" label="From" type="text" required="true"> </field>
        </fields>
    </config>

    <provider>
        <url> https://api.plivo.com/v1/Account/$config.$fields.AuthID/Message/ </url>
        <auth>
            <basic username="$config.$fields.AuthID"
                password="$config.$fields.AuthToken" />
        </auth>
    </provider>

    <message_send>
        <request method="post">
            <url> </url>
            <headers>
                <header name="Content-Type" value="application/json"> </header>
            </headers>
            <parameters>
                <parameter name="src" value="$config.$fields.From" />
                <parameter name="dst" value="@recipients" />
                <parameter name="text" value="@message" />
                <parameter name="method" value="POST" />
                <parameter name="url" value="@callback" />
            </parameters>

        </request>

        <response format="json">
            <message_responses use="message_uuid" />
            <error_message use="error" />
        </response>

        <statuses>
            <status Processing="queued,sent" />
            <status Delivered="delivered" />
            <status Failed="failed,rejected,undelivered" />
        </statuses>

        <callback>
            <message_id use="MessageUUID" />
            <message_status use="Status" />
        </callback>
    </message_send>

    <message_status>

<request method="get">
            <url> /@messageid</url>
        </request>

        <response format="json">
            <!-- CONFIGURE : What is the status identifier in response -->
            <message_status use="message_state" />
            <message_to use="to_number" />
        </response>

        <statuses>
            <status Processing="queued,sent" />
            <status Delivered="delivered" />
            <status Failed="failed,rejected,undelivered" />
        </statuses>
    </message_status>

</connector>
WhatsApp Connector
VTAP allows you to build connectors to whatsapp service providers. There are different types of whatsapp APIs by various whatsapp partners. To let CRM connect to these and send/receive messages VTAP now supports Whatsapp connector which gives a framework to build extensions and provide all these capabilities.
Build your own
VTAP introduced a new Resource type in Module Designer called Connectors. Add a new connector and select Whatsapp type of Connector and give a name to it.
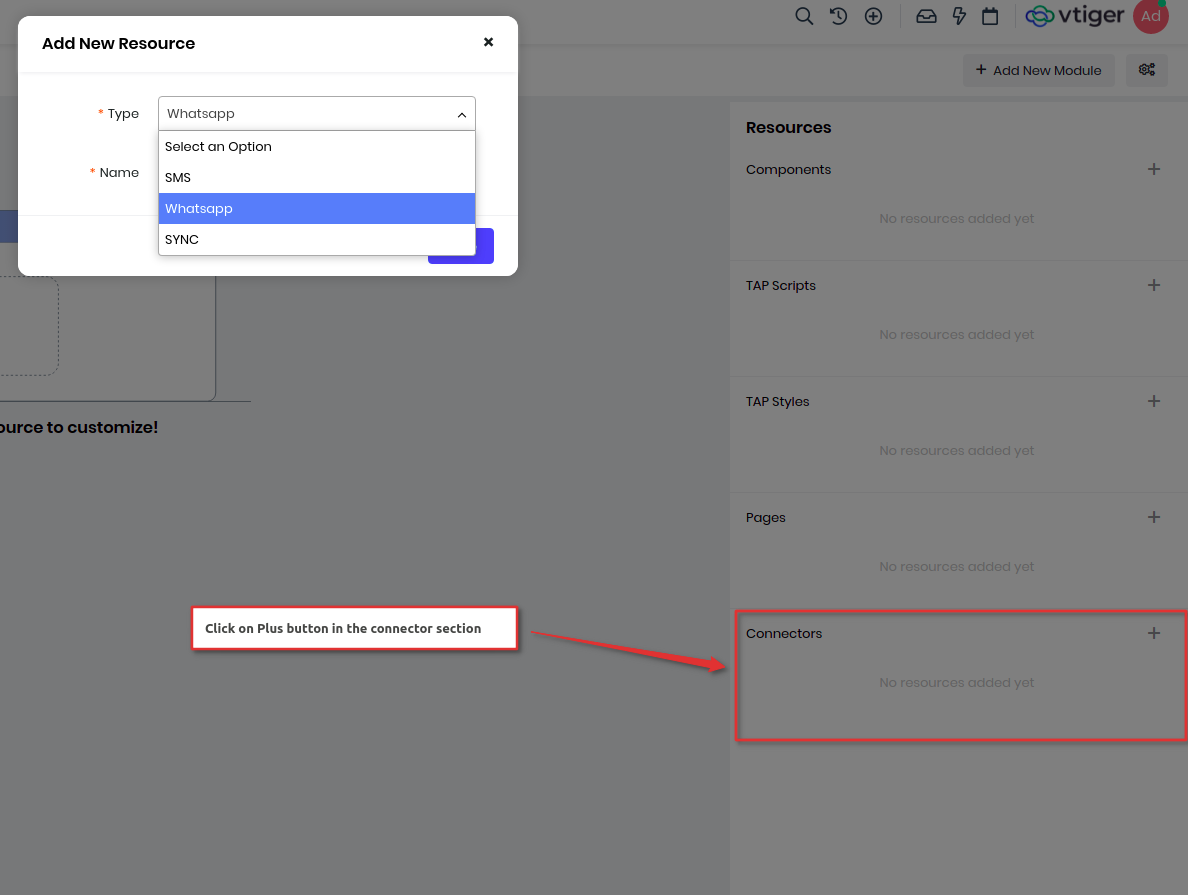
Define the XML and the save and publish to be available for the admin to configure from Whatsapp Configuration page.
XML configuration
On adding the connector, a default XML template will be loaded which needs to be updated with the service details which we want to enable sending/receiving whatsapp messages. Let’s go through each XML node from the top level.
Connector - This is the root node for all the configuration and for attribute will tell the type of connector.
Config - We need to take input from administrators to connect to external services like apikey, username, passwords etc. These configuration fields are added here under config > fields node with type attribute defining text type of fields.
These details will be used either in request as a header or part of a parameter or request body. To access these in other parts of xml we can use them with $config.$fields.appid.
The fields given here will appear in the Whatsapp > Settings > Add configuration page.
<config>
    <fields>
        <field name=”appid” type=”text” />
        <field name=”apikey” type=”text” />
    </fields>
</config>
Provider - To connect to any services you need to set an endpoint and other authentication details. These can be set under the provider node and we can input values from the administrator added in the config node here.
<provider>
    <url> https://provider_url </url>
    <auth>
        <basic username="$config.$fields.username" password="$config.$fields.password"/>
    </auth>
</provider>
| Url | This is where you will put in your endpoint of whatsapp service. |
| Auth | If the service provider expects the secret details to be sent as basic authorization or bearer token then it can be done using the Auth node. |
| Auth | |
|---|---|
| Basic | This is used to perform basic authorization. |
| Bearer | Use this if the service provider expects the key to be passed as bearer token. |
| Apikey | Use this if a token is to be passed in Authorization header. |
| JWT | Use this for JSON web token |
message_send
After setting endpoints and configuration details we need to send a request to send a whatsapp message. For this we have sub components described below
message_send.request
| request.url | url part for sending whatsapp messages. If provider.url already has the end point then you can ignore this. |
| request.headers | add headers like content-type and others under this |
| request.template | use this to send template messages. This contains below sub components |
| template.url | set this if the url part is different for template type of messages. |
| template.headers | these can be used to override the request.headers |
| template.parameters | this will have parameters that will be used to send whatsapp messages. If the request expects the data to be sent as raw data then use raw-post-data to true. |
<template>
    <url>/messaging</url>
    <headers>
        <header name=”content-type” value=”application/json”></header>
        <header name=”apikey” value=”$config.$fields.apikey”></header>
    </headers>
    <parameters raw-post-data="true">
        <parameter name="to" value="@to" />
        <parameter name="body" value="@message" />
        <parameter name="notifyurl" value="@callback" />
    </parameters>
</template>
| request.text | use this when you want to send text message(within 24 hour session). These messages are send once you customer has responded back to the template messages or have initiated the conversation with the businesses. |
text.url, text.headers and text.parameters follow the same conventions as template components.
<text>
    <url>/messaging</url>
    <parameters raw-post-data="true">
        <parameter name="appid" value="$config.$fields.appid" />
        <parameter name="deliverychannel" value="whatsapp" />
        <parameter name="notifyurl" value="@callback"></parameter>
    </parameters>
</text>
| request.media | use this when you want to add an attachment with the message. Rest of the sub components follow the same conventions like template components. We should use this when all attachment types(pdf, image, video etc) are to be sent using the same api. |
| request.document | use this when api expects to send pdf attachments. |
| request.image | use this when api expects to send image attachments. |
| request.video | use this when api expects to send video attachments. |
| request.template_headerfooter | use this node when you have a header and footer with the text template message. |
| request.template_media | if the template message has an attachment, then use this xml node to define the endpoints and parameters. |
| request.template_cta | If the template message has Call-to-action buttons, then use this xml node. These message will have website and phone number buttons in them, including file. |
| request.template_cta_text | If the Call-to-action template message does not have attachment then use this. |
| request.template_qr | If the template message have quick reply buttons, then use this xml node. Use this when there is attachment along with the quick reply buttons. |
| request.template_qr_text | Use this when quick reply buttons does not have attachments with them. |
Note : All the above xml nodes are used to define sending whatsapp messages and are defined inside message_send xml node.
message_send.response
We need to use the response of the message sent to update details like setting the status, unique id of message for later lookup on delivery status etc. Following nodes are useful to set:
| response.messages | use this if the message is wrapped around with some parameter. |
| response.message_id | this is used to identify the message's unique id. |
| response.message_status | this will identify the message’s status. |
| response.message_to | set this if the response has the receiver's number of messages. |
<response format="json">
    <error use="error" />
    <messages use="results" />

    <message_id use="messageId" />
    <message_status use="messageStatus" />
    <message_to use="messageTo" />
</response>
message_send.callback
To get delivery callbacks of the message like delivered, read etc, we need to configure the status and message_id in the callback node.
<callback format="json">
    <message_id use="messageid" />
    <message_status use="messageStatus" />
</callback>
message_send.statuses
Use this to map the status value of the provider with Vtiger. Here “Submitted” value from the service provider is mapped to the Send status of Vtiger. Likewise the other statuses.
<statuses>
    <!-- CONFIGURE : What is the success/failure status -->
    <status Sent="Submitted" />
    <status Queued="Queued" />
    <status Delivered="delivered" />
    <status Undelivered="failed" />
    <status Sent="sent" />
    <status Received="received" />
    <status Read="Read" />
</statuses>
message_receive
This node lets you configure the incoming messages from the customer to the CRM.
| message_receive.response | We need to capture information from the Incoming messages to assign it to associate to proper contact in CRM. Also incoming messages can have attachments which need to be created and linked. |
Following nodes needs to be mapped from response:
| response.message | map the incoming message. |
| response.from_number | phone number from which the Contact sent a message. |
| response.message_id | unique message id |
| response.attachments | if the attachment is sent in an array with file_url and file_mime then map it to attachments. |
| response.file_content | if attachment is sent as base64 encoded data then map it to file_content, other values like file type can be mapped to file_mime, and name to file_name |
| response.file_url | if a public file url is sent then use file_url with file_mime and file_name to map to type and name of the file. |
<message_receive>
    <response>
        <message use="message" />
        <from_number use="waid" />
        <message_id use="tid" />

        <attachments use="attachments" />
        <file_content use=”file.content” />
        <file_url use="url" />
        <file_mime use="mime" />
    </response>
</message_receive>
Data variables
VTAP gives several dynamic data variable which can be used in the xml, see below list:
| @message | this stores the message to be sent to the whatsapp number. |
| @to | this is the whatsapp number to which message is to be sent. |
| @file_type | this represents the mime type of the file to be sent out. |
| @file_url | this is the public url of the file to be sent out to the customer. |
| @file_name | this is the name of the file. |
| @file_mime_type | this is the type of the file. |
| @file_content | if api expects the file data to be sent as base64 encoded value. |
| @template_id | if template message is sent and the api requires whatsapp Template Id. |
| @template_params | in template message, dynamic parameters with their name and value for example {“OTP”: 1111, “time” : “10 mins”} |
| @template_values | if only dynamic values is needed in the api, for example [111, “10 mins”] |
| @template_name | name of the whatsapp template name. |
| @callback | callback url to check for delivery of the messages. |
| @incoming_callback | incoming callback url of the provider. |
| @header | use this dynamic variable when you want selected template's header to be fillled in the xml. |
| @footer | template's footer value will be replaced with this footer. |
| @website_button_text | website button text value from the selected template will be replaced for this variable in call to action template message. |
| @website_button_url | this will be replaced with actual website url from your in call to action template message. |
| @phone_button_text | this will be replaced with phone button's text value in call to action template message. |
| @phone_number | this will replace actual phone number button in call to action template message. |
| @button_text_1 | for quick reply template message, first button is represented by this. Likewise @button_text_2 and @button_text_3 represents 2nd and 3rd button. |
| @file | for uploading file directly in messages. |
Template Sync
To sync all the templates created in the service provider into vtiger crm. The skeleton to build the template sync is shown below.
<templates>
    <request>
        <url>url</url>
        <auth>

        </auth>
        <parameters>
            <parameter name="pageSize" value="100"></parameter>
            <parameter name="pageNumber" value="1"></parameter>
        </parameters>
    </request>
    <response format="json">
        <templates use="messageTemplates" />
        <templatename use="elementName" />
        <templateid use="id" />
        <category use="category" />
        <description use="bodyOriginal" />
        <status use="status" />
        <media_type use="header.typeString" />
        <header use="header.text" />
        <media_url use="header.link" />
        <footer use="footer" />

        <button_text_1 use="buttons|search_multi_array:{'check':'type','value':'quick_reply','return':'parameter.text','index':'0'}" />
        <button_text_2 use="buttons|search_multi_array:{'check':'type','value':'quick_reply','return':'parameter.text','index':'1'}" />
        <button_text_3 use="buttons|search_multi_array:{'check':'type','value':'quick_reply','return':'parameter.text','index':'2'}" />

        <website_button_text use="buttons|search_multi_array:{'check':'type','value':'url','return':'parameter.text'}" />
        <website_button_url use="buttons|search_multi_array:{'check':'type','value':'url','return':'parameter.url'}" />
        <phone_button_text use="buttons|search_multi_array:{'check':'type','value':'call','return':'parameter.text'}" />
        <phone_number use="buttons|search_multi_array:{'check':'type','value':'call','return':'parameter.phoneNumber'}" />

    </response>

    <statuses>
        <status Approved="APPROVED"></status>
        <status Rejected="REJECTED"></status>
        <status Not_Approved="DRAFT"></status>
    </statuses>

    <media_types>
        <media_type document="document"></media_type>
        <media_type video="VIDEO"></media_type>
        <media_type image="IMAGE"></media_type>
        <media_type text="TEXT"></media_type>
    </media_types>
</templates>
- Only providers which support get all templates can be used to sync.
- The starting node is the template where the template sync starts.
- Request has a url and auth which the service provider requires.
- paramerts are what the service provider requires.
- response is used for mapping the template name,templateid,headers,urls,media type,body,buttons.
- Media types is to know what all types of media is allowed in this provider.
Examples
Clickatell
Connecting to Clickatell whatsapp account, and here is the link to their api documentation.
<?xml version='1.0'?>
<connector for="Whatsapp">
<config>
<fields>
<!-- CONFIGURE : Data fields that need to be captured from Whatsapp settings -->
<field name="apikey" label="API Key" type="text" required="true"/>
</fields>
</config>
<provider>
<!-- CONFIGURE : Provider URL -->
<url>https://platform.clickatell.com/v1</url>
</provider>
<message_send>
<request method="post">
<!-- CONFIGURE : Whatsapp send request end point -->
<url> /message </url>
<headers>
<header name="content-type" value="application/json" />
<header name="authorization" value="$config.$fields.apikey" />
</headers>
<text>
<url>/message</url>
<parameters raw-post-data="true">
<!-- CONFIGURE : name of From parameter and value -->
<parameter name="messages">
<values>
<parameter name="channel" value="whatsapp"></parameter>
<parameter name="to" value="@to"></parameter>
<parameter name="content" value="@message"></parameter>
</values>
</parameter>
</parameters>
</text>
<template>
<url> /message </url>
<parameters raw-post-data="true">
<!-- CONFIGURE : name of From parameter and value -->
<parameter name="messages">
<values>
<parameter name="channel" value="whatsapp"></parameter>
<parameter name="to" value="@to"></parameter>
<parameter name="template">
<parameter name="templateName" value="@template_name"></parameter>
<parameter name="body">
<parameter name="parameters" value="@template_params"></parameter>
</parameter>
</parameter>
</values>
</parameter>
</parameters>
</template>
<template_headerfooter>
<url> /message </url>
<parameters raw-post-data="true">
<!-- CONFIGURE : name of From parameter and value -->
<parameter name="messages">
<values>
<parameter name="channel" value="whatsapp"></parameter>
<parameter name="to" value="@to"></parameter>
<parameter name="template">
<parameter name="templateName" value="@template_name"></parameter>
<parameter name="body">
<parameter name="parameters" value="@template_params"></parameter>
</parameter>
</parameter>
</values>
</parameter>
</parameters>
</template_headerfooter>
<template_media>
<url> /message </url>
<parameters raw-post-data="true">
<!-- CONFIGURE : name of From parameter and value -->
<parameter name="messages">
<values>
<parameter name="channel" value="whatsapp"></parameter>
<parameter name="to" value="@to"></parameter>
<parameter name="template">
<parameter name="templateName" value="@template_name"></parameter>
<parameter name="header">
<parameter name="type" value="media"></parameter>
<parameter name="media">
<parameter name="fileId" value="@file_url"></parameter>
</parameter>
</parameter>
</parameter>
</values>
</parameter>
</parameters>
</template_media>
<template_cta>
<url> /message </url>
<parameters raw-post-data="true">
<!-- CONFIGURE : name of From parameter and value -->
<parameter name="messages">
<values>
<parameter name="channel" value="whatsapp"></parameter>
<parameter name="to" value="@to"></parameter>
<parameter name="template">
<parameter name="templateName" value="@template_name"></parameter>
<parameter name="header">
<parameter name="type" value="media"></parameter>
<parameter name="media">
<parameter name="fileId" value="$file_url"></parameter>
</parameter>
</parameter>
<parameter name="body">
<parameter name="parameters" value="@template_params"></parameter>
</parameter>
<parameter name="buttons">
<parameter name="websiteUrl">
<values>
<parameter name="listPosition" value="1"></parameter>
<parameter name="parameters">
<parameter name="1" value="@website_button_url"></parameter>
</parameter>
</values>
</parameter>
</parameter>
</parameter>
</values>
</parameter>
</parameters>
</template_cta>
<template_cta_text>
<url> /message </url>
<parameters raw-post-data="true">
<!-- CONFIGURE : name of From parameter and value -->
<parameter name="messages">
<values>
<parameter name="channel" value="whatsapp"></parameter>
<parameter name="to" value="@to"></parameter>
<parameter name="template">
<parameter name="templateName" value="@template_name"></parameter>
<parameter name="body">
<parameter name="parameters" value="@template_params"></parameter>
</parameter>
<parameter name="buttons">
<parameter name="websiteUrl">
<values>
<parameter name="listPosition" value="1"></parameter>
<parameter name="parameters">
<parameter name="1" value="@website_button_url"></parameter>
</parameter>
<parameter name="listPosition" value="2"></parameter>
<parameter name="parameters">
<parameter name="1" value="@phone_number"></parameter>
</parameter>
</values>
</parameter>
</parameter>
</parameter>
</values>
</parameter>
</parameters>
</template_cta_text>
<template_qr>
<url> /message </url>
<parameters raw-post-data="true">
<!-- CONFIGURE : name of From parameter and value -->
<parameter name="messages">
<values>
<parameter name="channel" value="whatsapp"></parameter>
<parameter name="to" value="@to"></parameter>
<parameter name="template">
<parameter name="templateName" value="@template_name"></parameter>
<parameter name="header">
<parameter name="type" value="media"></parameter>
<parameter name="media">
<parameter name="fileId" value="@file_url"></parameter>
</parameter>
</parameter>
<parameter name="body">
<parameter name="parameters" value="@template_params"></parameter>
</parameter>
<parameter name="items">
<values>
<parameter name="title" value="@button_text_1"></parameter>
<parameter name="postbackData" value="@button_text_1"></parameter>
</values>
<values>
<parameter name="title" value="@button_text_2"></parameter>
<parameter name="postbackData" value="@button_text_2"></parameter>
</values>
<values>
<parameter name="title" value="@button_text_3"></parameter>
<parameter name="postbackData" value="@button_text_3"></parameter>
</values>
</parameter>
</parameter>
</values>
</parameter>
</parameters>
</template_qr>
<template_qr_text>
<url> /message </url>
<parameters raw-post-data="true">
<!-- CONFIGURE : name of From parameter and value -->
<parameter name="messages">
<values>
<parameter name="channel" value="whatsapp"></parameter>
<parameter name="to" value="@to"></parameter>
<parameter name="template">
<parameter name="templateName" value="@template_name"></parameter>
<parameter name="body">
<parameter name="parameters" value="@template_params"></parameter>
</parameter>
<parameter name="items">
<values>
<parameter name="title" value="@button_text_1"></parameter>
<parameter name="postbackData" value="@button_text_1"></parameter>
</values>
<values>
<parameter name="title" value="@button_text_2"></parameter>
<parameter name="postbackData" value="@button_text_2"></parameter>
</values>
<values>
<parameter name="title" value="@button_text_3"></parameter>
<parameter name="postbackData" value="@button_text_3"></parameter>
</values>
</parameter>
</parameter>
</values>
</parameter>
</parameters>
</template_qr_text>
<media>
<url>/message</url>
<parameters raw-post-data="true">
<parameter name="messages">
<values>
<parameter name="channel" value="whatsapp"></parameter>
<parameter name="to" value="@to"></parameter>
<parameter name="content" value="@file_content"></parameter>
<parameter name="media">
<parameter name="contentType" value="@file_mime_type"></parameter>
<parameter name="caption" value="@file_name"></parameter>
</parameter>
</values>
</parameter>
</parameters>
</media>
</request>
<!-- CONFIGURE : type of message response json or xml -->
<response format="json">
<!-- CONFIGURE : response identifiers -->
<error use="messages.0.error.description" /> <!-- What is the error message identifier if request fails from service -->
<message_id use="messages.0.apiMessageId" />
<message_status use="messages.0.accepted" />
<message_to use="messages.0.to" />
</response>
<!-- INFO : Callback will be https://instance_url/modules/Whatsapp/callbacks/Custom.php -->
<callback format="json">
<!-- CONFIGURE : What is the message/status identifier in callback response -->
<message use="event" />
<message_id use="event.messageStatusUpdate.0.messageId" />
<message_status use="event.messageStatusUpdate.0.status" />
</callback>
<statuses>
<!-- CONFIGURE : What is the success/failure status -->
<status Sent="SENT_TO_SUPPLIER" />
<status Queued="1" />
<status Delivered="DEVICE_ACK" />
<status Undelivered="failed" />
<status Received="received" />
<status Read="READ" />
</statuses>
</message_send>
<message_receive>
<response>
<message use="event.moMedia.0.caption || event.moText.0.content" />
<to_number use="event.moMedia.0.to || event.moText.0.to || event.moLocation.0.to" />
<message_id use="event.moMedia.0.messageId || event.moText.0.messageId || event.moLocation.0.messageId" />
<from_number use="event.moMedia.0.from || event.moText.0.from || event.moLocation.0.from" />
<from_name use="event.moMedia.0.whatsapp.profileName || event.moText.0.whatsapp.profileName || event.moLocation.0,whatsapp.profileName" />
<file_mime use="event.moMedia.0.contentType" />
<file_name use="event.moMedia.0.caption" />
<file_content use="event.moMedia.0.content" />
</response>
</message_receive>
</connector>
Gupshup
Gupshup Enterprise Whatsapp Connector with template sync
<?xml version='1.0'?>
<connector for="Whatsapp">
    <config>
        <fields>
            <field name="userid_2way" label="User ID(Two way)" type="text" />
            <field name="password_2way" label="Password(Two way)" type="password" />
            <field name="userid" label="User ID(Notification)" type="text" />
            <field name="password" label="Password(Notification)" type="password" />
        </fields>
    </config>
    <provider>

        <url>https://media.smsgupshup.com/GatewayAPI/rest</url>
    </provider>
    <message_send>
        <request method="get" support-text="true">
            <!-- CONFIGURE : Whatsapp send request end point -->
            <url>https://media.smsgupshup.com/GatewayAPI/rest</url>
            <headers>
                <header name="content-type" value="application/x-www-form-urlencoded" />
            </headers>

            <text>
                <url></url>
                <parameters>
                    <parameter name="userid" value="$config.$fields.userid_2way" />
                    <parameter name="password" value="$config.$fields.password_2way" />
                    <parameter name="method" value="SendMessage" />
                    <parameter name="auth_scheme" value="plain" />
                    <parameter name="v" value="1.1" />
                    <parameter name="send_to" value="@to" />
                    <parameter name="msg" value="@message" />
                    <parameter name="format" value="json" />
                    <parameter name="msg_type" value="DATA_TEXT" />
                    <parameter name="data_encoding" value="Unicode_text" />
                </parameters>
            </text>

            <template>
                <url></url>
                <parameters>
                    <parameter name="userid" value="$config.$fields.userid" />
                    <parameter name="password" value="$config.$fields.password" />
                    <parameter name="method" value="SendMessage" />
                    <parameter name="auth_scheme" value="plain" />
                    <parameter name="v" value="1.1" />
                    <parameter name="send_to" value="@to" />
                    <parameter name="msg" value="@message" />

                    <parameter name="isHSM" value="true"></parameter>
                    <parameter name="format" value="json" />
                    <parameter name="msg_type" value="HSM" />
                </parameters>
            </template>

            <template_headerfooter>
                <url></url>
                <parameters>
                    <parameter name="userid" value="$config.$fields.userid" />
                    <parameter name="password" value="$config.$fields.password" />
                    <parameter name="method" value="SendMessage" />
                    <parameter name="auth_scheme" value="plain" />
                    <parameter name="v" value="1.1" />
                    <parameter name="send_to" value="@to" />
                    <parameter name="msg" value="@message" />

                    <parameter name="isHSM" value="true" />
                    <parameter name="format" value="json" />
                    <parameter name="msg_type" value="HSM" />

                    <parameter name="footer" value="@footer" />
                    <parameter name="header" value="@header" />
                    <parameter name="isTemplate" value="true"/>
                </parameters>
            </template_headerfooter>

            <template_media>
                <url></url>
                <parameters>
                    <parameter name="userid" value="$config.$fields.userid" />
                    <parameter name="password" value="$config.$fields.password" />
                    <parameter name="method" value="SendMediaMessage" />
                    <parameter name="auth_scheme" value="plain" />
                    <parameter name="v" value="1.1" />
                    <parameter name="send_to" value="@to" />
                    <parameter name="msg" value="@message" />
                    <parameter name="isTemplate" value="true" />
                    <parameter name="isHSM" value="true" />
                    <parameter name="caption" value="@message" />
                    <parameter name="format" value="json" />
                    <parameter name="data_encoding" value="Unicode_text" />
                    <parameter name="footer" value="@footer" />
                    <parameter name="msg_type" value="@file_type" />
                    <parameter name="media_url" value="@file_url" />
                    <parameter name="filename" value="@file_name" />
                </parameters>
            </template_media>

            <template_cta_text>
                <url></url>
                <parameters>
                    <parameter name="userid" value="$config.$fields.userid" />
                    <parameter name="password" value="$config.$fields.password" />
                    <parameter name="method" value="SendMessage" />
                    <parameter name="auth_scheme" value="plain" />
                    <parameter name="v" value="1.1" />
                    <parameter name="send_to" value="@to" />
                    <parameter name="msg" value="@message" />
                    <parameter name="isTemplate" value="true" />
                    <parameter name="isHSM" value="true"></parameter>
                    <parameter name="caption" value="@message" />
                    <parameter name="format" value="json" />
                    <parameter name="data_encoding" value="Unicode_text" />
                    <parameter name="footer" value="@footer" />
                    <parameter name="msg_type" value="text" />
                    <parameter name="header" value="@header" />
                </parameters>
            </template_cta_text>

            <template_cta>
                <url></url>
                <parameters>
                    <parameter name="userid" value="$config.$fields.userid" />
                    <parameter name="password" value="$config.$fields.password" />
                    <parameter name="method" value="SendMediaMessage" />
                    <parameter name="auth_scheme" value="plain" />
                    <parameter name="v" value="1.1" />
                    <parameter name="send_to" value="@to" />
                    <parameter name="msg" value="@message" />
                    <parameter name="isTemplate" value="true" />
                    <parameter name="isHSM" value="true"></parameter>
                    <parameter name="caption" value="@message" />
                    <parameter name="format" value="json" />
                    <parameter name="data_encoding" value="Unicode_text" />
                    <parameter name="footer" value="@footer" />
                    <parameter name="msg_type" value="@file_type" />
                    <parameter name="media_url" value="@file_url" />
                    <!--parameter name="buttonUrlParam" value="@buttonurl" /-->
                    <parameter name="filename" value="@file_name" />
                </parameters>
            </template_cta>

            <template_qr>
                <url></url>
                <parameters>
                    <parameter name="userid" value="$config.$fields.userid" />
                    <parameter name="password" value="$config.$fields.password" />
                    <parameter name="method" value="SendMediaMessage" />
                    <parameter name="auth_scheme" value="plain" />
                    <parameter name="v" value="1.1" />
                    <parameter name="send_to" value="@to" />
                    <parameter name="msg" value="@message" />
                    <parameter name="isTemplate" value="true" />
                    <parameter name="isHSM" value="true"></parameter>
                    <parameter name="caption" value="@message" />
                    <parameter name="format" value="json" />
                    <parameter name="data_encoding" value="Unicode_text" />
                    <parameter name="footer" value="@footer" />
                    <parameter name="msg_type" value="@file_type" />
                    <parameter name="media_url" value="@file_url" />
                    <parameter name="filename" value="@file_name" />
                </parameters>
            </template_qr>

            <template_qr_text>
                <url></url>
                <parameters>
                    <parameter name="userid" value="$config.$fields.userid" />
                    <parameter name="password" value="$config.$fields.password" />
                    <parameter name="method" value="SendMessage" />
                    <parameter name="auth_scheme" value="plain" />
                    <parameter name="v" value="1.1" />
                    <parameter name="send_to" value="@to" />
                    <parameter name="msg" value="@message" />
                    <parameter name="isTemplate" value="true" />
                    <parameter name="isHSM" value="true"></parameter>
                    <parameter name="caption" value="@message" />
                    <parameter name="format" value="json" />
                    <parameter name="data_encoding" value="Unicode_text" />
                    <parameter name="footer" value="@footer" />
                    <parameter name="msg_type" value="HSM" />
                    <parameter name="header" value="@header" />
                </parameters>
            </template_qr_text>

            <media>
                <url></url>
                <parameters>
                    <parameter name="method" value="SendMediaMessage" />
                    <parameter name="auth_scheme" value="plain" />
                    <parameter name="v" value="1.1" />
                    <parameter name="send_to" value="@to" />
                    <parameter name="msg" value="@message" />
                    <parameter name="userid" value="$config.$fields.userid_2way" />
                    <parameter name="password" value="$config.$fields.password_2way" />
                    <parameter name="isTemplate" value="false" />
                    <parameter name="isHSM" value="false"></parameter>
                    <parameter name="msg_type" value="@file_type" />
                    <parameter name="caption" value="@message" />
                    <parameter name="format" value="json" />
                    <parameter name="media_url" value="@file_url" />
                    <parameter name="filename" value="@file_name" />
                </parameters>
            </media>
        </request>

        <response format="json">
            <!-- CONFIGURE : response identifiers -->
            <error use="response.details" /> <!-- What is the error message identifier if request fails from service -->
            <messages use="response" />

            <message_id use="id" />
            <message_status use="status" />
            <message_to use="phone" />
            <from_number use="$config.$fields.from_number" />

        </response>

        <callback format="json" >
            <!-- CONFIGURE : What is the message/status identifier in callback response -->
            <messages use="response" multiple="true"/>
            <message_id use="externalId" />
            <message_status use="eventType" />
            <error use="cause" />
            <message_receive use="type" />
        </callback>

        <statuses>
            <!-- CONFIGURE : What is the success/failure status -->
            <status Sent="SENT" />
            <status Sent="success" />
            <status Delivered="DELIVERED" />
            <status Undelivered="FAILED" />
            <status Received="Received" />
            <status Read="READ" />
        </statuses>
    </message_send>

    <message_receive>

        <response>
            <message use="text||image.caption||button.text" />
            <from_number use="mobile" />
            <from_name use="name" />
            <message_id use="timestamp" />
            <to_number use="waNumber" />
            <!-- if file contents are inside attachments node-->
            <attachments use="document||image||voice||audio||video" />
            <file_url use="url" download="true" append="signature"/>
            <file_mime use="mime_type" />
            <file_name use="caption" />
        </response>
    </message_receive>

    <templates>
        <request>
            <url>https://wamedia.smsgupshup.com/GatewayAPI/rest</url>
            <parameters>
                <parameter name="method" value="get_whatsapp_hsm"></parameter>
                <parameter name="userid" value="$config.$fields.userid"></parameter>
                <parameter name="password" value="$config.$fields.password"></parameter>
                <parameter name="fields" value="['buttons']"></parameter>
                <parameter name="limit" value="500"></parameter>
                <parameter name="offset" value="0"></parameter>
            </parameters>
        </request>
        <response format="json">
            <templates use="data" />
            <templatename use="name" />
            <templateid use="id" />
            <category use="category" />
            <description use="body" />
            <status use="status" />
            <media_type use="type" />
            <header use="header" />
            <media_url use="header.mediaHeaderId" />
            <header use="header" />
            <footer use="footer" />

            <button_text_1 use="buttons|search_multi_array:{'check':'type','value':'QUICK_REPLY','return':'text','index':'0'}" />
            <button_text_2 use="buttons|search_multi_array:{'check':'type','value':'QUICK_REPLY','return':'text','index':'1'}" />
            <button_text_3 use="buttons|search_multi_array:{'check':'type','value':'QUICK_REPLY','return':'text','index':'2'}" />

            <website_button_text use="buttons|search_multi_array:{'check':'type','value':'URL','return':'text'}" />
            <website_button_url use="buttons|search_multi_array:{'check':'type','value':'URL','return':'url'}" />
            <phone_button_text use="buttons|search_multi_array:{'check':'type','value':'PHONE_NUMBER','return':'text'}" />
            <phone_number use="buttons|search_multi_array:{'check':'type','value':'PHONE_NUMBER','return':'phone_number'}" />

        </response>

        <statuses>
            <status Approved="ENABLED"></status>
            <status Rejected="REJECTED"></status>
        </statuses>

        <media_types>
            <media_type document="DOCUMENT"></media_type>
            <media_type video="VIDEO"></media_type>
            <media_type image="IMAGE"></media_type>
            <media_type text="TEXT"></media_type>
        </media_types>
    </templates>
</connector>
Phonecall Connector
Vtiger has an PhoneCalls module that supports different PhoneCall providers which will help in making outbound and inbound calls from CRM. Right now, it is limited to some providers like Twilio, Plivo, Exotel, Telzio etc. But, we have a lot more Phone Call providers which are not yet available in Vtiger.
Phone Connectors helps you enable below functionality.
- Click to call
- Listening incoming calls and show poup inside Vtiger
With a simple xml code we can introduce a new Phone Provider in the PhoneCalls module and connect with telephony providers.
Requirements
Telephony provider should have REST API's support. That's it.
Build your own
Let's dig in to know how to enable the Phone Connector for the Provider you like.
- First you need to access Module Designer, go to the menu check Platform app and under that you can see Module Designer.
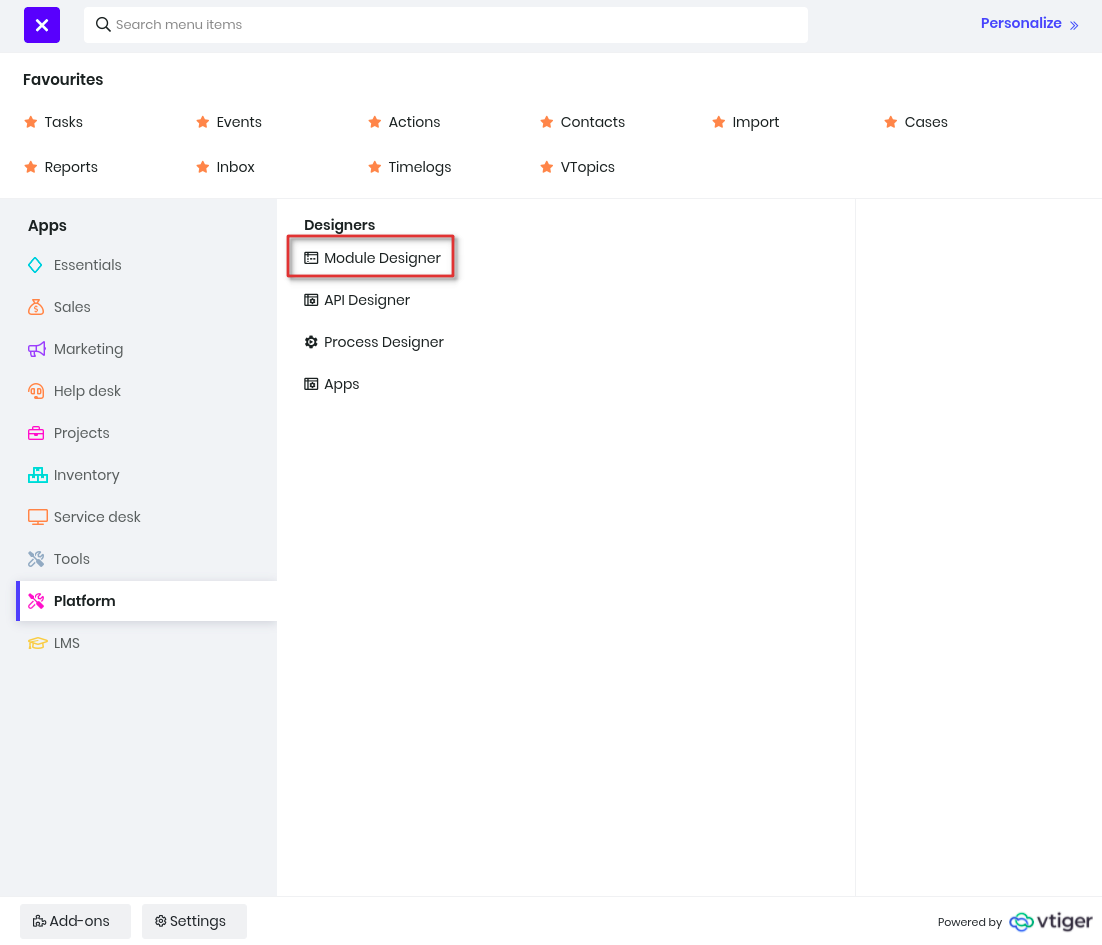
Here you get an option to add an extension module on the top right corner. Give a name to the module and ignore selecting an App Category.
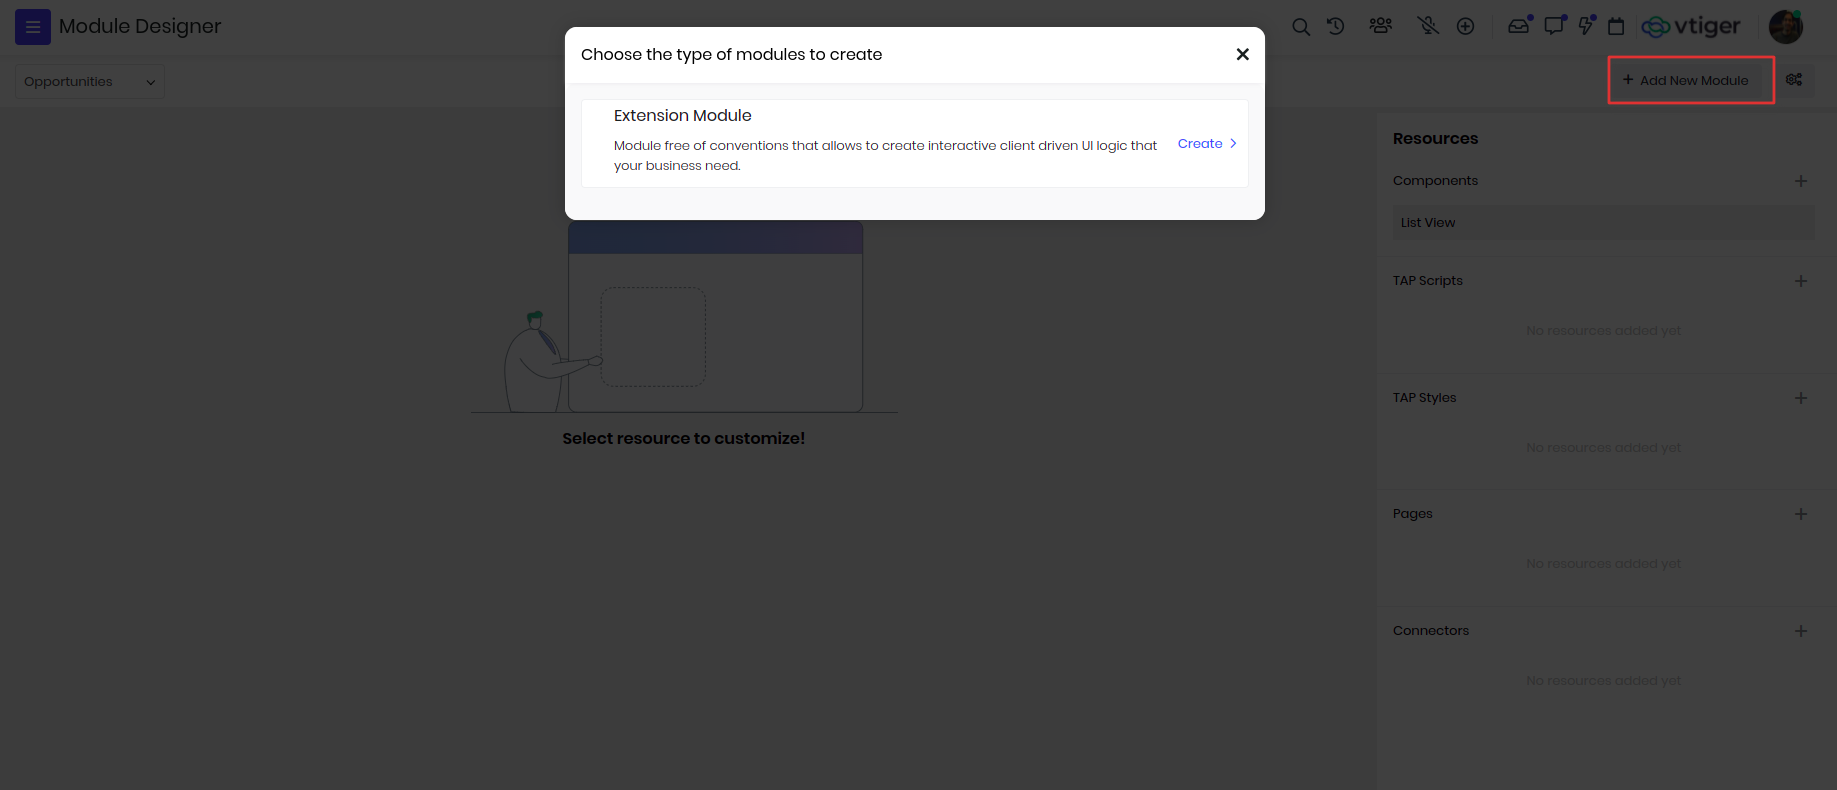
Adding Connector : VTAP introduced a new Resource type in Module Designer called Connectors - see Adding Connector will prompt for Connector Type and Name where we need to fill details - see
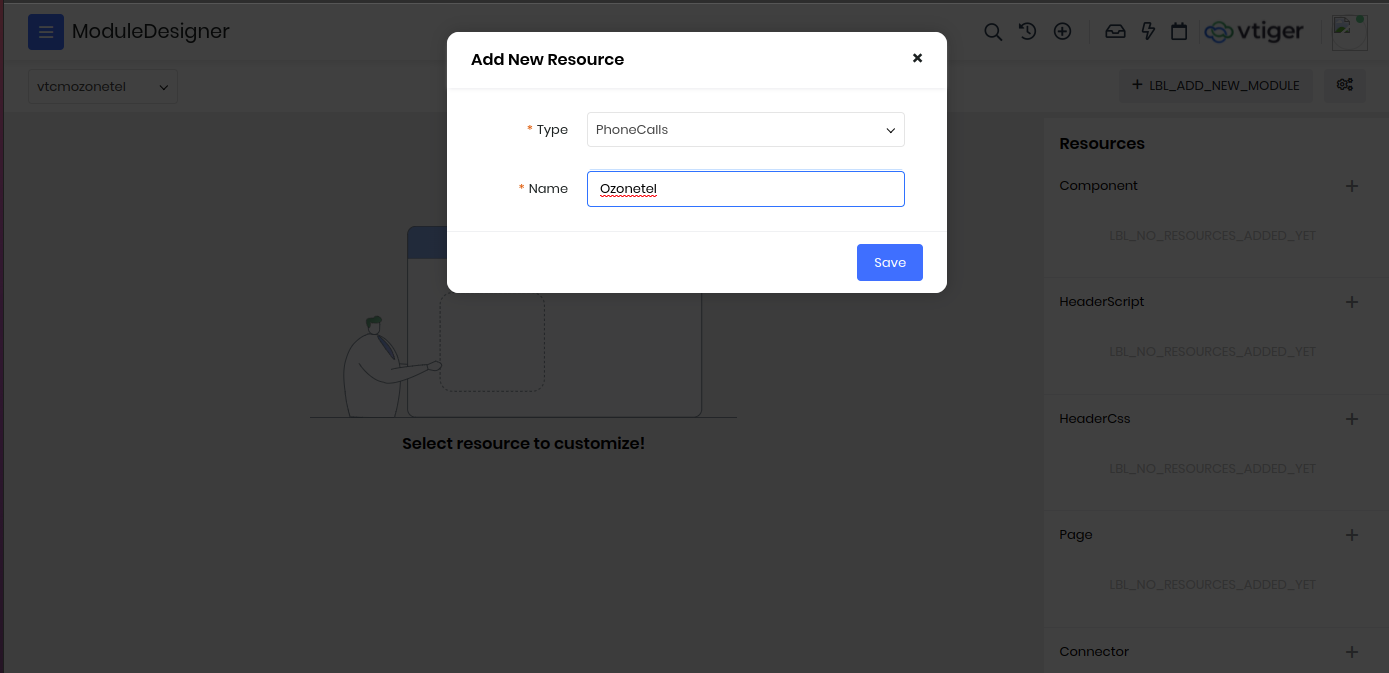
Adding XML configuration : On adding the connector, a default XML template will be loaded which needs to be updated with the provider details which we want to enable - see.
Let’s go through each XML component that needs our attention
Config
This is where we need to update the fields we need to enable in Settings > Phone Configuration > Provider configuration. We support text, password, url fields in here These are configuration required to make conenction with telephony api's like username, password, or connection keys.
<config>
   <fields>
       <field name="username" label="User Name" type="text" >
       <field name="password" label="Password" type="password" >
    <fields>
<config>
Provider
We should configure Phone provider endpoint and authentication details here. This is what we use for connecting to the Phone provider service to do call actions.
Any XML component in the connector will accept values from config fields. We have supported tags to access config fields. For instance if we want to access the username field from config then we can use $config.$fields.username We store the connection details using config xml node, then we can use those stored config info using $config.$fields.CONFIG_NAME.
<provider>
   <url> https://provider_url <url>
   <auth>
      <basic username="$config.$fields.username" password="$config.$fields.password">
   <auth>
<provider>
outgoing_call
So far we enabled the fields needed and configured the Provider details. Now, it is time to do the action part, configuration that is needed for placing outbound call. This has sub components
outgoing_call.request
- request.url - call provider endpoint for making outbound calls. We can leave this empty if provider url is good enough
- request.header - if provider is expecting any headers while making a call we can enable those headers here
- request.parameters - parameters that need to be sent while making a call. We can use config fields if there are any provider account specific parameters. We will have some dynamic parameters that are controlled from Vtiger UI (to, from) for which we can use @to_number, @from_number
outgoing_call.response
- Response has a format attribute. This helps in identifying the format of response from the Phone provider after placing a call. For now, we only support xml or json format
- We need to configure the identifiers of response. What key should be considered as call id, status etc. We support nested values as well(for ex:- result.content.call_id)
- response.call_id - this is used to identify call id from response
- response.call_status - this is used to identity call status from response
- response.error - this is used to identify error if call is failed
outgoing_call.callbacks
- We can remove this component if provider doesn’t support callbacks.
- Some providers support callback. When call is placed from the CRM, the provider will ring it, once it is answered then it hits the callback url
- We auto generate callback urls for custom Phone providers. We can use runtime parameter @answer_status_callback if we want to include in request parameters
- answer_callback:
- This will be triggered when an outgoing call is answered.
- answer_callback.response
- This is used to create phonecall record from the callback request
- answer_callback.send_response
- This is used to send response to the callback. Usually phone providers expect some xml to be emitted.
<answer_callback>
    <response format="json">
        <call_id use="CallSid"><call_id>
        <to_number use="DialTo"><to_number>
        <from_number use="From"><from_number>
        <user_number use="To"><user_number>
        <call_status use="CallStatus"><call_status>
    <response>

    <send_response format="xml" agentdialing="Number">
        <headers>
            <header name="Content-Type" value="text/xml"><header>
        <headers>
        <parameters>
            <parameter name="Dial" >
                <attrs>
                    <attr name="action" value="@status_callback"><attr>
                <attrs>
                <parameter name="Number" value="@to_number"><parameter>
            <parameter>
        <parameters>
    <send_response>
<answer_callback>
- status_callback
- This will be triggered when there is change of status for a call
- status_callback.status
- Specify for attribute as call statuses that has to be checked before triggering this part.
- status_callback.status.response
- This is used to update phone record
<status_callback use="CallStatus">
    <status for="completed,hanup">
        <response>
            <call_id use="CallSid"><call_id>
            <call_status use="CallStatus"><call_status>
            <duration use="duration"><duration>
            <starttime use="starttime"><starttime>
        <response>
    <status>

    <status for="in-progress,ringing">
        <response format="json">
            <call_id use="CallSid"><call_id>
            <status use="CallStatus"><to_number>
        <response>
    <status>
<status_callback>
This is how outgoing_call going to look after configuring every thing
<outgoing_call>
    <request method="get">
        <url>AgentManualDial.php?<url>

        <headers><headers>

        <parameters>
            <parameter name="username" value="$config.$fields.username"><parameter>
            <parameter name="api_key" value="$config.$fields.apikey"><parameter>
            <parameter name="agentID" value="@email"><parameter>
            <parameter name="campaignName" value="@user_phone_home"><parameter>
            <parameter name="customerNumber" value="@to_number"><parameter>
            <parameter name="format" value="json"><parameter>
        <parameters>
    <request>

    <response>
        <error use="message"><error>
        <success use="status"><success>
    <response>

    <callbacks>
        <status_callback use="data.Status">

            <status for="Answered">
                <response>
                    <call_id use="data.monitorUCID"><call_id>
                    <call_status use="completed" default="completed"><call_status>
                    <duration use="data.Duration"><duration>
                    <recordingurl use="data.AudioFile"><recordingurl>
                    <starttime use="data.StartTime"><starttime>
                    <endtime use="data.EndTime"><endtime>
                    <to_number use="data.Did"><to_number>
                    <from_number use="data.CallerID"><from_number>
                    <user_number use="data.AgentID"><user_number>
                    <gateway use="service"><gateway>
                    <direction use="direction" default="outbound"><direction>
                <response>
            <status>

            <status for="NotAnswered">
                <response>
                    <call_id use="data.monitorUCID"><call_id>
                    <call_status use="no-answer" default="no-answer"><call_status>
                    <duration use="data.Duration"><duration>
                    <recordingurl use="data.AudioFile"><recordingurl>
                    <starttime use="data.StartTime"><starttime>
                    <endtime use="data.EndTime"><endtime>
                    <to_number use="data.Did"><to_number>
                    <from_number use="data.CallerID"><from_number>
                    <user_number use="data.AgentID"><user_number>
                    <gateway use="service"><gateway>
                    <direction use="direction" default="outbound"><direction>
                <response>
            <status>
        <status_callback>
    <callbacks>
<outgoing_call>
Incoming_call
- incoming_call.response
- Response has a format attribute. This helps in identifying the format of response from the Phone provider after placing a call. For now, we only support xml or json format
- We need to configure the identifiers of response. What key should be considered as call id, status etc. We support nested values as well(for ex:- result.content.call_id)
- response.call_id - this is used to identify call id from response
- response.call_status - this is used to identity call status from response
- response.error - this is used to identify error if call is failed
- incoming_call.send_reponse
- This is used to send response to the callback. Usually phone providers expect some xml to be emitted
- Send Response has a format attribute. This helps in identifying the format of response from the Phone provider after placing a call. For now, we only support xml or json format.
incoming_call>
    <response format="json">
        <call_id use="CallSid"><call_id>
        <to_number use="To"><to_number>
        <from_number use="From"><from_number>
        <gateway use="service"><gateway>
        <direction use="direction" default="inbound"><direction>
    <response>

    <!-- sending response to callback -->
    <send_response format="xml" agentdialing="Number">
        <headers>
            <header name="Content-Type" value="text/xml"><header>
        <headers>
        <parameters>
            <parameter name="Dial" >
                <attrs>
                    <attr name="statuscallbackurl" value="@answer_status_callback"><attr>
                    <attr name="from_number" value="@from_number"><attr>
                <attrs>
                <parameter name="Number" value="@to_number"><parameter>
            <parameter>
        <parameters>
    <send_response>
<incoming_call>
Publish
Once we update the XML with all required details. We are good to go with publishing the connector.
Once we Save and Publish the Connector. We can see a new Provider added in Phone Configuration settings (Settings > Extensions > Phone Configuration) - see
Configure the Provider specific details and activate it.
To test if it's working properly, try Calling to a Contact. Go to the Contacts module, and select the Call option.
Twilio
Twilio extension we have developed to give you an idea on how the xml configuration would work, with using the above details: Voice API details for Twilio can be accessed from here
Explanation
- Under config we need details that will help us connect to the APIs using basic authorization. Here authid and authtoken input fields are used to store basic auth details.
- In provider we configure the endpoint, auth details which will be picked up from the Settings > Phone Call Settings > Add Provider > Twilio.
- In outgoing_call and incoming_call xml will define how the calls will be triggered and show phone call popup.
- In outgoing_call request xml node define making POST call to https://api.twilio.com/2010-04-01/Accounts/$TWILIO_ACCOUNT_SID/Calls.json and passing required parameters
- In outgoing_call request will make the actual call to the endpoint, and the response of the request is mapped under response xml node. Assuming the response is json and their keys are mapped to vtiger fields
- callbacks are webhook endpoints enabled in the platform to listen on the phone events like answer, call status, hangup event and incoming calls. All these callback response needs to mapped to vtiger relevant fields.
- Finally incoming_call listens to inbound calls and sends response back to acknowledge.
<?xml version='1.0'?>
<connector for="PhoneCalls">
    <config>
        <fields>
            <!-- CONFIGURE : Data fields that need to be captured from SMS Notifier settings -->
            <field name="authid" label="" type="text">
            <field name="authtoken" label="" type="text">
            <field name="callerid" label="" type="text" presence="mandatory">
            <field name="answer_callback" label="" type="text" presence="mandatory">
            <field name="status_callback" label="" type="text" presence="mandatory">
            <field name="incoming_callback" label="" type="text" presense="mandatory">
        <fields>
    <config>
    <provider>
        <!-- CONFIGURE : Provider URL -->
        <url> <![CDATA[https://api.twilio.com/2010-04-01/Accounts/$config.$fields.authid]]><url>
        <auth>
            <!-- CONFIGURE : Credentials -->
            <basic username="$config.$fields.authid" password="$config.$fields.authtoken" >
        <auth>
    <provider>

    <outgoing_call>
        <request>
            <url>Calls.json<url>

            <headers><headers>

            <parameters>
                <parameter name="To" value="@extension"><parameter>
                <parameter name="From" value="@callerid"><parameter>
                <parameter name="Url" value="@answer_callback|urlappend:{'DialTo': '@to_number'}"><parameter>
            <parameters>
        <request>

        <response>

            <callid use="id">
            <status use="callStatus">

            <!-- optional / use from request -->
            <to_number use="To">
            <from_number use="From">

        <response>

        <callbacks>

            <answer_callback>

                <response format="json">
                    <call_id use="CallSid"><call_id>
                    <to_number use="DialTo"><to_number>
                    <from_number use="From"><from_number>
                    <user_number use="To"><user_number>
                    <call_status use="CallStatus"><call_status>
                    <gateway use="service"><gateway>
                <response>

                //sending response to callback
                <send_response format="xml">
                    <headers>
                        <header name="Content-Type" value="text/xml"><header>
                    <headers>
                    <parameters>
                        <parameter name="Dial" >
                            <attrs>
                                <attr name="action" value="@status_callback"><attr>
                            <attrs>
                            <parameter name="Number" value="@to_number"><parameter>
                        <parameter>
                    <parameters>
                <send_response>

            <answer_callback>

            <status_callback use="CallStatus">

                <status for="completed,hangup">
                    <response>
                        <call_id use="CallSid"><call_id>
                        <call_status use="CallStatus"><call_status>
                        <duration use="duration"><duration>
                        <billrate use="billrate"><billrate>
                        <starttime use="starttime"><starttime>
                    <response>
                <status>

                <status for="in-progress,ringing">
                    <response format="json">
                        <call_id use="ParentCallSid"><call_id>
                        <call_status use="CallStatus"><call_status>
                    <response>
                <status>

            <status_callback>

        <callbacks>

    <outgoing_call>

    <incoming_call>
        <response format="json">
            <call_id use="CallSid"><call_id>
            <to_number use="To"><to_number>
            <from_number use="From"><from_number>
            <gateway use="service"><gateway>
            <call_status use="CallStatus"><call_status>
            <direction use="direction" default="inbound"><direction>
        <response>

        //sending response to callback
        <send_response format="xml" agentdialing="Number">
            <headers>
                <header name="Content-Type" value="text/xml"><header>
            <headers>
            <parameters>
                <parameter name="Dial" >
                    <attrs>
                        <attr name="action" value="@status_callback"><attr>
                    <attrs>
                    <parameter name="Number" value="@extension">
                        <attrs>
                            <attr name="action" value="@status_callback"><attr>
                        <attrs>
                    <parameter>
                <parameter>
            <parameters>
        <send_response>

    <incoming_call>
<connector>
Ozonetel
Another example developed for Ozonetel provider.
<?xml version='1.0'?>
<connector for="PhoneCalls">
    <config>
        <fields>
            <!-- CONFIGURE : Data fields that need to be captured from Phone Configuration settings -->
            <field name="apikey" label="" type="text">
            <field name="username" label="" type="text">
            <field name="callerid" label="" type="text" presence="mandatory">
            <field name="status_callback" label="" type="text" presence="mandatory">
            <field name="incoming_callback" label="" type="text" presence="mandatory">
        <fields>
    <config>
    <provider>
        <!-- CONFIGURE : Provider URL -->
        <url>https://api1.cloudagent.in/CAServices<url>

    <provider>

    <outgoing_call>
        <request method="get">
            <url>AgentManualDial.php?<url>

            <headers><headers>

            <parameters>
                <parameter name="username" value="$config.$fields.username"><parameter>
                <parameter name="api_key" value="$config.$fields.apikey"><parameter>
                <parameter name="agentID" value="@email"><parameter>
                <parameter name="campaignName" value="@user_phone_home"><parameter>
                <parameter name="customerNumber" value="@to_number"><parameter>
                <parameter name="format" value="json"><parameter>
            <parameters>
        <request>

        <response>
            <error use="message"><error>
            <success use="status"><success>
        <response>

        <callbacks>
            <status_callback use="data.Status">

                <status for="Answered">
                    <response>
                        <call_id use="data.monitorUCID"><call_id>
                        <call_status use="completed" default="completed"><call_status>
                        <duration use="data.Duration"><duration>
                        <recordingurl use="data.AudioFile"><recordingurl>
                        <starttime use="data.StartTime"><starttime>
                        <endtime use="data.EndTime"><endtime>
                        <to_number use="data.Did"><to_number>
                        <from_number use="data.CallerID"><from_number>
                        <user_number use="data.AgentID"><user_number>
                        <gateway use="service"><gateway>
                        <direction use="data.Type" default="outbound"><direction>
                        <uui use="data.UUI"><uui>
                        <campaign_name use="data.CampaignName"><campaign_name>
                    <response>
                <status>

                <status for="NotAnswered">
                    <response>
                        <call_id use="data.monitorUCID"><call_id>
                        <call_status use="no-answer" default="no-answer"><call_status>
                        <duration use="data.Duration"><duration>
                        <recordingurl use="data.AudioFile"><recordingurl>
                        <starttime use="data.StartTime"><starttime>
                        <endtime use="data.EndTime"><endtime>
                        <to_number use="data.Did"><to_number>
                        <from_number use="data.CallerID"><from_number>
                        <user_number use="data.AgentID"><user_number>
                        <gateway use="service"><gateway>
                        <direction use="data.Type" default="outbound"><direction>
                        <uui use="data.UUI"><uui>
                        <campaign_name use="data.CampaignName"><campaign_name>
                    <response>
                <status>

            <status_callback>
        <callbacks>

    <outgoing_call>

    <incoming_call>

        <response format="json">
            <call_id use="monitorUcid"><call_id>
            <to_number use="did"><to_number>
            <from_number use="callerID"><from_number>
            <user_number use="agentID"><user_number>
            <call_status use="in-progress" default="in-progress"><call_status>
            <gateway use="service"><gateway>
            <campaign_name use="campaignName"><campaign_name>
            <uui use="uui"><uui>
            <direction use="type" default="inbound"><direction>
        <response>

    <incoming_call>
<connector>
Payments Connector
TBD
Sync Connector
Vtiger has enabled sync with different applications like Google, Office365, Xero, Tally etc., But there are a lot more applications with which sync is not enabled yet.
Sync Connector opens the door to enable sync with applications that support REST based apis. With a XML schema, we can enable sync between Vtiger and any third party service.
Let’s see how we can do this.
Build your own
- Adding Sync Connector
VTAP introduced a new Resource type in Module Designer called Connectors - see Adding Connector will prompt for Connector Type and Name where we need to fill details - see
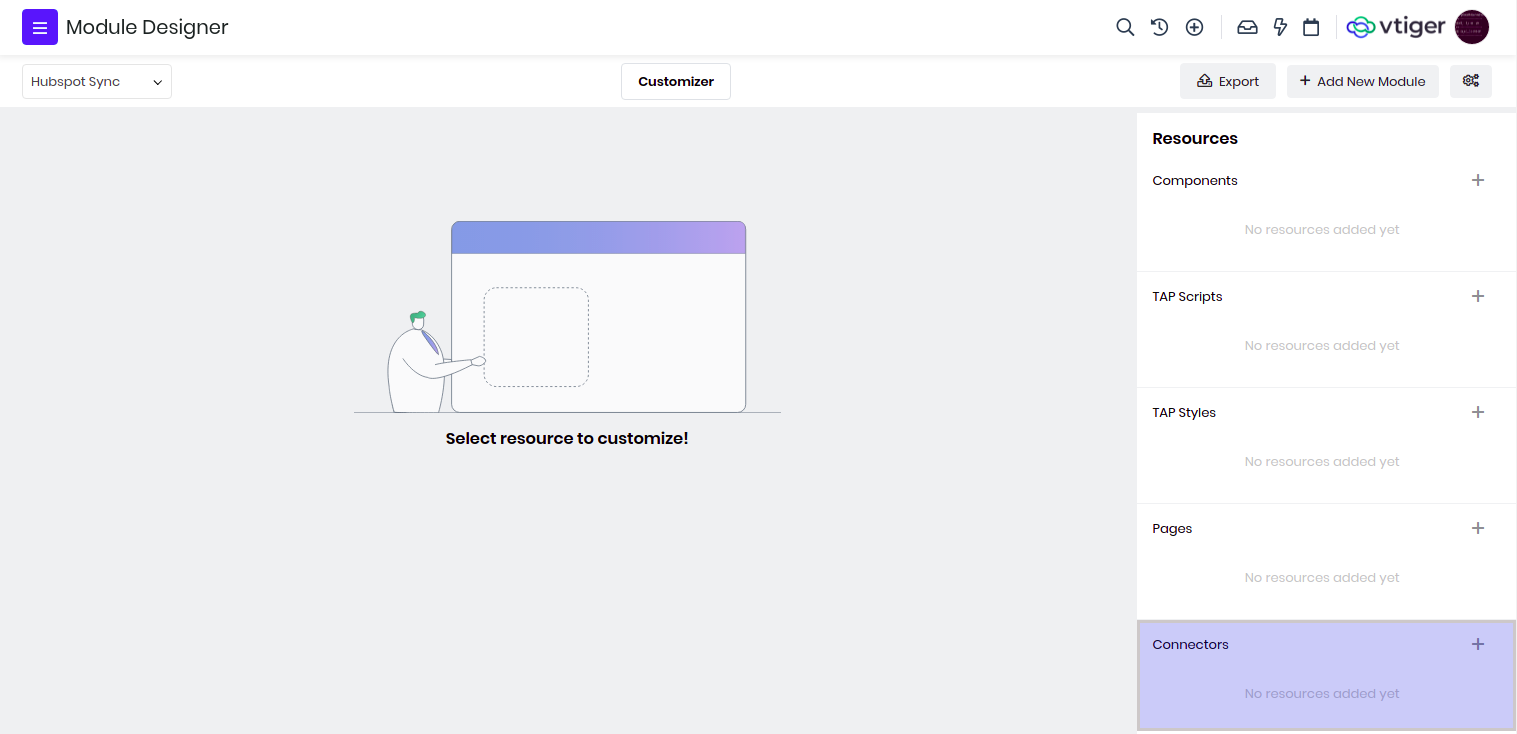
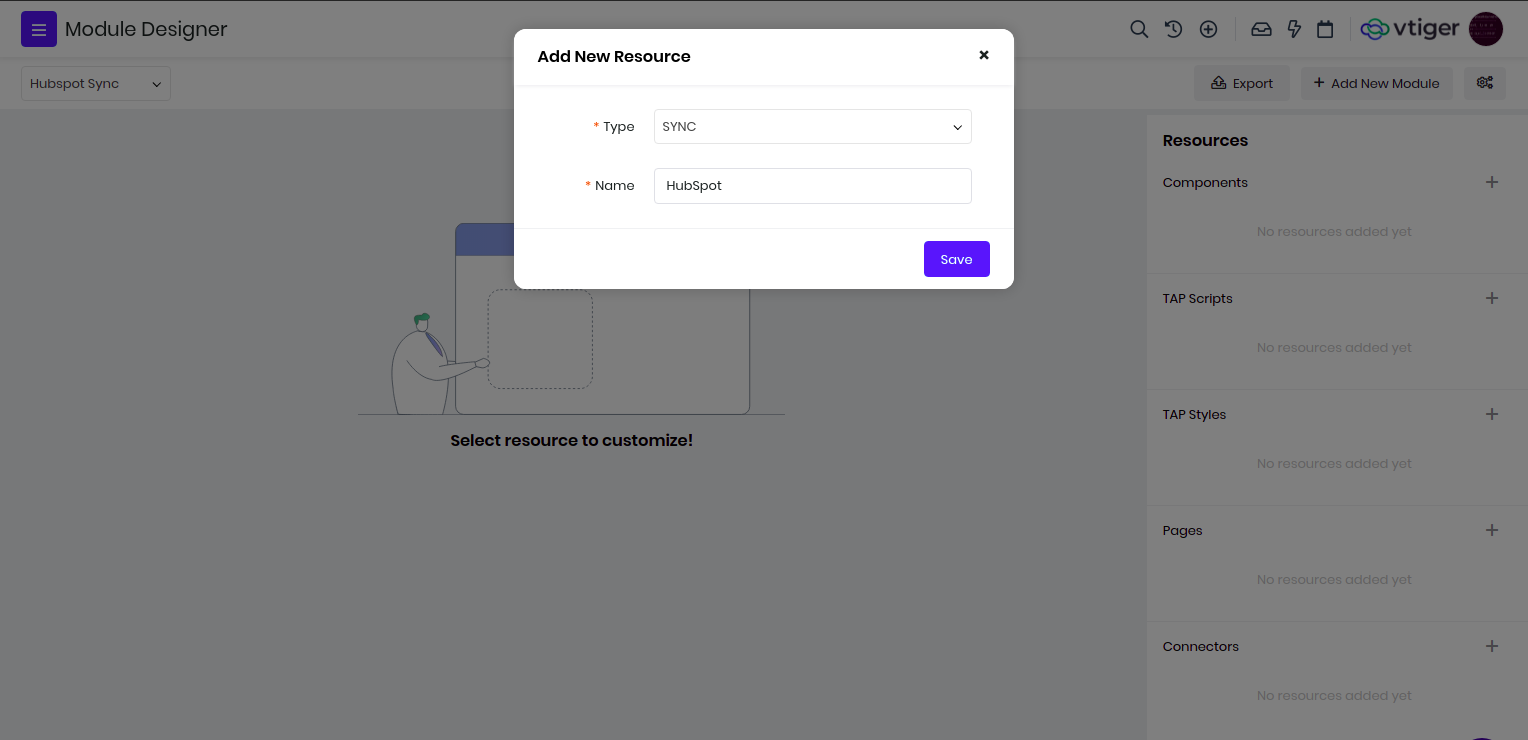
- XML configuration
On adding the connector, a default XML template will be loaded which needs to be updated with the service details which we want to enable sync with - see. Let’s go through each XML component that needs our attention.
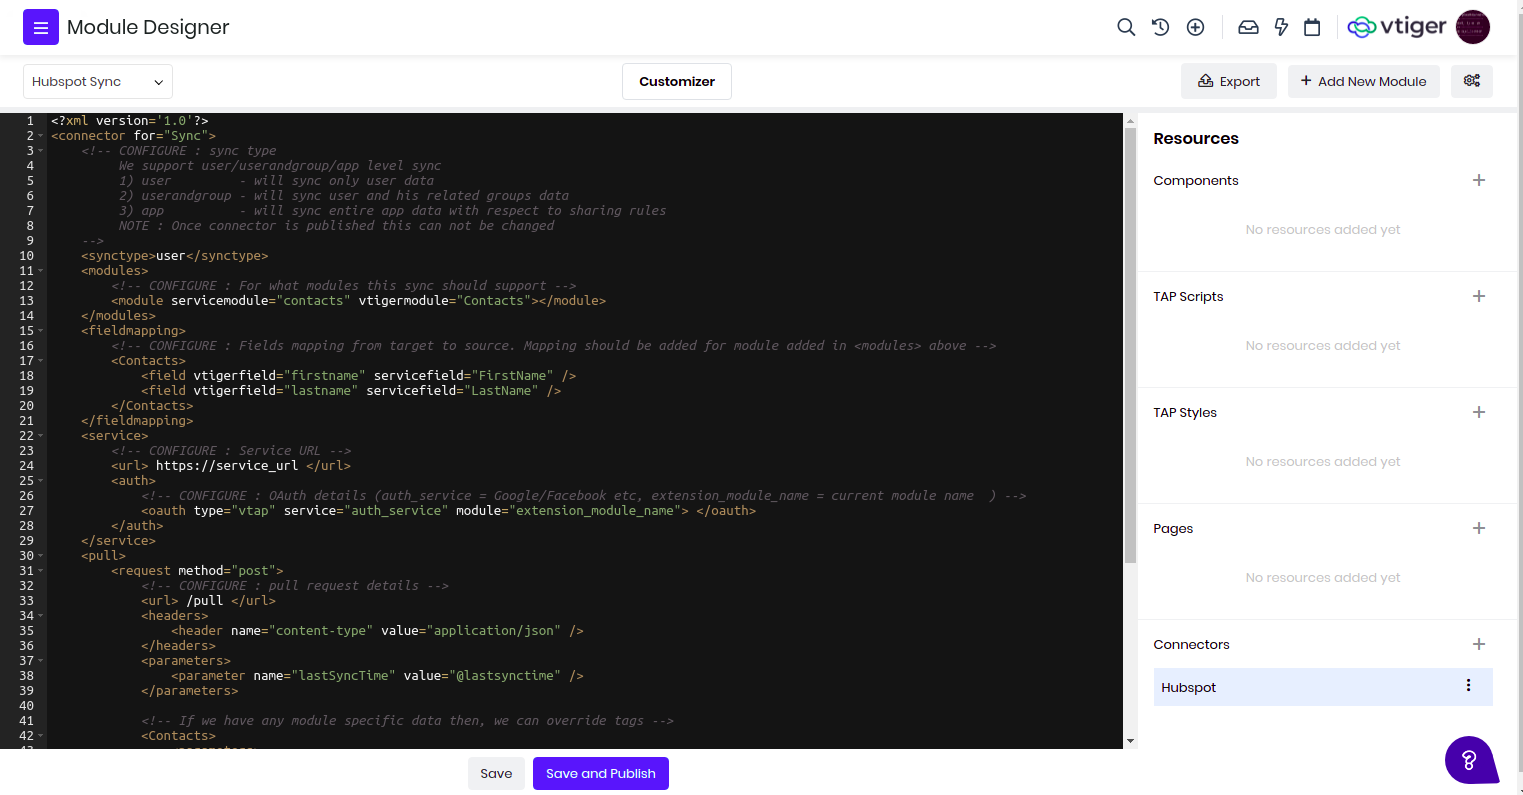
Sync type
We should set up the sync type of this connector. In Vtiger we support 3 types of sync types.
- user - will sync data that is directly assigned to user.
- userandgroup - will sync data that is directly assigned to user and his related groups.
- app - will sync entire app data with respect to sharing rules.
<synctype>user</synctype>
Note: Once a connector is published we can not set or change synctype.
Config
We can configure some fields in config to reuse in the parameters. Fields added in config will be shown in sync settings where the admin can set up the values. For example, we have username, password for service authentication. We can configure fields like this for admin to configure.
<config>
    <fields>
        <field name="username" type="text" />
        <field name="password" type="password" />
    </fields>
</config>
This is categorized into three types
Pre Sync Settings
Any field that is added with presync=true attribute will be considered as pre sync field and becomes a readonly field. You can make the field editable by removing presync=true.
<field name="apikey" required="true" type="text" presync="true" />
Sync will not work until all these fields are filled. Only pre sync settings will be shown in Sync settings page until the user saves the values.
By default Sync Records From field will be shown here. This field decides, from when records should be synced (1 month, 3 months, 6 months, Fetch all).
System Settings We have some system settings
- Debug Mode - checkbox to enable debug logs. Once this is enabled sync process will be logged into file
- Background Sync Frequency - Frequency of background cron for sync (3 hours, 6 hours etc)
Sync Settings All other fields in config->fields in the xml will be shown here. We support text, password, date, datetime, reference, integer, url, email, phone, picklist, boolean fields. We can set type attribute with one of these types to show specific field UI in the config section. Few types(reference, picklist) need some extra information. Below are example for those
<config>
    <fields>
        <field name="default_contact" type="reference" module="Contacts" />
        <field name="default_status" type="picklist">
            <options>
                <option>Open</option>
                <option>Close</option>
            </options>
        </field>
    </fields>
</config>
We can use these fields in the url attributes, auth or parameters in push or pull request like $config.$fields.username, $config.$fields.password Note : If any one of required field value is not set then sync will not start
Modules
We need to configure modules which we want to sync from Vtiger to Service and vice versa. This is how it will look like if we want to enable syncing Contacts, Accounts modules.
<modules>
    <module servicemodule="companies" vtigermodule="Accounts"></module>
    <module servicemodule="contacts" vtigermodule="Contacts" dependenton="Accounts"></module>
</modules>
Here:
| servicemodule | is the module name of third party service |
| vtigermodule | is the module name from Vtiger side |
| dependenton | is other modules on which this module is depending on. These can be comma separated values of any other modules that are configured to sync. If this is set then, until all dependent modules are completely synced this module will not start syncing |
Field Mapping
Mapping between Vtiger fields and Service fields will go here. While syncing data from Vtiger to Service or vice versa, we need to know what field of Vtiger should go to Service and the other way around. We need to provide field mapping for each module that we need to sync.
Module names that we use in this block will be Vtiger module names. This is how it will look for field mapping for Contacts, Accounts modules.
<fieldmapping>
    <Contacts>
      <field vtigerfield="firstname" servicefield="firstname" />
      <field vtigerfield="lastname" servicefield="lastname" />
      <field vtigerfield="email" servicefield="email" />
    </Contacts>
    <Accounts>
        <field vtigerfield="accountname" servicefield="name" />
        <field vtigerfield="website" servicefield="website" />
        <field vtigerfield="phone" servicefield="phone" />
    </Accounts>
</fieldmapping>
Line items mapping
<lineitems vtigerfield="_lineitems_" servicefield="line_items">
    <field vtigerfield="productid" servicefield="product_id" />
    <field vtigerfield="listprice" servicefield="item_price" />
    <field vtigerfield="quantity" servicefield="quantity" />
    <field vtigerfield="comment" servicefield="comments" />
</lineitems>
lineitems node is used when the module has items/line items which needs to be added in the record.
Below is the example of the default fieldmapping JSON.
[{"line_items":[{"product_id":null,"item_price":"1000.000000","quantity":"11.000","comments":"StartProduct 1"},{"product_id":null,"item_price":"1500.000000","quantity":"21.000","comments":"StartProduct 2"}],"clientversion":0,"id":""}]
To alter the values while sending the data from vtiger to service provider. Use a key serviceformat for each field which has to be modified before sending it to the service or provider.
Below is the example of the fielmapping for altering lastname and phone.
<fieldmapping>
    <Contacts>
      <field vtigerfield="firstname" servicefield="firstname" serviceformat="prefix:firstname-" />
      <field vtigerfield="lastname" servicefield="lastname" />
      <field vtigerfield="email" servicefield="email" />
    </Contacts>
    <Accounts>
        <field vtigerfield="accountname" servicefield="name" />
        <field vtigerfield="website" servicefield="website" />
        <field vtigerfield="phone" servicefield="phone" serviceformat="int" />
    </Accounts>
</fieldmapping>
For lineitems altering the values use the below
<lineitems vtigerfield="_lineitems_" servicefield="line_items">
            <field vtigerfield="productid" servicefield="product_id" />
            <field vtigerfield="listprice" servicefield="item_price" />
            <field vtigerfield="quantity" servicefield="quantity" serviceformat="int" />
            <field vtigerfield="comment" servicefield="comments" />
</lineitems>
Example JSON
Here you can see that the quantity is converted to int format.
[{"line_items":[{"product_id":null,"item_price":"1000.000000","quantity":11(int),"comments":"StartProduct 1"},{"product_id":null,"item_price":"1500.000000","quantity":21,"comments":"StartProduct 2"}],"clientversion":0,"id":""}]
NOTE: In the pull response below we will be configuring identifier for records object. In this object we will have records that are pulled from the service. Fields from these records should be configured in servicefield in field mapping.
We can use nested values too, for instance if firstname field is inside properties array of the each record then in the mapping we can keep properties.firstname
<field vtigerfield="firstname" servicefield="properties.firstname" />
We can go to any number of nested levels.
Service
We need to provide service details with which we are trying to sync the data. Here, we will need to set up the service url and the auth details.
<service>
    <url> service_url </url>
    <auth>
        <oauth type="vtap" service="service" module="ext_module_name"></oauth>
    </auth>
</service>
NOTE : If there are any dynamic parameters to be used in the URL we should use url attributes. Examples:-
<url SYNCMODULE="@syncmodule"> service_url/$SYNCMODULE </url>
<url TOKEN="$config.$fields.token"> service_url/$TOKEN </url>
Auth can be any of these types
- basic - if service authentication is username, password based then
<basic username="" password="" />
- apitoken - some services expect to send some api token for those
<apikey token="" />
- oauth - VTAP also opened the door to do oauth of any service. If we configure the auth this way then while doing the sync it will automatically show auth popup
<oauth type="vtap" service="service" module="ext_module_name"></oauth/>
- service = service name with which oauth should perform
- ext_module_name = module name of current connector
Pull This is the one that helps us to get data from the Service to CRM. Like any other request, we will have
Overview of pull request
<pull>
   <request>
      <url>endpoint</url>
      <headers>
         <header name="" value="" />
      </headers>
      <parameters>

      </parameters>
   </request>

   <response>
      <error use="message" />
      <records use="results" />
      <recordid use="id" />
      <recordmodifiedtime use="updatedAt" />
      <recorddeleted use="archived" />
   </response>
</pull>
Request This will have pull endpoint, headers, and parameters. If the service what we are trying to sync with, has module specific endpoint, headers or parameters then we can overwrite the request for that module using that module tag inside the main request
<request method="post" >
    <url SYNCMODULE="@syncmodule">/$SYNCMODULE/search</url>
    <headers>
        <header name="content-type" value="application/json" />
    </headers>

    <Contacts>
        <parameters raw-post-data="true">
            <parameter name="filterGroups">
            <values>
                <parameter name="filters">
                    <values>
                        <parameter name="value" value="@lastsynctime:M" />
                        <parameter name="propertyName" value="lastmodifieddate" />
                        <parameter name="operator" value="GTE" />
                    </values>
                </parameter>
            </values>
            </parameter>
        </parameters>
    </Contacts>

    <Accounts>
        <parameters raw-post-data="true">
            <parameter name="filterGroups">
                <values>
                    <parameter name="filters">
                        <values>
                            <parameter name="value" value="@lastsynctime:M" />
                            <parameter name="propertyName" value="hs_lastmodifieddate" />
                            <parameter name="operator" value="GTE" />
                        </values>
                    </parameter>
                </values>
            </parameter>
        </parameters>
    </Accounts>
</request>
If parameters are common for all modules then we can avoid module specific tags in the request and keep parameters in the request tag directly.
Parameters
Different services will expect parameters in different formats with respect to nested levels. Let see some examples of parameters set to understand this better
- If you have plain key value pair then
<parameters>
    <parameter name="key1" value="value1" />
    <parameter name="key2" value="value2" />
</parameters>
Output would be {"key1" : "value1", "key2" : "value2"}
- Sometimes we may want to send an array of objects, that’s where we can use values tag.
<parameters>
    <parameter name="filtergroup">
        <values>
            <parameter name="key1" value="value1" />
            <parameter name="key2" value="value2" />
        </values>
    </parameter>
</parameters>
Output would be {"filtergroup" : [{"key1" : "value1", "key2" : "value2"}]}
values can be used if we have any sub parameters (i.e., nested). If the values tag has a name attribute then it will be considered as an associative array, else a non-associative array.
For example, if values in the above xml has name attribute name="filter" then output would be {"filtergroup" : {"filter" : {"key1" : "value1", "key2" : "value2"}}}
We can go any number of nested levels with values. Like parameter -> values -> parameter. Then values can again have parameter -> values -> parameter and so on.
- If we just want to send array of values then inside values tag we can use value.
<parameters>
    <parameter name="fields">
        <values>
            <value>firstname</value>
            <value>lastname</value>
        </values>
    </parameter>
<parameters>
Output would be {"fields" : ["firstname", "lastname"]}
Pre-defined rules in parameters
- values with name will be an associative array, else a non-associative array
- values with value inside will be taken as array of values
- values with parameter inside will be as array of object
Dynamic values
In the parameters we use dynamic values, which will be calculated and used while hitting pull request
- @lastsynctoken - In general sync works based on the last sync time. We need to send filters to the service to give us data that is changed after last sync time. For this, we enabled this dynamic parameter. Wherever we use this parameter, while hitting pull request to service it will take the last sync time.
- @lastsynctoken:M - lastsynctoken is a unix timestamp. If we want to send milli seconds in the the lastsynctoken then we can use this parameter.
- @lastsynctoken:T - some services expect value in T format. T is just separator of Date and Time part in date time value.
- $config.$fields.fieldname - If config is enabled in xml when we can use the config fields. We can use these in request headers also.
Response
This will have identifiers for some required data in the response from the service.
<response format="json">
    <code use="200" />
    <error use="message" />

    <records use="results" />
    <recordid use="id" />
    <recordmodifiedtime use="updatedAt" />
    <recorddeleted use="archived" />
</response>
- code = Expected response code. We can use comma separated values without space.
- error = What value will have error message if request is failed
- records = What object in the response holds the records. If entire response is records object then we can set use = @response
In the records object each record will have few required details for which we need to configure the identifiers.
- recordid = what is the identifier for record id
- recordmodifiedtime = What is the identifier for record last updated time. This is must in the response, because we are using this to store the last sync token.
If response will not have this value then we can use @currenttime which will use current time
- recorddeleted = If there is any identifier to know the record is deleted or archived
Append fields Here appendfields node is using to re-rwite the record with new values or updated values.
<appendfields>
    <request>
        <url URL="$config.$fields.baseUrl" ID="@id"> $URL/v1/deals/$ID/products </url>
        <response>
            <line_items use="data"></line_items>
        </response>
    </request>
</appendfields>
Note : If any one of these things is missing then sync may misbehave!
Push This helps with configuring details for pushing data from Vtiger to Service. Like pull we will have
Request This will also have endpoint, headers, and parameters. Like pull, If the service what we are trying to sync with, has module specific endpoint, headers or parameters then we can overwrite the request for that module using that module tag inside the main request
This is how push request is going to look like
<request method="post" >
    <url SYNCMODULE="@syncmodule">/$SYNCMODULE/batch</url>

    <headers>
        <header name="content-type" value="application/json" />
    </headers>

    <parameters raw-post-data="true">
        <parameter name="inputs" value="@records"> </parameter>
    </parameters>
</request>
Modes While pushing we will have to create, update or delete on the service side. Some services might have different endpoints, parameters for these actions. In that case we can add those modes with urls which will be appended to the push endpoint. We can overwrite parameters also in these modes
In these modes we can have following tags.
- url - endpoint of that mode
- batchlimit - if the service is only accepting 10 records at a time we can put 10. If this is set to 1, we assume the service only does single record operations i.e., we send one record at a time and expect only one record in the response.
- record - record that needs to push to the service will be generated with respect to the field mapping configuration. If any new property needs to be added or overwritten then we use the property tag (please refer create/update in below code). Sometimes we want to overwrite entire record object, then we can add a overwrite attribute to record tag (please refer delete in below code)
- parameters - If mode has any parameters then we will consider those else we will take from request node.
Here is the push request object with modes.
<push>
    <request method="post" >
    <url SYNCMODULE="@syncmodule">/$SYNCMODULE/batch</url>

    <headers>
    <header name="content-type" value="application/json" />
    </headers>

    <parameters raw-post-data="true">
    <parameter name="inputs" value="@records"> </parameter>
    </parameters>

    <create>
    <url>/create</url>
    <batchlimit>10</batchlimit>
    <record>
        <property name="properties" value="@record:properties" />
    </record>
    </create>

    <update>
    <url>/update</url>
    <batchlimit>10</batchlimit>
    <record>
        <property name="id" value="@record:id" />
        <property name="properties" value="@record" />
    </record>
    </update>

    <delete>
    <url>/archive</url>
    <batchlimit>10</batchlimit>
    <record overwrite="true">
        <property name="id" value="@record:id" />
    </record>
    </delete>

    </request>
</push>
Dynamic values
- @records - In parameters we might want to send all records where we can use this.
- While generating record objects for any action (create, update, delete) we might need to set record properties
- @record - entire record array
- @record:id - set records id where we can use this
- @record:fieldname - If we want to set to any property from a record
- $config.$fields.fieldname - if config is enabled in xml when we can use the config fields NOTE: Whatever nested parameters we configured in field mapping. Record will be generated that way first, then in create, update, delete tags we can access that object using @record: as identifier.
Response
We need to configure identifiers for few mandatory things
<response format="json">
    <createdcode use="200" />
    <updatedcode use="200" />
    <deleteddcode use="200" />

    <error use="message" />
    <createdrecords use="results" />

    <recordid use="id" />
    <recordmodifiedtime use="updatedAt" />
</response>
- createdcode = Expected response code for push create. We can use comma separated values with out spaces.
- updatedcode = Expected response code for push update. We can use comma separated values with out spaces.
- deletedcode = Expected response code for push delete. We can use comma separated values with out spaces.
- error = What is the key for error message in the response
- createdrecords = After records are created in service, it will send response which will have records with ids, we need these ids for mapping in CRM. If entire response is records object then we can set use = @response
- recordid = How to identify record id from the response
- recordmodifiedtime = How to identify record modified time
Value format
While using parameters in the pull/push request, sometimes we might want to format the values. For instance, if we have parameter like this which is a timestamp
<parameter name="time" value="@lastsynctoken" />
and, we want to convert this to specific date format then we can do
<parameter name="time" value="@lastsynctoken" format="dateformat:Y-m-d H:i:s" />
(or) short form
<parameter name="time" value="@lastsynctoken|dateformat:Y-m-d H:i:s" />
Likewise we support the following formats
- int - value|int - To convert the value to an integer
- float - value|float - To convert the value to decimal
- string - value|string - To convert the value to string
- array - value|aray - To wrap the string into an array
- json - value|json - To convert any array to json
- trim - value|trim - To trim any spaces at first and end
- timestamp - value|timestamp - To convert date to timestamp
- wrap - value|wrap:’ - To wrap value with any character
- prefix - value|prefix:+ - To prefix value with any character
- suffix - value|suffix:+ - To suffix value with any character
- join - value|join:, - To join array with given character
- separate - value|separate:, - To separate string with given character
- array_values - value|array_values - To take values of array
We support multiple formats as well for same value For example, if you want to separate value by comma (,) and convert that to json then
<parameter name="field" value="value|separate:,|json" />
Each format should be separated by | symbol
This formatting is supported in URL Attributes, Headers, Parameters, Push record properties
Notes
- Debug logs will show time in UTC format.
- While writing xml for pull, always order the records by last modified time in ascending order. Services may give the data in random order, but we depend on fetched records last modified time to fetch the next set of records
- By default sync records limits are fixed
- User action - 100 per sync (Pull - 100, Push - 100)
- CLI (cron) - 500 per sync (Pull - 100, Push - 100)
- But, if we want to change this limit for any sync connector then we can add these global variables
- User action - $MODULENAME_$CONNECTORNAME_SYNC_RECORDS_LIMIT
- CLI (cron) - $MODULENAME_$CONNECTORNAME_SYNC_RECORDS_LIMIT_CLI
- Module sync will be skipped if any dependent module is not completely synced yet
Security
Vtiger supports 2 algorithms used for encryption and decrytpion.
- AES - Advanced Encryption Standard(AES) is a symmetric encryption algorithm. Uses key - 32 bits and iv is not mandatory in this algorithm.
- 3EDS - Triple Data Encryption Standard. Uses Key- 24bits and iv - 8bits. iv is mandatory for using this algorithm.
key and iv are the variables which are enabled in sync connector which helps in encyrption and decryption. Add the key and iv input in config node.
Add the algorithm by deafult while building the sync connector as:
<config>
    <fields>
        <field name="key" label="KEY" type="text" required="true"/>
        <field name="Algo" label="Algo" type="text" value="AES"  />

    </fields>
</config>
To decrypt the response data from the service.
Add the following in the response of pull request.
<algo use="AES"></algo>
<decrypt use ="true" />
<iv use="$config.$fields.iv"/>
<key use="$config.$fields.key"/>
This will decypt the data from the service (which is in encrypted format using the same algorithm).
Here algo node is used to add the algorithm ie, AES or 3DES.
decrypt,key,iv are the nodes.
During the push operation.
We will encrypt the data before passing to the service or provider.
Use the below format inside push node.
<push>
    <request method="post" encrypt="true">
            <headers>  </headers>
            <parameters raw-post-data="true"  key="$config.$fields.key" iv="$config.$fields.iv"  algo="AES">
                <parameter name="_raw_data" value="@records"><parameter>
            </parameters>
    </request>
 </push>
This will encyrpt the data using the algorithm provided.
Resources
Find below the detailed runtime references to make your implementation simple and stonger:
- VTAP JS: For CRM In-app customization.
- Client Framework: For CRM UX Changes.
- VCAP JS: For VTAP standalone app interaction.
- VADL: For API development.
- VDS
VTAP JS
App Creator provides Javascript runtime under VTAP which provides helper APIs to interact with CRM.
VTAP.Component
Component is the representation of UI element on the page. It controls the presentation of data based on UI state.
.Core
You can create custom components by extending core component as follows:
var MyModule_Component_BasicButton = VTAP.Component.Core.extend({});
To create Settings View component for MyModule you should use:
var MyModule_Component_SettingsView = VTAP.Component.Core.extend({});
Core component has lifecycle hooks as of VueJS 2.x read more
var MyModule_Component_RegisterButton = VTAP.Component.Core.extend({
    props: {
        /* parent to this component */
    },
    data() {
        return {
            /* self data variables */
        }
    },
    components: {
        /* dependent components */
    },

    template: `<div>Custom component HTML structure</div>`,

    created() {
        /* setup listener to events (or) fetch data */
    },

    mounted() {
        /* UI element is mounted to DOM */
    }
})
.Load
VTAP.Component.Load(name, module) - Load and return Vtiger Component Object.
Parameters
| name | string |
| module | string |
Returns
| object | Vtiger Component |
.Find
VTAP.Component.Find(name) - Find Vtiger Component Object defined by name.
Parameters
| name | string |
| module | string |
Returns
| object | Vtiger Component |
.Register
VTAP.Component.Register(type, data, component, filter) - Add and Return custom component on a Page.
Parameters
| type | string | type of component to be added, click here for complete list with examples. |
| data | object | Many components only depend on data to show in UI, these are generally key-value pair values. See component types for examples |
| component | Vtiger Component | Custom component that you want to render in the UI. |
| filter | object | Use this when you want to restrict the component to be loaded for a particular module. For example {‘module’:’Contacts’) |
Returns
| object | Vtiger Component |
This API allows subscribing to UI Event Hooks that are emitted by core or custom components on the page. Visual representation of the hooks is shown below:
See all UI Hooks here
VTAP.View
VTAP.View() helps get the current page view name like list, detail, edit etc.
VTAP.User
VTAP.User() helps fetch the current logged in user details like first name, last name, email, profile image, isadmin etc.
Example : To display a button based on the roles of the users.
var Contacts_Component_ListViewExamples = VTAP.Component.Core.extend({
    created() {
        var userInfo = VTAP.User();
        var userRole = userInfo.roleid.label;

        // Define the roles allowed to view the button
        var allowedRoles = ['CEO','Sales Manager'];

        if (allowedRoles.includes(userRole)) {
            VTAP.Component.Register('LIST_BASIC_BUTTON', {
                label: 'Custom Page',
                clickHandler: () => {
                    window.location.href = " ";
                },
                icon: 'fa-check',
                variant: 'primary'
            });
        }
    }
});
VTAP.Utility
Provides utility functions like showing modal, show success/error UI notification etc.
.ShowSuccessNotification
VTAP.Utility.ShowSuccessNotification(message)
Shows success UI notification - useful to inform success after the action.
| message | string | The message that needs to be shown in notification. Default values to "Success". |
.ShowErrorNotification
VTAP.Utility.ShowErrorNotification(message)
Shows the error UI notification - useful to inform users about failed actions.
| message | string | The message that needs to be shown in notification. (default=error) |
.ShowPopup
VTAP.Utility.ShowPopup({component, componentData, modalOnModalMode})
Shows a popup modal
| component | Vtiger Component | This is Vtiger Vue component, see here for more details. |
| componentData | object | It will hold parameters that need to be sent to the Vtiger component to be shown in popup. |
| modalOnModalMode | boolean | If there is another popup then do you want to show the modal on top of it or not. (default=false) |
VTAP.Utility.ShowPopup({
    component : VTAP.Component.Load('Relation', 'MYMODULE'),
    componentData : {title : 'List of records'},
    modalOnModalMode : true
});

var MYMODULE_Component_Relation = VTAP.Component.Core.extend({
   template:
   //We are using boostrap-vue components b-modal here. Check [here](https://bootstrap-vue.org/docs/components/modal) more details.
      `<b-modal id="modal-1" title="Vtiger popup">
          <p class="my-4">Add popup contents here</p>
       </b-modal>`
});
.HidePopup
VTAP.Utility.HidePopup('modal-1') - This will hide the popup opened by ShowPopup API. 'modal-1' is the id value from the above pop up template example.
.UserLabels
VTAP.Utility.UserLabels() - This returns a list of all the CRM users and their ids. This is useful to identify owner of the record as API's return back in the form of ID.
.ShowProgress
VTAP.Utility.ShowProgress() - This can be used to when some background tasks like fetching data from the server is initiated, and inform user to wait for the job to complete.
.HideProgress
VTAP.Utility.HideProgress() - This is used to hide the progress bar initiated by ShowProgress API.
.ShowRecordPreview
This API lets you see the preview of a CRM record, given you have crm ID and the name of the module.
| id | string | This is the CRM record ID. |
| module | string | Module name |
VTAP.Utility.ShowRecordPreview('1234', 'Contacts')
.ShowRecordCreate
VTAP.Utility.ShowRecordCreate(record,module,callback)
Shows a quickcreate popup modal
| record | object | Here we need to send params to which quickcreate modal fields will be populated with that data |
| module | string | Module name |
| callback | function | user handler function |
VTAP.Utility.ShowRecordCreate(
        {'fieldname':'fieldvalue'},
        'MODULENAME',
        ()=>{}
);

var MYMODULE_Component_ComponentName = VTAP.Component.Core.extend({
    //Here record is injected by the VTAP framework.
    props : ['record'],
    created() {
        var showRecordCreate = ()=>{
            VTAP.Utility.ShowRecordCreate(this.record,'MODULENAME',()=>{});
        };
        VTAP.Component.Register('DETAIL_BASIC_BUTTON',
                                {label:'Custom',
                                icon:'fa-pencil',
                                variant:'primary',
                                clickHandler : showRecordCreate
                            }, '', {module:'MODULENAME'});
   }
});
.ShowRecordEdit
VTAP.Utility.ShowRecordEdit(record,module,callback)
Shows a edit popup modal of a record
| record | object | Vtiger_Record_Model object |
| module | string | Module name |
| callback | function | user handler function |
let record = Vtiger_Record_Model.getCleanInstance();
record.set('id', '12345');

VTAP.Utility.ShowRecordEdit(record, 'Contacts', () => {
    //callback function
});
.ShowRecordDelete
VTAP.Utility.ShowRecordDelete(record_id,module)
Shows a delete popup confirmation of a record.
| record_id | number | Vtiger_Record_CRMID |
| module | string | Module name |
VTAP.Utility.ShowRecordDelete(record_id, 'Contacts', () => {
    //callback function
});
VTAP.List
Provides helper function to work on List View Page.
.Records
VTAP.List.Records() returns current record objects available in the list page.
Returns void
.NextPageExist
VTAP.List.NextPageExist() - checks if there are records in the next page.
Returns
| Boolean | Returns true if records exists in next page, if not then returns false |
.PrevPageExist
VTAP.List.PrevPageExist() : checks if there are records in the previous page.
Returns
| Boolean | Returns true if records exists in previous page else returns false |
.NextPage
VTAP.List.NextPage() : moves the current page to the next page.
Returns void
.PreviousPage
VTAP.List.PreviousPage() : moves the current page to the previous page if it exists.
Returns void
.Reload
VTAP.List.Reload() : reloads the current page, all the meta data are retained like page, search, ordering etc. It only reloads the list page records not the entire page.
Returns void
.Search
VTAP.List.Search(searchobject) : It searches for the search string, you can search for multiple fields. It searches for those fields that are available in the UI.
Parameters
| searchObject | object | javascript map of fieldname and search string. |
VTAP.List.Search({'firstname':'John', 'lastname':'wick'})
.ClearSearch
VTAP.List.ClearSearch() : It will remove all the search values applied for all the fields.
Returns void
.Sort
VTAP.List.Sort(fieldname, order) : It will sort the list page with the fieldname.
Parameters
| fieldname | string | Name of the field on which sort has to be applied |
| order | string | 'asc' for ascending order, 'desc' for descending order. (default=desc) |
.SelectedRecords
VTAP.List.SelectedRecords() : It gives a list of records selected in the list page.
Returns
| Promise | Returns Promise function, use a handler to get the list of records. |
VTAP.List.SelectedRecords().then( (records) => {
    console.log(records);
});
VTAP.Detail
Provides helper functions to work with Detail View Page.
.Id
VTAP.Detail.Id() : If you are in the detail page, then it returns record id.
Returns
| integer | it returns record id |
.Module
VTAP.Detail.Module() : This function returns the name of the module.
| string | it returns module name |
.Record
VTAP.Detail.Record() : It returns a current record object.
Returns
| Promise | It returns Promise function, use handler to get record object |
VTAP.Detail.Record().then( (record) => {
        //record is of type Vtiger_Record_Model
})
.RefreshRecord
VTAP.Detail.RefreshRecord() : This function is used to refresh the record in detail view when any PUT or POST action is performed.
VTAP.Detail.RefreshRecord();
.Relations
VTAP.Detail.Relations() : This function returns all the relationship meta with the current record(module).
Returns
| Promise | It returns Promise function, use handler to get relation objects |
VTAP.Detail.Relations().then( (relations) => { });
.Relation
VTAP.Detail.Relation(module) : Use this function to get relation meta for a particular module.
Parameters
| module | string | module name of the relation |
Returns
| Promise | It returns Promise function, use handler to get relation object |
VTAP.Detail.Relation('Contacts').then( (relations) => { });
.RelatedRecords
VTAP.Detail.RelatedRecords(module, filterobject) : It returns related records of the current record.
Parameters
| module | string | module name of the relation |
| filterobject | object | filterobject lets you set a page, filter conditions etc. |
| extrafields | array | Use this parameter to include extra fields beyond the default ones, such as fields that are not enabled for Quick Create, Header, etc. You can include the label field to fetch the record's name in the API's response. |
Returns
| Promise | It returns Promise function, use handler to get filtered records |
VTAP.Detail.RelatedRecords('Contacts', {page : 2, filter : [] }).then(
(records) => {
    console.log(records);
});
Assume you are working with the Contacts module and want to retrieve related Case records that include fields such as casechannel and slastatus, which are not part of the default response. You can now easily include these fields in your API request.
VTAP.Detail.RelatedRecords("Cases", { 'extrafields': ['casechannel', 'slastatus'] })
.then((case_records) => {
    // Process the retrieved case records with extra fields
});
When fetching related Case records, you might want to include the record's name for easy identification. Simply pass label as an additional field.
VTAP.Detail.RelatedRecords("Cases", { 'extrafields': ['label'] })
.then((case_records) => {
    // The response now includes the label (name) of each case
});
.RelatedRecordsCount
VTAP.Detail.RelatedRecordsCount(module, filterobject) : It gives you total records available in the relation.
Parameters
| module | string | module name of the relation |
| filterobject | object | filterobject lets you set filter conditions etc. |
Returns
| Promise | It returns Promise function, use handler to get filtered records |
VTAP.Detail.RelatedRecordsCount('Contacts', {filter : [ ] }).then( (count) => { });
.ShowRelatedRecordCreate
VTAP.Detail.ShowRelatedRecordCreate(record,module,callback) : It opens QuickCreateRelatedModal popup and allows to create related records
| record | object | Get detail recordmodel send as record object ,you can see here for reference |
| module | string | Related Module name |
| callback | function | user handler function |
var MYMODULE_Component_DetailButton = VTAP.Component.Core.extend({
    var showRelatedRecordCreate = ()=>{
        VTAP.Detail.Record().then((record)=>{
                    VTAP.Detail.ShowRelatedRecordCreate(record,'Tasks',()=>{});
            })
    };
    VTAP.Component.Register('DETAIL_BASIC_BUTTON',
                                {label:'Custom',
                                icon:'fa-pencil',
                                variant:'primary',
                                clickHandler : showRelatedRecordCreate
                            }, '', {module:'Deals'});
});
VTAP.Modules
Provides helper function to get access to module meta information on any page.
VTAP.Modules.CurrentModuleName
VTAP.Modules.CurrentModuleName() : returns current module name.
Returns
| string | module name |
VTAP.Modules.CurrentModuleModel
VTAP.Modules.CurrentModuleModel() : It returns current module meta information.
Returns
| Promise | It returns Promise function, use handler to get module object |
VTAP.Modules.CurrentModuleModel().then( (moduleObject) => { });
VTAP.Modules.GetModule
VTAP.Modules.GetModule(modulename) : It returns module meta information for passed modulename.
Parameters
| modulename | string | name of the module |
Returns
| Promise | It returns Promise function, use handler to get module object |
VTAP.Modules.GetModule('Contacts').then( (moduleObject) => { })
VTAP.Modules.GetAll
VTAP.Modules.GetAll() : It returns list of accessible modules
Returns
| Promise | It returns Promise function, use handler to get module list |
VTAP.Modules.GetAll().then( (moduleList) => { });
VTAP.Api
Provides helper functions to interact with core product APIs. For more details on see here
VTAP.Api.Get
VTAP.Api.Get(uri, parameters, callback) : Performs get request on the uri and returns the response to the callback handler.
Parameters
| uri | string | unique server resources, see here for the list |
| parameters | object | parameters required for the uri, it is to be given in key-value format |
| callback | function(error, success) | handler function gets response from server |
Example: To retrieve record information
VTAP.Api.Get('records', {id : VTAP.Detail.Id(),
  module : VTAP.Detail.Module()}, (error, response) => {
    //response has record data
});
VTAP.Api.Post
VTAP.Api.Post(uri, parameters, callback) : It is used to add new resources to the server.
| uri | string | unique server resources, see here for the list |
| parameters | object | parameters required for the uri, it is to be given in key-value format |
| callback | function(error, success) | handler function gets response from server |
Example : To add a Contact record
VTAP.Api.Post('records', {module : 'Contacts', firstname : 'John', 'lastname' : 'Wick', 'email' : 'john@wick.com'}, (error, response) => {
    //response will have record data
});
VTAP.Api.Put
VTAP.Api.Put(uri, parameters, callback) : It updates an existing resource on the server.
| uri | string | unique server resources, see here for the list list |
| parameters | object | parameters required for the uri, it is to be given in key-value format |
| callback | function(error, success) handler function gets response from server |
Example: To update Contact record, id is the record crmid or the id you see in the url of detail page.
VTAP.Api.Put('records', {module : 'Contacts', id : '123', 'email' : 'newjohn@newwick.com'}, (error, response) => {
    //response will have record data
});
VTAP.Api.delete
VTAP.Api.delete(uri, parameters, callback) : This function deletes a resource on the server.
| uri | string | unique server resources, see here for the list |
| parameters | object | parameters required for the uri, it is to be given in key-value format |
| callback | function(error, success) | handler function gets response from server |
Example: To delete a Contact record.
VTAP.Api.Delete('records', {module : 'Contacts', id : '123'}, (error, response) => { });
VTAP.CustomApi
Provides helper functions to invoke API defined through API Designer using logged in user context. Signature of the functions are similar to VTAP.Api scope.
VTAP.CustomApi.Get
VTAP.CustomApi.Get(uri, parameters, callback) : Performs get request on the uri and returns the response to the callback handler.
| uri | string | unique server resources created from API Designer |
| parameters | object | parameters required for the uri, it is to be given in key-value format |
| callback | function(error, success) | handler function gets response from server |
Example: To retrieve weather of a Mailing City of a Contact (get_weather added from Api Designer)
VTAP.Detail.Record().then( (record) => {
    VTAP.CustomApi.Get('get_weather', {'city' : record.mailingcity},
        (error, response) => {
            //response has record data
        });
});
VTAP.Event
Provides helper functions register, unregister and listen on Vtiger UI Events.
VTAP.Event.Register
VTAP.Event.Register(eventname, handlerName) : It allows you to register for vtiger events or custom events.
| eventname | string | name of the event, list of supported events are here |
| handlerName | function | handler function |
Example: To listen for detail preview popup to show up.
function handler() { }
VTAP.Event.Register('DETAIL_PREVIEW_SHOWN', handler);
VTAP.Event.DeRegister
VTAP.Event.DeRegister(eventname, handlerName) : You can de-register for events that you have registered with the Event.Register API. Parameters and return type are the same as the Register API.
Example :
function handler() { }

VTAP.Event.DeRegister('DETAIL_PREVIEW_SHOWN', handler);
VTAP.Event.Trigger
VTAP.Event.Trigger(eventname, data) : You can trigger custom events using this API, generally used when you have custom buttons, links and widgets.
| eventname | string | name of the event, list of supported events are here |
| data | object | key value pair of data that you want to send to the listening handler. |
Example: To trigger a custom event on a page..
VTAP.Event.Trigger('MY_CUSTOM_EVENT', ({"id":VTAP.Detail.Id(), "module":VTAP.Detail.Module()});
VTAP.Notification
Provides helper functions to work with real-time notifications.
VTAP.Notification.Trigger
VTAP.Notification.Trigger(module, data) : This is used to send real-time notification from client-side to other connected users on the same module.
| module | string | name of the module |
| data | object | key value pair of data that you want to send to the listening handler. |
Example: To trigger notification on Contact Detail View for all connected users.
VTAP.Notification.Trigger('Contacts', ({"id":VTAP.Detail.Id(), "user_name":VTAP.User().user_name, "mode":"accessed"});
Example: To trigger notification on Contact Detail View for only specific connected users.
VTAP.Notification.Trigger('Contacts', ({"id":VTAP.Detail.Id(), "user_name":VTAP.User().user_name, "mode":"accessed","users": [1, 6]});
VTAP.Notification.Listen
VTAP.Notification.Listen(module, callback): This helps you listen on the event notification sent using VTAP.Notification.Trigger api.
| module | string | name of the module |
| callback | function | user handler function |
Example: To listen to notification triggers.
VTAP.Notification.Listen('Contacts', (data) => {
    //data has the custom info send from Notification.Trigger api
});
VTAP.AppData
VTAP.AppData.Save(module, data, callback) : It saves the data for the module.
| module | string | name of the module |
| data | object | data_key is used to store the key and data_value is where actual data is stored. Use onlyadmin flag to allow only admins to read/write. Ex : ({"data_key":"secret", "data_value":"wrfs3fr","onlyadmin":true}) |
| callback | function | user handler function |
Example:
VTAP.AppData.Save("my_extension_name", {"data_key" : "username", "data_value" : "something@email.com"}, (error, success) => {

});
.Get
VTAP.AppData.Get(module, data, callback) : This is used to fetch the app data that is stored using VTAP.AppData.Save api.
| module | string | name of the module |
| data | object | data_key is used to retrieve the key. Ex : ({"data_key":"secret"}) |
| callback | function | user handler function |
VTAP.AppData.Get("my_extension_name", {"data_key":"username"},
(error, success) => {

});
.Delete
VTAP.UserData.Delete(module, data, callback) : It will delete the data saved by UserData.Save api.
VTAP.UserData.Delete("extension_name", {"data_key" : "conversation", "id" : "23"}, (error, success) => {

});
VTAP.Resource
Provides helper functions to include external resources like Javascript libraries, style sheets.
.Require
VTAP.Resource.Require(path, type) : This will let you add external resources to use them in your components.
| path | String | Path to external script |
| type | String | Default value is “script”, if you are including style sheets then set type as “style” |
VTAP.Resource.Require('https://unpkg.com/leaflet@1.6.0/dist/leaflet.js');
Note: Before using any resource you need to whitelist the domain in Module Designer > Settings > Add Domain
VTAP.OAuth
Provides a helper function to gather the OAuth grant from the user of the application to further interact with APIs of third-party-services (setup through API designer).
.Authorize
This will open up the service that is registered for the module. This depends on the oauth client app that you have registered in your application.
Any OAuth needs an client app to be registered, this setup is generally done by the administrators. Admins will be first prompted to provide client details like Client ID, Client Secret, Auth URL, Token URL and Scopes. Refer the screenshot here, once the setup is done then only other users will be able to use it.
After saving the details, if they are correct then we will redirect and open popup requesting grant from the target application.
| service | String | name of the service |
| module | String | name of the module |
| callback | function | user handler function |
VTAP.OAuth.Authorize("3PService", "Contacts", (error, success) => {

});
.IsAuthorized
Checks if a service is already authorized or not.
VTAP.OAuth.IsAuthorized("3PService", "Contacts", (response) => {
    if(response.authorized) {
    //user has authorized
    }
});
.Revoke
Removes oauth tokens which has earlier obtained using Authorize api.
VTAP.OAuth.Revoke("3PService", "Contacts", (response) => {
});
.ShowAuthClientDetailsPopup
Show oauth client app details which was earlier saved by admins. This should generally be used when admins wants to change client secret or scopes.
VTAP.OAuth.ShowAuthClientDetailsPopup("3PService", "Contacts");
VTAP.OAuth.DeleteAuthClientDetails
Revokes a oauth client app details which was earlier saved by admins.
VTAP.OAuth.DeleteAuthClientDetails("3PService", "Contacts").then((success){
    //success
}, (error) => {
    //failure
});
VTAP.Field
This object exposes api's that will help you add custom behaviour on the Vtiger Fields. Fields are pieces of information which make a CRM record. For example Contact first name, last name, Company Name are considered as field in Vtiger.
VTAP.Field.RegisterValidator
This API lets you register custom field validation. You may want to avoid your agents making mistakes of filling incorrect values in the CRM. For example, VAT number should be strictly 16 character length, or tracking shipping delivery code should
| fieldname | String | name of the field where custom validation should be applied |
| module | String | name of the module |
| handlerFunction | function | the function will have the logic to decide the validation rules, and returns true/false |
| errorHandler | function | returns the error message that should be shown when validation fails. |
//Adding validation for Contact's First name to be not empty.
VTAP.Field.RegisterValidator('firstname','Contacts', (value) => {
    if(value == '') {
        return false;
    }
}, (error) => {
    return "First name cannot be empty";
});

//Adding validation for Contact's Mobile number cannot be less than 10 digit
VTAP.Field.RegisterValidator('mobile','Contacts', (value) => {
    if(value.length < 10) {
        return false;
    }
}, (error) => {
    return "Mobile should be atleast 10 digits!!";
});
VTAP.Field.RegisterValidatorForType
This API will enable you to add validation for field type. For instance if you want to add same validation to all the email fields, or phone fields or url fields then you need to use this field. Another example is you want to avoid adding any email address in any of the email field with gmail.com/outlook.com in Contacts module. The definition of the API is same as RegisterValidator, except the first argument is field type instead of field name.
| fieldtype | String | field type like 'email', 'phone', 'url', 'multicurrency', 'picklist', 'text', 'boolean', 'percentage', 'richtext', 'image', 'file', 'metricpicklist', 'grid', 'datetime', 'radio', 'anniversary', 'owner' |
| module | String | name of the module |
| handlerFunction | function | the function will have the logic to decide the validation rules, and returns true/false |
| errorHandler | function | returns the error message that should be shown when validation fails. |
//Adding validation for Contact's First name to be not empty.
VTAP.Field.RegisterValidatorForType('email','Contacts', (value) => {
    if(value != '' && value.indexOf('gmail.com') !== -1) {
        return false;
    }
}, (error) => {
    return "We do not accept gmail addresses";
});

//Adding validation for Contact's Mobile number cannot be less than 10 digit
VTAP.Field.RegisterValidatorForType('phone','Contacts', (value) => {
    if(value.length < 10) {
        return false;
    }
}, (fieldLabel) => {
    return fieldLabel+" should be atleast 10 digits!!";
});
Component Types
| Type | Description | Example |
|---|---|---|
| LIST_ADD_VIEWTYPE | Add custom views like kanban, calendar view in list view. | VTAP.Component.Register('LIST_ADD_VIEWTYPE', {name : 'ChartView', icon : 'fa-barchart', 'label' : Chart View'}); Note : Once added it will search for a component named “ChartView”, you need to register component Vtiger_Component_ChartView = VTAP.Component.Core.extend({ }); To understand the typical structure of a vtiger component click here |
| LIST_ADVANCED_SETTING | In the List page we show settings icons next to navigation for admins, your custom option will be available here. Generally used to store extension settings. | VTAP.Component.Register('LIST_ADVANCED_SETTING', {name : 'Workflows', clickHandler : () => { } }); |
| LIST_BASIC_BUTTON | Add a custom button in the list page next to the Add Record button. | VTAP.Component.Register('LIST_BASIC_BUTTON', {label:'Custom', icon:'fa fa-pencil', varient:'btn btn-primary', clickHandler: () => { } }, '', {module:'Contacts'}); For icon you can use any font awesome icon class, and for varient you can use any bootstrap button class. clickHandler is a function. |
| LIST_ROW_BASIC_ACTION | Every list row has actions on the right side, your component can add any element but recommended is an icon. | VTAP.Component.Register('LIST_ROW_BASIC_ACTION', {icon:'fa fa-plus',label:'Send email',clickHandler: () => {}}, '', {module:'Contacts'}); |
| LIST_ROW_SECONDARY_ACTION | Your component will add an action to the left side of every row in the list page after the star action. | VTAP.Component.Register('LIST_ROW_SECONDARY_ACTION', {icon:'fa fa-plus',label:'Send email',clickHandler: () => {}}, '', {module:'Contacts'}); |
| LIST_MASS_ACTION | It will add an icon in the list view mass actions. | VTAP.Component.Register('LIST_MASS_ACTION', {icon:'fa-pencil',name:'Edit',clickHandler:()=>{},showHandler:()=>{}}, false, {module:'Contacts'}); |
| GLOBAL_ACTION | It will add a component at the top of the page where search and other actions are available. These actions will be available in all the pages. | VTAP.Component.Register('GLOBAL_ACTION', {icon:'fa fa-plus',label:'Send email',clickHandler: () => {}}, '', FILTER); |
| DETAIL_ONEVIEW_WIDGET | It will let you add widget in One view related tab of the detail page | VTAP.Component.Register('DETAIL_ONEVIEW_WIDGET', {}, VTAP.Component.Load('NAME','MODULE'), FILTER); |
| DETAIL_MORE_ACTION_ITEM | Add custom actions from 3 dots on the top right side of the detail page. | VTAP.Component.Register('DETAIL_MORE_ACTION_ITEM', {icon:'fa fa-plus',label:'Send email',clickHandler: () => {}}, '', FILTER); |
| DETAIL_BASIC_BUTTON | Add a button in detail view header where other actions are available. | VTAP.Component.Register('DETAIL_BASIC_BUTTON', {label:'Custom', icon:'fa fa-pencil', varient:'btn btn-primary', clickHandler: () => { } }, '', FILTER); |
| DETAIL_ACTION_ICON | Add an actionable icon in more actions(3 dots) in the detail page. | VTAP.Component.Register('DETAIL_ACTION_ICON', {name:'',icon:'',showHandler:() => {},clickHandler: () => {}}, '', FILTER); |
| DETAIL_HEADER_WIDGET | Add component in the detail page header. | VTAP.Component.Register('DETAIL_HEADER_WIDGET', {}, VTAP.Component.Load("COMPONENT_NAME","MODULENAME"), FILTER); |
| DETAIL_RELATED_RECORD_ACTION | Add a custom action for records appearing in the related list. | VTAP.Component.Register('DETAIL_RELATED_RECORD_ACTION', {icon:'fa fa-plus',label:'Send email',clickHandler: () => {}}, '', FILTER); |
| DETAIL_MORE_ACTION_ACTIVITY_ITEM | Add custom action under the detail page with more actions, inside “Reach out now” section. | VTAP.Component.Register('DETAIL_MORE_ACTION_ACTIVITY_ITEM', {icon:'fa fa-plus',label:'Send email',clickHandler: () => {}}, '', FILTER); |
| DETAIL_SUMMARY_WIDGET | Add custom widget in detail page summary view. | VTAP.Component.Register('DETAIL_SUMMARY_WIDGET', {}, VTAP.Component.Load('NAME','MODULE'), FILTER); |
Event Types
List of UI Events triggered from core / custom components on different pages.
| Type | Description | Example |
|---|---|---|
| DETAIL_PREVIEW_SHOWN | When record detail preview popup is shown. | VTAP.Event.Register('DETAIL_PREVIEW_SHOWN', (data) => { }); |
| DETAIL_PREVIEW_HIDDEN | When record detail preview popup is hidden. | VTAP.Event.Register('DETAIL_PREVIEW_HIDDEN', (data) => { }); |
| DETAIL_ALLFIELDS_SHOWN | When record detail page all field popup is shown. See here. | VTAP.Event.Register('DETAIL_ALLFIELDS_SHOWN', (data) => { }); |
| DETAIL_ALLFIELDS_HIDDEN | When record detail page all fields popup is hidden. | VTAP.Event.Register('DETAIL_ALLFIELDS_HIDDEN', (data) => { }); |
| EDIT_MODAL_SHOWN | When record edit page is shown. | VTAP.Event.Register('EDIT_MODAL_SHOWN', (data) => { }); |
| EDIT_MODAL_HIDDEN | When record edit page is hidden. | VTAP.Event.Register('EDIT_MODAL_HIDDEN', (data) => { }); |
| CREATE_MODAL_SHOWN | When record create page is shown. | VTAP.Event.Register('CREATE_MODAL_SHOWN', (data) => { }); |
| RECORD_CREATED | When record is created from any where inside the crm. | VTAP.Event.Register('RECORD_CREATED', (module, record) => { }); |
| RECORD_UPDATED | When record is updated from any where inside the crm. | VTAP.Event.Register('RECORD_UPDATED', (module, record) => { }); |
| RECORD_SAVED | When you want to listen to both record created/updated from any where inside the crm. | VTAP.Event.Register('RECORD_SAVED', (module, record) => { }); |
| RECORD_DELETED | This event is triggered after record is deleted. This is triggered from detail page. | VTAP.Event.Register('RECORD_DELETED', (module, id) => { }); |
| MASS_RECORD_DELETED | This event is triggered after multiple records are deleted from list page. | VTAP.Event.Register('MASS_RECORD_DELETED', (module, ids) => { }); |
| ONE_VIEW_RELOAD | You can refresh one view related lists by triggering this event. This should be done after you add/update record from one view section. | VTAP.Event.Trigger('ONE_VIEW_RELOAD'); |
| EVENT_SHOW_INVITEES | Triggers the display of the Invitees block. | VTAP.Event.Trigger('EVENT_SHOW_INVITEES'); |
| EVENT_HIDE_INVITEES | Hides the Invitees block. | VTAP.Event.Trigger('EVENT_HIDE_INVITEES'); |
In-App API's
records
GET
VTAP.Api.Get(uri, parameters, callback) fetches all the records for the specified module.
| uri | string | records |
| parameters | object | {"module": "moduleName"} |
| callback | function(error, success) | handler function gets response from server |
Parameters
| Name | Type | Description |
|---|---|---|
| module (mandatory) | String | name of the module |
| id | Integer | id of the record |
| filterid | Integer | id of the filter, if filterid and id is not provided then default user filter is taken and filter records will be returned |
| page | Integer | page number when filterid is used |
| pagelimit | Integer | number of records in the filter to be returned |
| sortfield | String | name of the field |
| sortorder | String | "ASC" for Ascending or "DESC" for Descending |
| fields | String | field names separated by commas |
Example : To fetch all the records of the Tasks Module
VTAP.Api.Get("records", {
    "module": "Tasks" // module Name
}, (error, response) => {
    if (error) {
        console.error("Error:", error);
    }
});
Example : To fetch the most recently updated records
VTAP.Api.Get("records", {
     "module": "Quotes",
     "pagelimit":"5",
     "sortfield":"modifiedtime",
     "sortorder":"DESC"
    }, (error, response) => {
      console.log(response)
});
POST
VTAP.Api.Post(uri, parameters, callback) helps create records.
| uri | string | records |
| parameters | object | {"module": "moduleName", "fieldname": "value"} |
| callback | function(error, success) | handler function gets response from server |
NOTE: Values for the mandatory fields of the record has to be provided
Example : To create a record for the Conatcts Module
VTAP.Api.Post("records", {
    "module": "Contacts",
    "lastname": "xxx", // mandatory field
    "firstname": "yyy",
    "email": "test@gmail.com",
    "phone": "",
    "contacttype": "Lead" // mandatory field
}, (error, response) => {
    if (error) {
        console.error("Error:", error);
    }
});
PUT
VTAP.Api.Put(uri, parameters, callback) helps update an existing record.
| uri | string | records |
| parameters | object | {"id": "", "module": "moduleName", "fieldname": "value"} |
| callback | function(error, success) | handler function gets response from server |
Example:
VTAP.Api.Put("records", {
    "id": "", // recordID you want to update
    "module": "Contacts", // module Name
    "firstname": "www", // add the fields with their values that you want to update
    "mobile": ""
}, (error, response) => {
    if (error) {
        console.error("Error:", error);
    }
});
DELETE
VTAP.Api.Delete(ur, parameters, callback) helps delete the specfied record.
| uri | string | records |
| parameters | object | {"id": "", "module": "moduleName"} |
| callback | function(error, success) | handler function gets response from server |
Example:
VTAP.Api.Delete("records", {
    "id": "964",
    "module": "Contacts"
}, (error, response) => {
    if (error) {
        console.error("Error:", error);
    }
});
Line Items Create, Update and Delete
To manage line items in VTAP API for updating records, you must follow a specific format when adding or deleting items. Here's how you can handle adding and deleting line items for a Quote record in VTAP API.
Creating Line Items for a new Quotes Record
- Construct the payload: Include all the mandatory fields required for Quotes, and new line items in the payload.
- Pass totalProductCount: The payload should include the totalProductCount parameter to indicate the number of line items.
let newRecord = {
    module: 'Quotes',
    subject: 'New Quote with Multiple Items',
    quotestage: 'New',
    bill_street: 'Banglore',
    ship_street: 'Banglore',
    // First line item
    hdnProductId1: '<product_record_id>',
    productName1: '<product_name>',
    comment1: '',
    qty1: 2,
    listPrice1: 400,
    // Second line item
    hdnProductId2: '<product_record_id>',
    productName2: '<product_name>',
    comment2: '',
    qty2: 2,
    listPrice2: 400,
    totalProductCount: 2
}
Send Request Using VTAP Api
VTAP.Api.Post('records', newRecord, (error, response) => {
    if (error) {
        console.error("Error creating record with line items:", error);
    } else {
        console.log("Record created with line items successfully:", response);
    }
});
Updating Line Items
- Fetch existing line items: First, retrieve all existing line items for the Quote record.
- Construct the payload: Include all existing line items in the payload, appending the new line item details sequentially.
- Pass totalProductCount: The payload should include the totalProductCount parameter to indicate the number of line items.
Assume you already have the existing line item details
let existingLineItems = {
    hdnProductId1:’<product_record_id>’,
    productName1: '<product_name>',
    comment1: '',
    qty1: 1,
    listPrice1: 700.00
};
Add a new line item to the existing Quote record
let newLineItem = {
    hdnProductId2: ‘<product_record_id>’,
    productName2: '<product_name>',
    comment2: '',
    qty2: 5,
    listPrice2: 500.00
};
Combine existing and new line items
let params = {
    module: 'Quotes',
    id: quoteId, // replace with the actual Quote ID
    // add existingLineItems,
    // add newLineItem,
    totalProductCount: 2 // Update this count as per the total number of line items
};
Send the request using VTAP API
VTAP.Api.Put('records', params, (error, response) => {
    if (error) {
        console.error("Error adding line item:", error);
    } else {
        console.log("Line item added successfully:", response);
    }
});
Update Line Items With Taxes, Charges and TaxRegions
Taxes
To update Taxes you can follow these steps :
- Use decribe core api to fetch the specific inventory module describe details.
- In the API response, you can locate all taxes-related information under the "taxes" key.
There are two Tax Modes that can be applied while adding line items : Group and Individual
- For Group Tax Mode
Construct the payload
let updateRecord = {
    module: 'Quotes',
    id: '', // record ID

    // Update line item
    hdnProductId1: '<product_id>',
    productName1: '<product_name>',
    qty1: 1,
    listPrice1: 500,

    // additional item details
    region_id: '1', // tax_region Id
    taxtype: 'group', // tax-mode
    currency_id: '1', // currency

    // group-tax-mode values
    tax4_group_percentage: 6, // the number 4 refers to that particular Taxes Id
    tax4_group_amount: 30,
    tax5_group_percentage: 7,
    tax5_group_amount: 40,
    tax6_group_percentage: 6,
    tax6_group_amount: 30,

    // total line items that are present
    totalProductCount: 2
}
Update the record
VTAP.Api.Put('records', updateRecord, (error, response) => {
    if (error) {
        console.error("Error creating record with line items:", error);
    } else {
        console.log("Record updated with line items successfully:", response);
    }
});
- For Individual Tax Mode
Construct the payload
let updateRecord = {
    module: 'Quotes',
    id: '', // record ID

    // addtional item details
    region_id: '1', // tax_region Id
    taxtype: 'individual', // tax-mode
    currency_id: '1', // currency


    // Existing line item
    hdnProductId1: '<product_id>',
    productName1: '<product_name>',
    qty1: 1,
    listPrice1: 500,
    // individual tax for product 1
    tax4_percentage1: 6, // the number 4 refers to that particular Taxes Id

    // New line item
    hdnProductId2: '616',
    productName2: 'Sugar BodyLotion',
    qty2: 1,
    listPrice2: 300,
    // individual tax for product 2
    tax4_percentage2: 6,

    // total line items that are present
    totalProductCount: 2
}
Update the record
VTAP.Api.Put('records', updateRecord, (error, response) => {
    if (error) {
        console.error("Error creating record with line items:", error);
    } else {
        console.log("Record updated with line items successfully:", response);
    }
});
Charges
To update Charges you can follow these steps :
- Use decribe core api to fetch the specific inventory module describe details.
- In the API response, you can locate all charges-related information under the "chargesAndItsTaxes" key.
Construct the payload
let updateRecord = {
    module: 'Quotes',
    id: '', // record Id
    region_id: '1',
    taxtype: 'individual',
    // update Existing line item
    hdnProductId1: '601',
    productName1: 'Percy Jackson and The Lightening Thief Book',
    qty1: 1,
    listPrice1: 400,
    // Update with Charges Values
    "charges[4][name]": "Shipping & Handling",
    "charges[4][format]": "Flat",
    "charges[4][taxes][5]": 6, // Taxes On Charges : charges[charge_id][taxes][tax_id]
    "charges[4][deleted]": 0,
    "charges[4][type]": "Fixed",
    "charges[4][chargesByRegion][default]": 10.0,
    "charges[4][calculation]": "Simple",
    "charges[4][value]": 9.00,  // Charge : charges[charge_id][value]
    totalProductCount: 1
}
Upadate the record
VTAP.Api.Put('records', updateRecord, (error, response) => {
    if (error) {
        console.error("Error creating record with line items:", error);
    } else {
        console.log("Record updated with line items successfully:", response);
    }
});
TaxRegions
To update TaxRegions you can follow these steps :
- Use decribe core api to fetch the specific inventory module describe details.
- In the API response, you can locate all taxregions-related information under the "tax_regions" key.
Construct the payload
let newRecord = {
module: 'Quotes',
id: '', // record Id
region_id: '13', // tax_region Id
taxtype: 'individual',
// update Existing line item
hdnProductId1: '601',
productName1: 'Percy Jackson and The Lightening Thief Book',
qty1: 1,
listPrice1: 400,
totalProductCount: 1
}
Construct the payload
VTAP.Api.Put('records', newRecord, (error, response) => {
if (error) {
consolerecords/records/.error("Error creating record with line items:", error);
} else {
console.log("Record updated with line items successfully:", response);
}
});
Deleting Line Items
- Fetch existing line items: Get all current line items of the record.
- Remove the line item you wish to delete: Modify the list by excluding the line item you want to delete.
- Update totalProductCount: Adjust the count to reflect the new number of line items.
Fetch existing line items and filter out the items you want to remove
let lineItems = {
hdnProductId1:’<product_record_id>’,
productName1: '<product_name>',
comment1: '',
qty1: 1,
listPrice1: 700.00,
hdnProductId2: ’<product_record_id>’,
productName2: '<product_name>',
comment2: '',
qty2: 5,
listPrice2: 500.00
};
Suppose we want to delete the second line item
delete lineItems.hdnProductId2;
delete lineItems.productName2;
delete lineItems.comment2;
delete lineItems.qty2;
delete lineItems.listPrice2;
Updated payload with the remaining line items
let updatedPayload = {
module: 'Quotes',
id: quoteId, // replace with the actual Quote ID
// add lineItems,
totalProductCount: 1 // Update the count as needed
};
Send the updated request
VTAP.Api.Post('records', updatedPayload, (error, response) => {
if (error) {
console.error("Error deleting line item:", error);
} else {
console.log("Line item deleted successfully:", response);
}
});
relations
GET
VTAP.Api.Get(uri, parameters, callback) helps retrieve the relation details of the specified module with other modules.
| uri | string | relations |
| parameters | object | {"module": "moduleName"} |
| callback | function(error, success) | handler function gets response from server |
Example:
VTAP.Api.Get("relations", {
"module": "" // module Name
}, (error, response) => {
if (error) {
console.error("Error:", error);
}
});
records/relationrecords
GET
VTAP.Api.Get(uri, parameters, callback) helps fetch all the records which are related to the specified module.
| uri | string | records/relationrecords |
| parameters | object | {"module": "moduleName", "id": "", "relationid": ""} |
| callback | function(error, success) | handler function gets response from server |
Example : To fetch all the related records of the Module specified(relationid) and Contacts
VTAP.Api.Get("records/relationrecords", {
"module": "Contacts", // module Name
"id": "", // Contacts recordID
"relationid": "" // Contacts - Module relationID
}, (error, response) => {
if (error) {
console.error("Error:", error);
}
});
POST
VTAP.Api.Post(uri, parameters, callback) helps link two existing records.
| uri | string | records/relationrecords |
| parameters | object | {"module": "moduleName", "id": "", "relation_id": "", "related_module": "", "related_record_id": ""} |
| callback | function(error, success) | handler function gets response from server |
Example : To link Contacts-Cases records
VTAP.Api.Post("records/relationrecords", {
"module": "Contacts",
"id": "", // Contacts recordID
"relation_id": "", // Contacts-Cases relationID
"related_module": "Cases",
"related_record_id": "" // Cases recordId
}, (error, response) => {
if (error) {
console.error("Error:", error);
}
});
DELETE
VTAP.Api.Delete(uri, parameters, callback) helps un-link the linked records between the specified modules.
| uri | string | records/relationrecords |
| parameters | object | {"module": "moduleName", "id": "", "relation_id": "", "related_module": "", "related_record_id": ""} |
| callback | function(error, success) | handler function gets response from server |
Example :
VTAP.Api.Delete("records/relationrecords", {
"module": "Contacts",
"id": "", // Contacts recordID
"relation_id": "", // Contacts-Cases relationID
"related_module": "Cases",
"related_record_id": "" // Cases recordId
}, (error, response) => {
if (error) {
console.error("Error:", error);
}
});
records/count
GET
VTAP.Api.Get(uri, parameters, callback) gives a count of the number of records present in that module.
| uri | string | records/count |
| parameters | object | {"module": "moduleName"} |
| callback | function(error, success) | handler function gets response from server |
Example :
VTAP.Api.Get("records/count", {
"module": "", // Module Name
}, (error, response) => {
if (error) {
console.error("Error:", error);
}
});
records/findduplicates
GET
VTAP.Api.Get(uri, parameters, callback) fetches all the records that have same field's values for a particular module.
| uri | string | records/findduplicates |
| parameters | object | {"module": "moduleName", "fields": ["",""]} |
| callback | function(error, success) | handler function gets response from server |
Example : Fetches all records having the same firstname.
VTAP.Api.Get("records/findduplicates", {
"module": "Contacts",
"fields": ["firstname"]
}, (error, response) => {
if (error) {
console.error("Error:", error);
}
});
records/globalsearch
GET
VTAP.Api.Get(uri, parameters, callback) helps you find anything from anywhere in Vtiger CRM.
| uri | string | records/findduplicates |
| parameters | object | {"module": "moduleName", "value": ""} |
| callback | function(error, success) | handler function gets response from server |
Example :
VTAP.Api.Get("records/globalsearch", {
"module": "", // module Name - mandatory
"value": "", // search value - mandatory
"page:" "",
"pagelimit": "",
"isDeepSearch": "0", // to enable deepsearch give 1
}, (error, response) => {
if (error) {
console.error("Error:", error);
}
});
filters
GET
VTAP.Api.Get(uri, parameters, callback) helps retrieve filters for the specified module.
| uri | string | filters |
| parameters | object | {"module": "moduleName"} |
| callback | function(error, success) | handler function gets response from server |
Example :
VTAP.Api.Get("filters", {
"module": "" // module Name
}, (error, response) => {
if (error) {
console.error("Error:", error);
}
});
POST
VTAP.Api.Post(uri, parameters, callback) helps create a custom filter.
| uri | string | filters |
| parameters | object | {"module": "moduleName", "viewname": "", "fields": ["","","","",""]} |
| callback | function(error, success) | handler function gets response from server |
Example :
VTAP.Api.Post("filters", {
"module": "", // module Name
"viewname": "", // name of the filter
"fields": ["","","","",""] // an array of selected fields for the filter (min - 5 fields)
}, (error, response) => {
if (error) {
console.error("Error:", error);
}
});
PUT
VTAP.Api.Put(uri, parameters, callback) helps update the filter.
| uri | string | filters |
| parameters | object | {"module": "moduleName", "id": "", "fields": ["","","","",""]} |
| callback | function(error, success) | handler function gets response from server |
Example :
VTAP.Api.Post("filters", {
"module": "", // module Name
"id": "", // filter ID of the filter you want to update
"fields": ["","","","",""] // an array of updates fields for the filter (min - 5 fields)
}, (error, response) => {
if (error) {
console.error("Error:", error);
}
});
describe
GET
VTAP.Api.Get(uri, parameters, callback) helps retrieve the describe information for a specified module.
| uri | string | describe |
| parameters | object | {"module": "moduleName"} |
| callback | function(error, success) | handler function gets response from server |
Example: To retrieve the describe information for Quotes module
VTAP.Api.Post("describe", {
"module": "Quotes",
}, (error, response) => {
if (error) {
console.error("Error:", error);
}
});
Client Framework
Vtiger CRM frontend client framework is developed using VueJS 2.x components which serves as building block. UI page, widget, chart, listview in CRM is built using tailored components. These components can be further reused by finding their name read more
The VTAP.Component.Core can be extended to create custom components with naming convention:
ModuleName_Component_ComponentName
To create WeatherWidget component for Contacts module you will have define it as follows:
var Contacts_Component_WeatherWidget = VTAP.Component.Core.extend({});
Each component comprises of following essential properties or methods:
| Name | Type | Description |
|---|---|---|
| data | function | should return object having variable and default value. variables can be in templates or methods |
| props | array | list of tag attributes that can be used when embedded in HTML |
| components | object | dependent component-name mapped to target component instance. |
| methods | object | instance specific functions. |
| created | function | life-cycle function called when instance of component is created. |
| mounted | function | life-cycle function called when component is mounted to DOM. |
| template | string | HTML content that will be transformed to DOM. |
There are other properties but we have defined the commonly used ones only here, if you are interested to learn more then you can give this a read. A skeleton structure of a component is shown below.
var Contacts_Component_WeatherWidget = VTAP.Component.Core.extend({
props : {
//add props from the parent
},
data() {
return {
//add your component data variables here
}
},
components :{
//add other child components here if used in templates
},
computed : {
//add computed properties
},
created() {
//add other component registration or listen to vtiger events
//perform ajax request required for your component.
},
mounted() {
//this is called after component is mounted on the DOM
},
template :
`<div>Custom component structure</div>`
});
VCAP
Vtiger Custom Application runtime (a.k.a VCAP) is a helper runtime script designed for applications built using VTAP's App Creator. It simplifies the process of interacting with CRM data and user APIs, making it easier for developers to retrieve or post records, trigger events, and manage configurations.
VCAP.userapi
.records.get
VCAP.userapi.records.get(params, cb) performs a GET request to retrieve records from a specified module in the Vtiger CRM. It uses the provided filter ID and search criteria to fetch the records and returns them through the callback function.
| params | object | parameters required for the API call, it is to be given in key-value format |
| cb(callback) | function(error,success) | handler function gets response from server |
Example: To retreive record information
VCAP.userapi.records.get({module: module, filterid: filterid,
q: JSON.stringify( searchWithOrClause(fields, term) )}, (e, response) => {
//response has records data
});
.records.post
VCAP.userapi.records.post(params, cb) performs a POST request to create a new record in a specified module within Vtiger CRM. It sends the record data as parameters and returns the result through the callback handler.
| params | object | parameters required for the API call, it is to be given in key-value format |
| cb(callback) | function(error,success) | handler function gets response from server |
Example: To add an Event Record
VCAP.userapi.records.post({
module : "Events",
subject : "Testing with userapi ",
eventstatus : " ",
activitytype: " ",
date_start : showdate,
time_start : "09:00",
due_date : showdate,
time_end : "10:30",
contact_id: contactid
}, (e, response) => {
//response will contain record data
});
VCAP.customapi
.get
VCAP.customapi.get(CustomApiName, parameters, cb) performs a GET request to a custom API endpoint defined in the Vtiger CRM. It sends parameters to the API and handles the response via a callback function.
| CustomApiName | String | Name of the Custom API you want to send request to. You can checkout more about custom apis here |
| parameters | object | parameters required for the API call, it is to be given in key-value format |
| cb(callback) | function(error,success) | handler function gets response from server |
Example:
VCAP.customapi.get("SearchTMDB", {moviename: "xxx"
}, (e, response) => {
//response contains the data received from the custom api
});
.post
VCAP.customapi.post performs a POST request to a custom API endpoint defined in the Vtiger CRM. It sends data to the API and handles the response via a callback function.
| CustomApiName | String | Name of the Custom API you want to send request to. You can checkout more about custom apis here |
| parameters | object | parameters required for the API call, it is to be given in key-value format |
| cb(callback) | function(error,success) | handler function gets response from server |
Example:
VTAP.CustomApi.Post("sendRequest",{identifier:13, managerId:652,managerName: "dghfc"}, (e,res) => {
//response containds the record data
});
VCAP.Event
.trigger
VCAP.event.trigger('eventName', args) can be used to trigger custom events using this API, generally used when you have custom buttons, links and widgets.
| eventName | string | name of the Event |
| args |
Example :
$('#alertButton').on('click', function() {
VCAP.event.trigger('alertEvent'); // Triggers the custom 'alertEvent'
});
.on
VCAP.event.on('eventName', func()) can be used, to listen for specific events that occur within the VCAP environment and perform necessary actions accordingly.
| eventName | string | name of the Event |
| func() | function | performs necessary action once the event is triggered |
Example :
VCAP.event.on('alertEvent', function() {
alert("Showing alert on button click.");
});
VADL
Vtiger Application Definition Language (a.k.a VADL) is custom XML based specification for developing API on VTAP.
XML format makes it easy for administrator or developer to quickly start without needing deep investment in programming skills.
Through VDAL you can define:
- API to CREATE, RETERIVE, UPDATE or DELETE records.
- Invoke REST or SOAP external endpoints.
- Create Inboud API to CRM from external applications.
General structure is as follows:
<?xml version="1.0"?>
<api method="HTTP_METHOD">
<!-- your definition here. -->
</api>
APIs
| Name | Description | Example |
|---|---|---|
| api | entire api definition is encapsulated inside api node, method attribute set the type(get,post,put,delete) of http request. | <api method='post'></api> |
| select | this will let you select the vtiger record data, you can select which fields to be fetched, filter records and sort them | <api method='get'><select module='Contacts'></select></api> |
| record | This will have all the fields which needs to be retrieved and is placed inside select node. | <record><field name="firstname"></field><field name="lastname"></field></record> |
| where | Use this when you want to filer the records, you can pass multiple fields. Use glue attribute(OR, AND) to decide if all or any fields should match the conditions. | <where glue="OR"><field name="firstname" value="@first"></field><field name="lastname" value="@last" condition="like"></field></record> |
| sort | This will have fields that will sort the data, with order attribute defining descending or ascending. | <sort><field name="annual_revenue" order="descending"></field></sort> |
| limit | By default we return 100 records, but you can pass max attribute to limit records. If there are more records, you can pass page parameter in the request get specific page records. | <limit max="5" page="@page"></limit> |
| create | this will let you create vtiger record | <api method='post'><create module='Contacts'></create></api> |
| update | this will let you update vtiger record | <api method='put'><update module='Contacts'></update></api> |
| upsert | this will let you update record if exists else create it | <api method='put'><upsert module='Contacts'></upsert></api> |
| delete | this will help you delete vtiger record | <api method='delete'><delete module='Contacts'></delete></api> |
| rest | this will help you connect with other application | <api method='get'><rest method="get"><url>https://slack.com/api/conversations.list</url></rest></api> |
| soap | connect with legacy soap api's | <api method='get'><soap method="get"><auth><basic username="" password=""></basic></auth><url></url></soap></api> |
| webhook | build incoming webhook api's | <api><webhook><select module='Contacts'></select></webhook></api> |
For examples on how to create custom apis, visit here or to learn how to connect to other applications click here.
VDS
Vtiger Design System (a.k.a VDS) provides core HTML components as part of VTAP. These components can be used when creating your custom pages, widgets, popups.
v-select2
Drop-down component with options.
<v-select2 :required=true :emptyOption=false
v-model="" :multiple=false :options=""></v-selec2>
| Property | Type | Default | Description |
|---|---|---|---|
| required | bool | false | true - mandatory, false - optional |
| emptyOption | bool | false | true - show empty option, false - otherwise |
| v-model | string | - | store the choice made into variable |
| multiple | bool | false | true - allow multiple selection, false - otherwise |
| options | object | - | list of map: [ {label: 'Private', value: 'private'}. {label: 'Public', value: 'public'} ] |
vds-switch
A custom toggle switch component.
<vds-switch v-model="" :disabled=false :status=false label="" ></vds-switch>
| Property | Type | Default | Description |
|---|---|---|---|
| v-model | string | - | store the choice made into variable |
| disabled | bool | false | true - disables the switch, making it non-clickable |
| status | bool | false | true - controls the checked state of the switch i.e switch is on |
| label | string | - | optional text label displayed next to the switch |
vds-checkbox
A custom checkbox component.
<vds-checkbox v-model="" :disabled=false :status=false name="" :type="" label="" ></vds-checkbox>
| Property | Type | Default | Description |
|---|---|---|---|
| v-model | string | - | store the choice made into variable |
| disabled | bool | false | true - disables the checkbox, making it non-clickable |
| status | bool | false | true - controls the checked state of the checkbox i.e checkbox is checked |
| name | string | - | defines the name attribute of the checkbox, helps in identifying the checkboxes |
| type | string | checkbox | radio - shows radio button instead of checkbox |
| label | string | - | optional text label displayed next to the switch |
vds-progress
A progress bar component.
<vds-progress :value="" :size="'lg'" customColourCode="" :total="" @vds::progressbar::clicked=""></vds-progress>
| Property | Type | Default | Description |
|---|---|---|---|
| value | number | - | A number representing the progress percentage to be shown in the progress |
| size | string | 'lg' | A string controlling the size of the progress bar. It accepts values like 'xxl', 'xl', 'lg', 'md', 'sm' |
| customColorCode | string | - | A string allowing you to specify a custom background color for the progress bar |
| total | - | - | Displays a value inside the progress made of the progress bar |
| vds::progressbar::clicked | - | - | Binds the custom click event to a method |
vds-datepicker
A date picker component.
<vds-datepicker
:dateFormat="'YYYY-MM-DD'"
:name=""
:validators="{ required: true }"
:placeHolder="'Select Date'"
:readonly="false"
:allowDefault="false"
:pickerPosition="{ horizontal: 'right', vertical: 'bottom' }"
/>
| Property | Type | Default | Description |
|---|---|---|---|
| dateFormat | string | - | Defines the format in which the date will be displayed |
| name | string | - | The name of the date picker input field |
| validators | object | - | Custom validation rules for the date input (e.g., { required: true }) |
| placeHolder | string | - | Placeholder text to show when no date is selected |
| readonly | bool | false | true - disables the input so the user cannot interact with or modify it |
| allowdefault | bool | false | true - sets a default date (current date) when no date is selected |
| pickerPosition | object | - | Controls the position of the date picker widget (e.g., { horizontal: 'right', vertical: 'bottom' }) |
vds-daterange-picker
A date range picker component that allows users to select a range of dates.
<vds-daterange-picker
v-model="dateRange"
:dateFormat="'MM/DD/YYYY'"
:name=""
:showDefaultDateRange="true"
></vds-daterange-picker>
| Property | Type | Default | Description |
|---|---|---|---|
| v-model | string | - | store the choice made into variable |
| dateFormat | string | 'MM/DD/YYYY' | The format for displaying dates |
| name | string | - | The name attribute for the input field |
| showDefaultDateRange | bool | false | true - the date range picker will automatically show the default date range when initialized |
vds-datepicker-inline
An inline date picker component that allows users to select a single date.
<vds-datepicker-inline
v-model="selectedDate"
:dateFormat="'MM/DD/YYYY'"
></vds-datepicker-inline>
| Property | Type | Default | Description |
|---|---|---|---|
| v-model | string | - | store the choice made into variable |
| dateFormat | string | 'MM/DD/YYYY' | The format for displaying dates |
vds-time-picker
A time picker component that allows users to select a time.
<vds-timepicker v-model="selectedTime" :timeFormat="'24'" :field="{ name: 'appointmentTime', validateRules: { required: true } }" :disabled="false"></vds-timepicker>
| Property | Type | Default | Description |
|---|---|---|---|
| v-model | string | - | store the choice made into variable |
| timeFormat | string, number | - | Defines the time format. Use '24' for 24-hour format or '12' for 12-hour format |
| field | object | { validateRules: {} } | An object containing the field name and validation rules for the time picker |
| disabled | bool | false | true - the user wont be able to select time |
vds-nav
A navigation component for paginated data.
<vds-nav
:currentPage=""
:totalCount=""
:pageLimit=""
:showPageJump="true"
/>
| Property | Type | Default | Description |
|---|---|---|---|
| currentPage | number | - | Controls the currently active page number for pagination |
| totalcount | number | - | Represents the total number of records available across all pages |
| pageLimit | number | - | Defines the number of records displayed on each page |
| showPageJump | bool | true | true - a dropdown is displayed allowing users to jump to a specific page, false - doesn't show any dropdown |
vds-input-clear
An enhanced input component with clearing functionality and custom events.
<vds-input-clear
:inputvalue=""
:placeholder=""
:iconclass="true"
:autoFocus="true"
@vds::search::on::keyup="onKeyUp"
@vds::search::on::enter="onEnter"
/>
| Property | Type | Default | Description |
|---|---|---|---|
| inputvalue | string | - | This is the value that will be entered into the input field |
| placeholder | string | - | Placeholder text shown inside the input field when it is empty |
| iconclass | bool | false | true - displays an icon inside the input field for clearing the input |
| autofocus | bool | false | true - the input field is automatically focused when the component is mounted |
| vds::search::on::keyup | event | - | This event is emitted whenever a key is pressed inside the input field. The event object is passed as an argument, which you can use to capture the key pressed or other details |
| vds::search::on::enter | event | - | This event allows you to easily trigger actions such as performing a search when the user submits their query by pressing the "Enter" key |
vds-field-label
A custom field label component.
<vds-field-label
:field="fieldObject"
module="ModuleName"
:isEditView="true"
:smallLabels="false"
:largeLabels="true"
/>
| Property | Type | Default | Description |
|---|---|---|---|
| field | object | - | Object containing field information, such as name, label, and type |
| module | string | - | Module Name |
| isEditView | bool | false | Indicates if the current view is an edit view |
| smallLabels | bool | false | Controls if the label should be displayed in a smaller size |
| largeLabels | bool | false | Controls if the label should be displayed in a larger size |
vds-inventory-adress-dropdown
A custom dropdown component to select or copy an address from organization or related records in the inventory system.
<vds-inventory-address-dropdown :field="{fieldname: 'bill_street'}" :editable=true :record="recordData"></vds-inventory-address-dropdown>
| Property | Type | Default | Description |
|---|---|---|---|
| field | object | - | It is a mandatory field. Field object that represents the address field in the inventory, used to determine if the field is for billing or shipping address (i.e bill_street or ship_street) |
| editable | bool | true | false - the dropdown is disabled and non-selectable |
| record | object | - | The record object that contains multipleaddresses. These addresses are displayed as options in the dropdown for selection. Options are grouped under "Copy from Organization" (for account_id addresses) or "Copy from Related To" (for related_to addresses), with additional options for copying between billing and shipping addresses |
Example for recordData :
recordData: {
multipleaddresses: {
account_id: [
{ id: '1', name: '' },
{ id: '2', name: '' }
],
related_to: [
{ id: '3', name: '' },
{ id: '4', name: '' }
]
}
}
vds-record-star
A component to toggle the star status of a record.
<vds-record-star :status="false" :recordId="" module="" @update:status=""></vds-record-star>
| Property | Type | Default | Description |
|---|---|---|---|
| status | bool | false | true - indicates the record is starred |
| recordId | number | false | crmID of the record |
| module | string | - | Module Name to which the record belongs |
| @update:status | event | - | Emitted when the star status changes. Passes the updated status (true for starred, false for unstarred) |
vds-email-search
A component to search, select, and manage email addresses from multiple sources (e.g., users, groups, and modules).
<vds-email-search
:searchModule="''"
:sourceModule="''"
:searchUsers="1"
:searchGroups="1"
:selected=""
:maximumSelectionLength=""
:showNoResultsMsg="false"
/>
| Property | Type | Default | Description |
|---|---|---|---|
| searchModule | string, array | - | Defines the module(s) to search within. Accepts either a string or an array of module names |
| sourceModule | string | - | Specifies the source module to use for the email search |
| searcUsers | number | - | Controls whether users are included in the search (1 to include, 0 to exclude) |
| searchGroups | number | - | Controls whether groups are included in the search (1 to include, 0 to exclude) |
| selected | string, array, object | - | The currently selected email address(es). Can be a string, array, or object depending on the selection |
| maximumSelectionLength | number | 0 | Sets the maximum number of email addresses that can be selected. When the limit is crossed, shows a max selection message |
| showNoResultsMsg | bool | false | true - Displays a custom "no results found" message if no matching emails are found |
vds-iframe
A component to render content inside an iframe
<vds-iframe :content="iframeContent"></vds-iframe>
| Property | Type | Default | Description |
|---|---|---|---|
| content | string | - | HTML content to be displayed inside the iframe |
vds-document-basic
A component to display basic text content.
<vds-document-basic :content="textContent"></vds-document-basic>
| Property | Type | Default | Description |
|---|---|---|---|
| content | string | - | The text content to be displayed |
vds-document-pdf
A component to display a PDF Document within an iframe.
<vds-document-pdf :filePath="pdfFilePath" :divheight="iframeHeight"></vds-document-pdf>
| Property | Type | Default | Description |
|---|---|---|---|
| filePath | string | - | The path or URL to the PDF file to be displayed |
| divheight | number | - | The height of the iframe in pixels |
vds-document-opendoc
A component to display OpenDocument files (like .odt) within an iframe.
<vds-document-opendoc :recordId="" :fileId=""></vds-document-opendoc>
| Property | Type | Default | Description |
|---|---|---|---|
| recordId | string | - | The ID of the record containing the document |
| fileId | string | - | The ID of the file to be displayed |
vds-document-image
A component to display an image.
<vds-document-image :imgPath="path/to/imageFile"></vds-document-image>
| Property | Type | Default | Description |
|---|---|---|---|
| image | string | - | The path or URL to the image file to be displayed |
vds-document-audio
A component to display audio player for playing audio files.
<vds-document-audio :filePath="path/to/audioFile" :fileType=""></vds-document-audio>
| Property | Type | Default | Description |
|---|---|---|---|
| filePath | string | - | The path or URL to the audio file to be played |
| fileType | string | - | The type of the audio file (e.g., audio/mpeg) |
vds-document-video
A component to display a video player for playing videos.
<vds-document-video :filePath="path/to/videoFile" :fileType=""></vds-document-video>
| Property | Type | Default | Description |
|---|---|---|---|
| filePath | string | - | The path or URL to the video file to be played |
| fileType | string | - | The MIME type of the video file (e.g., video/mp4) |
vds-wizardtiles
A component to display a set of action tiles in a wizard view.
<vds-wizardtiles :actions="actions" @vds::wizardtile::select="handleActionSelect"/>
| Property | Type | Default | Description |
|---|---|---|---|
| actions | object | {} | An object containing a list of actions. Each action should have icon, info, and label properties |
| @vds::wizardtile::select | Event | - | Emitted when a tile is clicked. The payload is the clicked action object |
vds-multiple-selection-tiles
A component to display a list of actions as selectable tiles with checkboxes.
<vds-multiple-selection-tiles :actions="actions" :selectedActions="selectedActions" @vds::wizardtilerectangle::select="handleSelect"/>
| Property | Type | Default | Description |
|---|---|---|---|
| actions | object | - | An object or array containing a list of actions. Each action should have an id and a label property |
| selectedActions | array | - | An array of action IDs that are currently selected |
| @vds::wizardtilerectangle::select | Event | - | Emitted when a tile is clicked. The payload is the clicked action object |
vds-wizardtiles-rectangle
A component to display a list of actions in rectangular tiles with icons.
<vds-wizardtiles-rectangle :actions="actions" @vds::wizardtilerectangle::select="handleSelect"/>
| Property | Type | Default | Description |
|---|---|---|---|
| actions | object | - | An object containing a list of actions. Each action should have label, icon, and optionally isAllowed properties |
| @vds::wizardtilerectangle::select | Event | - | Emitted when a tile is clicked. The payload is the clicked action object |
vds-file-icon
A component to display a file icon with customizable size and color.
<vds-file-icon :icon="" :customClass=""/>
| Property | Type | Default | Description |
|---|---|---|---|
| icon | String/Object | fa-info-circle | Specifies the Font Awesome icon class to display. It can be a string or an object |
| customClass | String | - | An optional class to apply additional styling to the icon |
Examples of icon :
fa-file-pdf
fa-file-image
fa-file
fa-file-word
fa-file-excel
fa-file-archive
fa-file-video
fa-file-powerpoint
fa-file-spreadsheet
fa-file-csv
fa-file-audio
fa-folder
vds-multi-step-wizard
A component to display a multi-step process as breadcrumb-like navigation.
<vds-multi-step-wizard :selectedStep="currentStep" :steps="stepsList"/>
| Property | Type | Default | Description |
|---|---|---|---|
| selectStep | String, Number | - | The current step in the wizard. Can be used with v-model to bind the selected step to a parent component |
| steps | object | - | An object containing the list of steps in the wizard. The object keys represent step identifiers (String or Number), and the values are the labels displayed for each step |
vds-color-picker
A color picker component to select colors from a predefined palette or choose a custom color.
<vds-color-picker v-model="selectedColor" :selectedColors="['#ff0000','#00ff00']" />
| Property | Type | Default | Description |
|---|---|---|---|
| v-model | string | - | store the choice made into variable |
| selectedColors | Array | - | An array of colors to prioritize and display prominently at the end of the color list |
vds-rating
A star rating component that allows users to rate something by clicking on stars.
<vds-rating :rating="" :editable="true"></vds-rating>
| Property | Type | Default | Description |
|---|---|---|---|
| rating | Number, String | 0 | The current rating value to display |
| editable | bool | true | false - rating cannot be changes by the user |
vds-typing-progress
A visual indicator for typing activity, used in chat applications to show that someone is typing.
<vds-typing-progress></vds-typing-progress>
vds-circular-progress
A circular progress bar that shows a percentage completion in a circular format.
<vds-circular-progress :radius="50" :progress="70" :stroke="10" progressMessage="70% Complete"></vds-circular-progress>
| Property | Type | Default | Description |
|---|---|---|---|
| radius | number | - | The radius of the circular progress bar |
| progress | number | - | The percentage of progress (0-100) |
| stroke | number | - | The width of the stroke |
| progressMessage | string | - | A message displayed inside the circular progress bar |